Thursday, July 28, 2011

What the.........PHO #$%!

I hope I didn't startle you with that title--- I swear I didn't mean to!

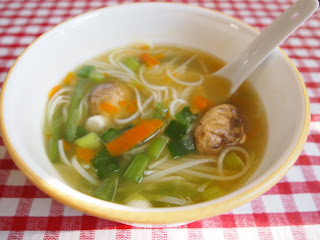
Vietnamese rice noodle soup= Pho (pronounced Fuh)= veggies, some lean meat/tofu and some rice noodles in a delicious broth; healthy, simple, quick and delicious. And it is also a great dish to whip up when you are running low on that zeal for cooking. Exactly what happened to me as the day went by and so, it was Pho for dinner tonight.

Now usually when you order Pho at a restaurant, they pour some piping hot broth over a heap of veggies and meat or tofu and rice noodles in a humongous bowl and top it off when some chopped green onion and bean sprouts. But I just prefer that one-pot style for my everyday cooking, especially if the food is going to be eaten as soon as it is cooked. If I were to make this for a later meal, I would keep the noodles separate and add them in later, just before eating.

Ingredients: 

1. Different vegetables- I took some carrots*, green beans, cabbage, bell pepper and mushrooms.

The Veggies
 *I "cut" my carrots by peeling them-- so basically, instead of using a knife, I just kept peeling them with my peeler into beautiful thin err, peels (?). Not sure about the terminology here.........

2. Vegetable stock (you could use any kind- beef, chicken etc).

3. Rice noodles (any kind of thin noodles will work just fine).

4. Salt to taste- you won't really need much of this as the stock itself has salt, freshly ground pepper.

Method:

1. I started off as usual with my pot. Poured in a whole carton of veggie stock. Alternately you could use bouillon cubes and dissolve in water and make the stock. And then switched on the stove.

2. Once the stock came to a boil, I added the veggies into the boiling stock and a pinch of salt and covered the pot for 5 minutes on low flame to allow the veggies to sort of cook. You want to sort of cook them and yet keep them crunchy.

3. After 5 minutes, I added a handful of rice noodles into the pot, increased the flame and let it all boil for 3 minutes exact and switched it off. Covered the pot and let it all hang out.
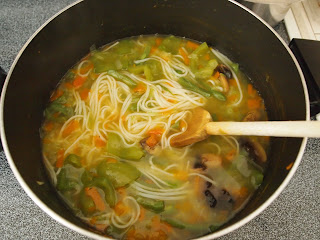
Pho in a Pot


4. In the end I added some chopped green onion and freshly ground pepper and there, Pho was ready!

Pho in a bowl
When you pour piping hot broth onto a heap of vegetables and noodles, sure, it tastes fine, but usually the noodles and the veggies taste bland. That's the Pho you get at a restaurant. Not when you make it my way, though. My one-pot method allows for more flavorful vegetables and noodles as they get more time to hang out in the broth.

So even though my zeal for cooking was low as the day went by, dinner turned out delicious. So has that zeal returned? I'll know tomorrow!

Note: Interestingly:   http://www.whatthepho.net/

Sunday, July 24, 2011

Addendum to "Minchi from Macau--- or not!"

It is pretty clear that only 1 person is reading my blog very sincerely and I very sincerely thank that person--- you know who you are! ;)

So it was brought to my attention that I forgot to mention where to add those wood ear mushrooms in that Minchi I made (http://yetanotherfoodie.blogspot.com/2011/07/minchi-from-macau-or-not.html). That's what happens when there's a couple kids at home, always disturbing you when you try to write for your blog!

Anyway, so in the Minchi recipe I added those lovely wood ear mushrooms just when the chicken got cooked, before I added the tomato ketchup--- so at the end of Step 2.

Saturday, July 23, 2011

Minchi from Macau--- or not!

The new season of Anthony Bourdain's "No Reservations" on Travel Channel has begun and yes, I have set my DVR to record every new episode. I watched his show on Macau and I am probably not the only one saying this, but it was such an eye-opener. Well, for starters, call me ignorant, but whenever I thought of China, I always thought of Hong Kong! Never knew that gambling in Macau is big, I mean, BIG! Las Vegas is nothing compared to Macau! Portuguese happens to be one of their two official languages, Cantonese being the other. It was the last Portuguese colony in China that lasted from the 16th century to 1999! Wow, quite a history there! (And enough with the exclamation marks, I suppose!)

Macanese cuisine is a wonderful blend of Portuguese, Chinese, African and even Indian (yes!) flavors. In fact, one of the people who Bourdain was talking to on the show clearly said that Macanese cuisine is "fusion cuisine." And I am all for fusion cuisine. If different flavors marry each other and create something even more delicious, hey, it is definitely worth it, don't you think?

And so, on that show, I saw this lady prepare a dish called "Minchi" with ground pork and wood ear mushrooms. She said that they use ground beef too. The preparation looked pretty darn good on TV and I of course was already coming up with a plan. I was going to use chicken instead of pork or beef and I was going to try and cook that Minchi from Macau in my kitchen!

Ingredients:

1. Ground Chicken (I used 4 boneless skinless breasts and ground them myself in the food processor)
2. 2 green onions, 3 cloves of garlic, a tiny piece of ginger
3. A handful of wood ear mushrooms
4. 4-5 tablespoons of soy sauce
5. 3 dry red chillies and a pinch of red crushed pepper (you can adjust this per your heat level)
6. 1-2 tablespoons of oil
7. 1-2 cups of water (depending on how wet you want)

My twist on the dish:

1. Peas- a couple handfuls (or say, 1/2 cup)
2. Tomato ketchup- 1/4 cup (this added a lovely tang)

This was the first ever time that I used wood ear mushrooms. When I touched one of the mushrooms, it felt almost like jello--- not at all gross like I expected--- was pretty cool actually.

Wood ear mushrooms, green onions, garlic, ginger

Method: 

1. I took my lovely pot and poured in a couple tablespoons of oil, got the heat going and then added the chopped green onion, garlic, ginger, some red crushed pepper and 3 dry red chillies. Sauteed it all a bit and then added the ground chicken.

2. Cooked the chicken for about 10 minutes, also adding a bit of salt in between to season the chicken. After 10 minutes of cooking, added 4-5 tablespoons of soy sauce, stirred everything.The chicken looked a bit dry and so I added around 1-2 cups of water (broth would work even better). Gave it a quick taste.

3. Upon tasting, I felt it needed something more. Something tangy. Tomato Ketchup! Added a quarter cup of that and it actually worked! Covered the pot and let it simmer for 10 more minutes. Everything smelled real good!

4. Once the timer went off, I took off the lid, tasted it and had my daughter taste it too and we both loved it. And then my brilliant mind whispered to me, "Color!" So I grabbed the frozen peas packet from my freezer and scooped out a couple handfuls and threw it into the almost-ready "minchi." I covered the pot once again and switched off the stove.

I served it with some plain, steamed rice. And it was simply delicious! I had to add some extra hot sauce for myself because really, it needed that kick.

Delicious Minchi!
To my pleasant surprise, my son, the one who hates mushrooms, did not complain even once about those wood ear mushrooms. He just gobbled everything up and quite appreciated it too!

Not sure what a true Macanese chef would say about my take on minchi--- heck, it might not even be close to the real Minchi from Macau--- but I give myself points for my attempt. Besides, the end result was delicious and that is what counts, right?

Tuesday, July 19, 2011

Mushrooms and Stuff!

After 4 days of wonderful time with brother and sis-in-law, it is back to square one, back to schedule, until the next time we meet. As ever, after they left, the house seemed a bit empty and to fill up that emptiness [translation: to cheer myself up], I made myself some lovely ginger soy tea and sat on my swing all by myself, recollecting all the good times.......OK, OK--- I am going a bit overboard with this whole mushy stuff, I suppose!

I decided to cook one of those one-pot pasta dinners tonight and as I was looking in my fridge, picking out the veggies for the pasta, I happened to see this box of beautiful, Costco size, white mushrooms hidden behind the roma tomatoes. I took the box out with the idea of throwing some mushrooms into that one-pot pasta dinner. Immediately I could picture my son's grimace--- he hates mushrooms and it is always a struggle to get him to eat 'em. We always end up with a grumpy son and mom duo at the end of the meal. So well, I said to myself, forget it, I don't want any grimaces tonight! And then I thought hmm, how about I stuff those beauties and bake them? That way, everybody is happy! (The rest of us love mushrooms).

I took:

1. 10 fairly big white mushrooms (wiped clean with a wet cloth and stalk removed)
2. Some chipotle jack cheese slices (the choice is really yours)
3. Pinch of salt and pepper
4. Tad bit of oil to drizzle

What I did: 

1. I pre-heated my oven to 400 degrees (when I am unsure of the temperature, my rule of thumb is 375 to 400 degrees.......).

2. While the oven was pre-heating, I took a couple slices of chipotle jack cheese and tore into smaller pieces and just stuffed each mushroom (in the area where the stalk was) with the cheese. Like this:

Cheese nestled in each mushroom

3. I then sprinkled some salt and pepper on the mushrooms and finally drizzled some oil over each mushroom.

4. I put this into into the 400 degree oven for 15 minutes (again, when I am unsure of the baking time, my rule of thumb is 15 to 20 minutes to start off with.

Stuffed mushrooms baking away
5. At the end of 15 minutes, I checked on the mushrooms--- the cheese had definitely melted and the mushrooms were nicely done (look at the delicious juices from the mushrooms on the baking sheet in the above picture!). I wanted the cheese to brown up a bit and so I broiled it all on High for 5 minutes. Perfect!

Stuffed mushrooms ready to be eaten!
The stuffed mushrooms turned out great. The mushrooms were succulent and delicious and the chipotle jack cheese added this wonderful smoky taste to the baked mushrooms. Worked as a delicious starter to the pasta meal. What a treat!

Stuffed Mushrooms- what a treat!

If you love mushrooms, you must make this. You will love it! If you already know how to make this, great, go make some more! And if you are like my son and hate mushrooms, you sure are missing out on some good stuff!

Note: I know that mushrooms are basically fungi, however, I consider them as veggies. Besides, they are pretty nutritious too-- low calories, low sodium, 0 cholesterol and packed with various good minerals-- I read somewhere that they are packed with selenium that is great for the immune system.

Thursday, July 7, 2011

Corn on Cob Curry- "Bhutte Ki Sabzi"

"Sabzi" stands for vegetable. In Indian cuisine, we tend to eat a variety of "sabzi;" for instance aloo-ki-sabzi (potato), aloo-pyaaz-tamatar ki sabzi (potato+onion+tomato), bhindi ki sabzi (okra/lady finger), baingan ki sabzi (eggplant/brinjal), karele ki sabzi (bitter gourd/bitter melon- that most people hate!) etc etc. Basically you take any vegetable or a medley of vegetables and cook it/them in some spices and voila! you have one tasty "sabzi" (dry or wet) that you can eat with rotis (Indian bread) or rice.

And so, here is a recipe for my special "Bhutte ki Sabzi," that is corn on cob cooked in a lovely spicy masala or gravy:

Ingredients:


I'll break the ingredients down into 3 parts, so that the list doesn't seem too overwhelming! Though, in reality, this is, like all my cooking, real easy:

1. A couple corn on the cob (not sure about the plural form.......corns on the cobs? corn on the cobs? corns on the cob?)
2. 1 tablespoon tomato paste
3. 1 russet potato (could use 2 medium potatoes) cut into fairly large cubes- this takes care of the consistency of the final gravy

Corn on Cob

For the Gravy/Masala:

1. 1 medium onion
2. 1 tomato
3. 3-4 cloves of garlic
4. 1"-2" ginger piece

Grind all the above 4 items in a food processor. This is the base for almost all masalas/gravies in North Indian cooking.

Masala/Gravy Base (onion+garlic+ginger+tomato)

The Rest:

1. 5-6 teaspoons of oil
2. 1 teaspoon of cumin seeds
3. Salt to taste
4. Red chilli powder (per desire!)
5. Pinch of turmeric powder
6. 1 or 2 teaspoons of garam masala/curry powder
7. 1-2 cups of water (gotta gauge this measurement a bit) 

Utensil of Choice: A Pressure Cooker- works best to cook corn on cob (10 minutes only). You may use a regular pot, though it will take way longer- maybe about 40-45 minutes up to an hour.

Method:

1. Pour in 5-6 teaspoons of oil into the pressure cooker and get the heat going. Add a teaspoon of cumin seeds to the heated oil followed by the masala base (onion+garlic+ginger+tomato). Immediately start stirring the masala (be careful, it might splatter around). I also add a pinch of turmeric at this point and continue to stir.

2. Ideally the masala needs to be fried until all the water has evaporated and you see oil floating on top of a thick masala. (And if you are on a time-crunch, it is OK to skip the oil-has-to-float-on-top part, but do fry it for minimum 5-7 minutes just to get that raw onion-garlic taste out).  Salt, red chilli powder and garam masala powder may be added at this point.

3. Throw in the chopped potato and the corn on cob into this masala, followed by a cup or two of water, plus 1 tablespoon of tomato paste. Stir everything and close the pressure cooker lid.

Just before closing the lid........
4. Once the pressure has built up in the cooker, lower the flame and cook for 10 minutes (if you have a pressure cooker that has a "whistle," I would say give it about 3-4 whistles) and then switch off the stove and allow the cooker to cool off.

5. Once all the pressure has been released from the cooker, open the lid and enjoy the view!

Yummmm!
Before serving, I cut the corn on cob into nice individual pieces so that everybody gets to nibble on some corn. If you notice, in the picture above, there is one little piece on the left-- well, that was my failed attempt to cut the corn in the beginning- my knife didn't do the job too well. If you have a good sharp and strong knife, you could very well cut the corn on cob right at the start. 

Everybody can nibble on some corn!
The real fun lies in nibbling the corn and then sucking out all the juices from the cob. You know, you almost bite down on the cob, but not quite and then suck out the delightful juice out of it. YUM!

I made bhutte-ki-sabzi today for lunch and the kids loved it, especially the nibbling part. Here's a picture that my son wanted me to put up, just to show you how enjoyable this whole nibbling the corn on cob really is:

Delightful nibbling!
And finally, this is what was left on the table (in a bowl, of course!):

No more corn on the cob!

Tuesday, July 5, 2011

Appi's Jambalaya

Jambalaya Vs Khichdi: Jambalaya to me is basically "Khichdi."  Khichdi in India is a one-pot comfort food made with rice and lentils, simply seasoned with salt, turmeric, cumin seeds and pepper. It is typically yellow in color because of the turmeric. Vegetables may be added to this for some color, my personal favorites being peas and carrots. While living in England, I learned about "Kedgeree" from one episode of Jamie Oliver's show. He made that kedgeree with haddock and hard boiled eggs. I realized that Kedgeree was basically Khichdi! I soon learned that pretty much every culture has its own version of khichdi--- that one-pot-wonder comfort food. Therefore the inference that Jambalaya is Khichdi too!

So the other day I decided to make jambalaya with tilapia and prawns. I did not have that special jambalaya spice mix (Zatarain's or otherwise) and so decided to just make my own spice mix and go with that. It is quite simple, actually. I mixed up some onion powder, garlic powder, red cayene pepper powder, italian seasoning (I know, I know, that sounds a bit off--- but believe me, it works!) and took a couple cubes of veggie bouillon.

Ingredients:

1. 2 cups of rice (I used basmati that day), washed and ready to go.
2. 2 cubes of veggie bouillon (this is really your choice- you could use fish or chicken or beef......)
3. Jambalaya or Gumbo spice mix OR make your own spice mix (see earlier para)
4. Tilapia (or any fish of your choice) cut into bite sized pieces, prawns (tail-on or off). You could even add sausage and chicken if you'd like.
5. A medium sized onion, chopped up
6. 1 Red Bell Pepper, chopped up
7. 1 tablespoon tomato paste
8. Salt, pepper
9. 4-5 teaspoons of oil
10. Don't forget water to cook the rice in! (Veggie bouillon+water= broth)

Method:

1. Pour in 4-5 teaspoons of oil into a pot and get the heat going. Throw in the chopped onion, saute a bit, followed by the red bell pepper. (Now one can use celery too- but we are not big fans of celery and so I don't typically use celery in my cooking).

2. Add the washed rice into this and stir it all up. Then add water (or broth) (2 cups of water for 1 cup of rice). For this dish, you gotta add extra water as the desired consistency in the end is a risotto-like consistency. So what I do is that towards the end of the entire preparation, depending on the need, I add extra liquid to get that nice not-too-wet-not-too-dry consistency.


3. Add the jambalaya spice-mix, veggie bouillon, pepper and a tablespoon of tomato paste and give it all a good stir, bring to a boil, reduce heat and cover the pot and leave it to cook for 20 minutes.

4. While that is going, prep the fish and the prawns by sprinkling some salt and pepper on them, so as to not have them too bland.

5. At the end of 20 minutes, check to make sure that the rice is done. At this point, gently fold in the tilapia and the prawns. If the consistency is on the drier side, pour in some extra water or broth. Cover the pot again and leave it for another 10 minutes. That will allow the fish and the prawns to cook.

6. That's it! Jambalaya is ready to be served!

Jambalaya ready to be served
Finishing Touch:

Before serving, I sprinkle some of that awesome spice-mix over the jambalaya for a great flavor blast.

Appi's Jambalaya- deeeelicious!
My family loves this jambalaya. Well, my daughter is not too crazy about prawns, and so she just skips them, or if she does happen to end up with a couple prawns that might have sneaked in, she just gives them to her brother, who is crazy about prawns!

Next time you want some comfort food, think along the lines of a one-pot-wonder dish. Think Jambalaya!