Showing posts with label Indian Fast Food. Show all posts

Monday, September 23, 2013

Sabudana Vada

Low temperatures and clouds in the sky,
Equate to a hot cup of chai,
And pakoras with some ketchup on the side,
And I kind of lost that whole rhyming thing......
But hey, that's beside (the point).
OK, now, people, do not snide,
For fall is here! And don't we all,
Simply love fall?!

Uh, yes, I shall set aside my poetic genius for now, and jump right into the subject of this post. Sabudana Vada is one of my favorite kind of pakora/fritter. Made of sabudana, i.e. tapioca pearls, also referred to as sago pearls. In fact, I have an older post on Sabudana Khichdi that I would like you to skim through. Note down the first part of the recipe, "Prepping those Pearls." That is exactly what you would do to start off with the fritter recipe. Also get those peanuts ready (in the same recipe).

While the sabudana prepping is going on, cook a few potatoes. I like to use my pressure cooker to cook potatoes- the job gets done in 5 minutes.

Ingredients: 

1. Sabudana

2. Cooked potatoes- 2 or 3 (or more, depending on the quantity of sabudana)

3. Green chilies, sliced or chopped, your choice. Qty per your liking.

4. Salt per taste

5. Red chili powder (optional)

6. Pinch of sugar (secret ingredient!)

7. A pinch of asafoetida/hing (good for the tummy)- if you have it

8. Cumin seeds (jeera)

9. Coarsely ground roasted peanuts

10. Chopped fresh cilantro/coriander leaves

Method: 

1. Mix up the soaked sabudana with the cooked potaoes and all the other ingredients. Mash it all up together. Give it a taste, and adjust accordingly.

Note: Potatoes are basically the binding agent here.

2. Make little patties of the whole mash-up. You could make little balls too.

Sabudana vadas- ready to be fried
3. Take a kadhai/wok/pan/pot, pour in a good amount of cooking oil, and get the heat going.

Tip: I just make a very tiny ball with the sabudana-potato mash-up and throw it into the oil. If the tiny ball immediately floats up, I know that the oil is nice and hot, and ready to go.

4. Start frying those patties/balls. You know they are done, when they are nice and golden brown in color. Ladle them out with one of those slotted spoons/ladles onto some paper towel(s), so as to drain of excess oil.

Frying the sabudana vadas
Golden brown delicious sabudana vadas
Yum yum! 
Eat away!! 

Serve immediately with some ketchup, or mint chutney.

The perfect sabudana vada is cripsy on the outside, and soft, and almost gooey on the inside. Best when served hot, off the oil. The coarsely ground peanuts and the cumin add that crunch, and well, I am salivating right now.......

Don't forget that cup of chai! Happy Fall, y'all!


Wednesday, December 7, 2011

Paani Poori- SLURRRRP!

Paani Poori is an extremely popular street-food in India. Paani means water and poori is basically fried, puffed up Indian flat bread. Uh, yeah, flat bread that is puffed up! In this case, the poori is nice and thin and crunchy. And oh, bite sized and made with (correct me if I am wrong) a combination of semolina flour and all purpose flour. Another name for paani-poori is golgappa; plural: golgappe or golgappas.

The main idea behind this snack is to poke a hole in the tiny little poori and dunk the poori in this very tangy, spicy, tamarind water so that the poori is filled with that water (paani) and keep popping one poori after another into your mouth, until you are full; rather, until you are satisfied, which could actually take a while, just so you know.

Here's how you do it: You put one poori filled with the paani into your mouth, close your mouth and gently pop the poori with the help of your tongue onto your palate. What follows is this really "loud" explosion inside your mouth, with all that delicious spicy tangy water gushing into your taste buds and you literally shudder and close your eyes in ecstasy, followed by some major lip-smacking (remember, this is street-food we're talking about!). You do the same with the next poori and the next......and yeah, you got it- the cycle continues! 

Now along with the paani, you can add certain other fillings such as cooked garbanzo, potato, mint chutney and perhaps finely chopped onion, green chilies, cilantro etc.

And here is my take on paani poori and believe me, you'll see that it is extremely EASY!

Ingredients:

1. I buy the (paani) poori package from the Indian store. That just made the whole thing easy, didn't it? (Oh, by the way, don't worry about the spelling....... poori or puri--- doesn't matter, sort of like tomAAto Vs toMAYto.......)

Paani Poori (or Pani Puri) box from the Indian store
2. Cooked garbanzo beans- easiest way is to open a can of garbanzo, all ready to use!

3. Tamarind concentrate (available in any Indian or Asian store).

4. Mint leaves, a couple green chilies, a clove of garlic and some lemon juice for mint chutney.

5. Potatoes- cooked (pressure cooker works best for this or the m-wave may be used) and chopped.

6. Salt, Red chili powder/cayenne pepper, black pepper powder, cumin powder, pinch of garam masala powder (optional), pinch or more of sugar (depends on individual taste preference), pinch of aamchur (dry mango powder)- optional.

Note: The spices are really your choice.

Steps:

1. Open a can of garbanzo beans. I like to wash them in running water to "freshen" them up a bit. I add a pinch of salt, cumin powder, garam masala powder and just mix it all up.

Chickpeas/Garbanzo
2. Next, I get the potato ready. If it is just the four of us, then I just take 1 medium potato, wash it, poke it a bit with a fork all over and then cook it in the microwave. Takes about 3 to 5 minutes. I then peel it, chop it up and season with salt and perhaps some garam masala powder or even just plain simple ground black pepper.

Potato
3. For the paani (the spicy tangy tamarind water), I take a teaspoon of the tamarind concentrate, dilute it with 1/2 a cup of warm water (makes it easier to thin out the concentrate) and then add salt, cumin powder, red chili powder and a pinch of sugar. If you like it sweeter, then add more sugar. And then I stir it all up, and add some more water (room temperature) to thin it out completely. There, the paani is ready! (Of course, I do taste it and adjust accordingly).

Paani- Spicy Tamarind water
4. For the mint chutney, I pluck leaves from my very own home-grown mint plant (how much more organic can you get?!) and then wash the leaves and make a quick not-too-thick chutney in my food processor. It is very simple, really: mint leaves+a clove of garlic+1-2 green chilies+a dash of lemon juice+salt+1/4 cup of water. One or two pulses in the food processor and voila, mint chutney is ready.

My mint plant (as proof!)
Mm-Mint Chutney!
5. And, last but not the least, I open that box of (paani) pooris to get the party going!

Pooris!
Like I explained earlier, you poke a hole in a poori, stuff it with some garbanzo, potato and mint chutney and then dunk it in or spoon in some of that lip-smacking delicious tamarind water into the hole and pop it into your mouth and just keep eating........

Paani Pooris- SLURRRP!

Sometimes, we eat paani pooris for dinner. Yes! I just pick up a couple boxes of pooris from the Indian store and it works out great. The kids love it too! Light, satisfying and totally slurpilicious!

P.S.: Thanks to the lack of sunshine and the cold temperature at this time of the year, my mint plant is not doing very well, though I am trying to keep it alive and kicking........ gotta see how that goes!


Sunday, April 3, 2011

Bread Pakoras

Where I live, it is always cloudy with a chance of rain; well and then there's about 3 months of sunshine. Some people think that this weather is rather depressing. But I think that it is actually quite romantic. A good excuse to snuggle up with your better-half. And a good excuse to eat some good old fried junk! Everybody likes some fried junk once in a while. I mean, come on, admit it, anything fried is "junkilicious!"

"Pakoras" are deep fried fritters- you can make them with onions, potatoes, cauliflower, spinach etc-- whatever you want. You can make chicken and fish pakoras too. And you can even make pakoras with bread.

1. The basic requirement for any kind of pakora is "besan," i.e. chickpea flour. You make a not-too-thick-not-too-thin smooth batter (you don't want lumps in there) with chickpea flour and water. Add salt, red chilli powder and any other spice of your choice. I, for instance, add cumin seeds, caraway seeds (ajwain), little bit of turmeric powder and sometimes even a pinch of garam masala. You could add some finely chopped green chillies and cilantro. Anything your mind desires.

2. Then take that bread. If it is sliced bread, I just cut each slice into four equal parts- so you get 4 little squares.

Chickpea batter and Bread Squares

3. Meanwhile pour in some oil in a pan/pot and get it going on the stove.

4. To check if the oil is hot enough or not, I just dip my finger into the batter and let that batter drop into the oil. I know that the oil is ready if that little droplet quickly sizzles and rises up and floats atop the oil. At that point, you start the frying process. Dip each bread square into the batter and then into the hot oil. I usually fry 5 to 6 squares in one go. Within a minute or two, one side will have browned up. Then you gotta flip all the squares so that the other side gets fried up too.

Dip the bread into the batter

Then put it into the hot oil

Frying up  one side

Flip to fry the other side
5. Once all the squares look nice and golden brown, you ladle them out with one of those slotted ladles. I put them onto a couple paper-towels just to blot out the extra oil (yeah, yeah, I know, it is anyway deep fried, so why bother......but hey, it is more for the esthetics).

Golden Brown Bread Pakoras!
6. Then you eat those hot, crisp junkilicious bread pakoras with ketchup or chutney or just by themselves! If it is raining outside, make yourself some lovely spiced Chai (tea) and you have the perfect combination! Mmm!

Junkilicious indeed!!

The next time it is cloudy outside and it is starting to rain and you are about to grumble about the weather, STOP! Go grab that bread and make yourself some bread pakoras and some spiced chai. Believe me, it'll make you happy. As for those extra calories, hey, knowing you, you probably would have already worked out a good sweat earlier during the day. So no sweat!

Wednesday, February 2, 2011

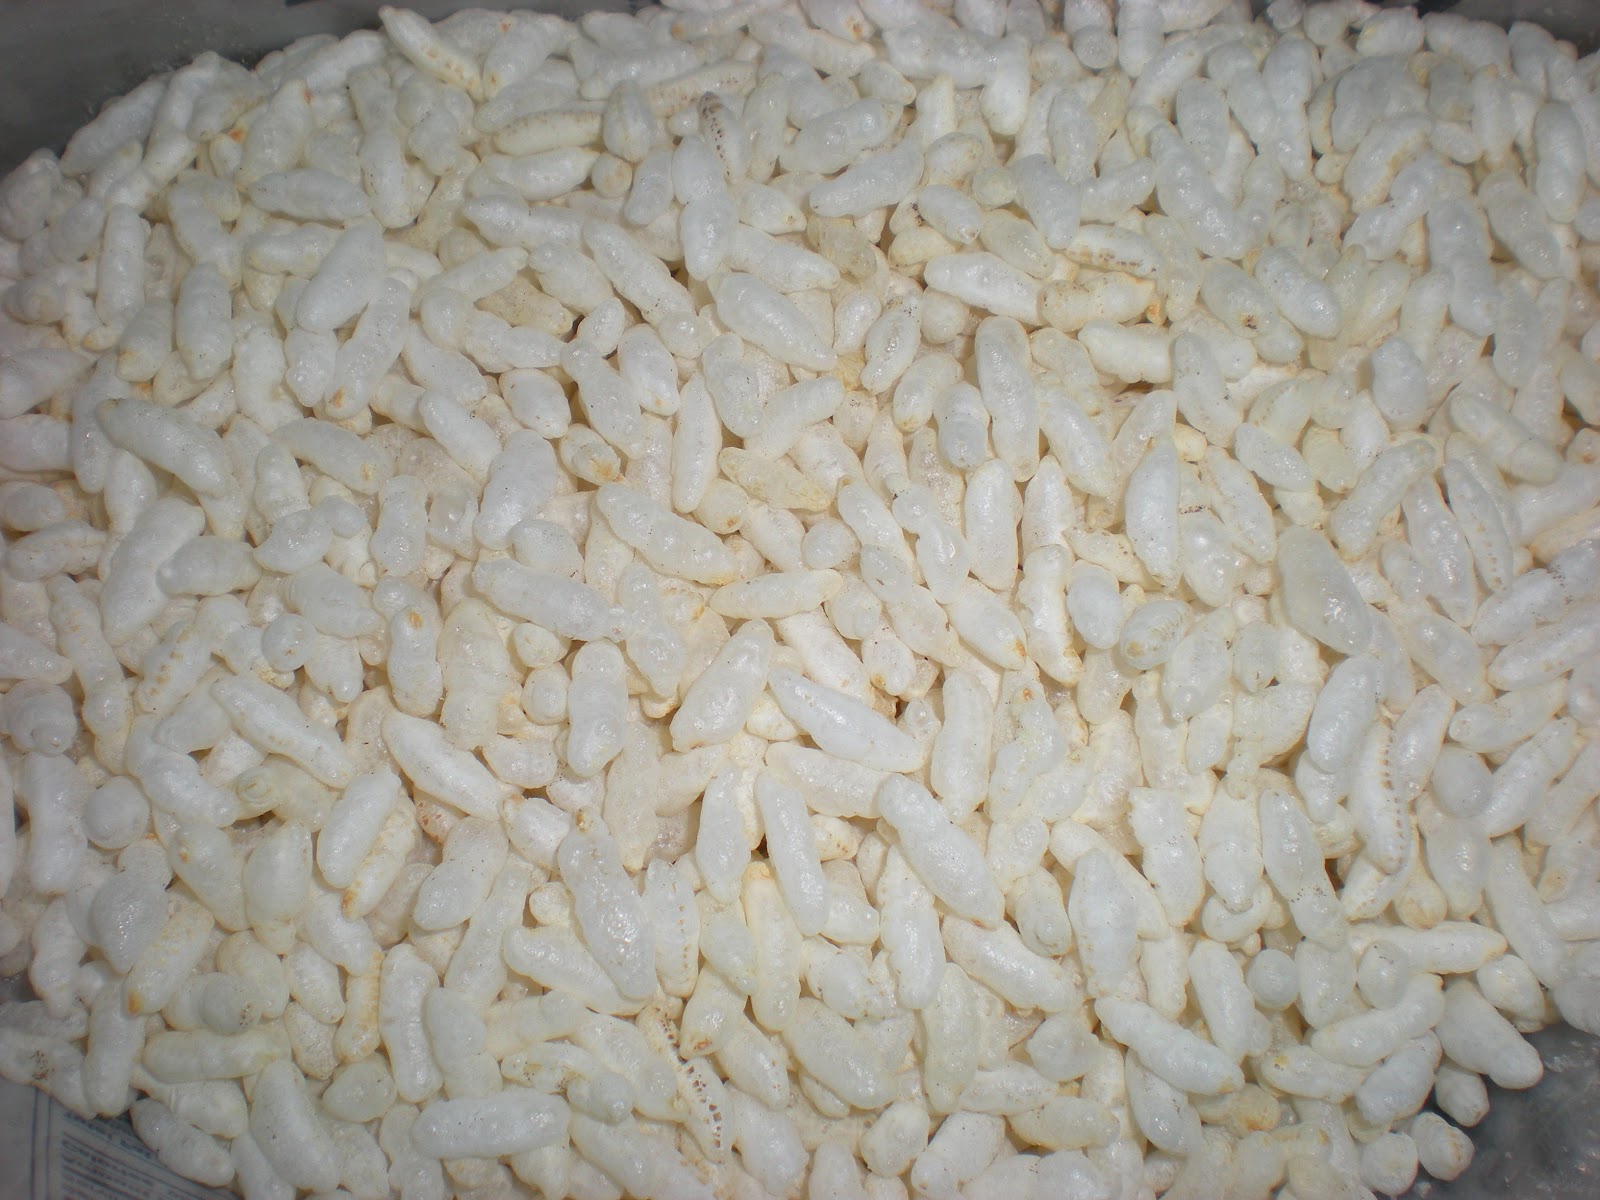
Not Your Ordinary Puffed Rice Cereal

Chivda/Chewda/Chiwda--- not sure what the correct spelling is--- is this great crunchy snack mixture with several different flavors going on at the same time- a lovely combination of hot-sweet-spicy-salty, sometimes tangy........you name it. Great with afternoon chai (tea) or coffee. I remember whenever we had unexpected guests at home (back then, guests were always unexpected- nobody called!!), my mom would make chai and pour in some chivda into a serving bowl, stick a spoon in, place the chai and the chivda onto a tray and serve it to the guests. She would usually make a good amount of this crunchy snack well in advance and then stock it up in these air-tight containers. Worked out great!

There are many different kinds of chivda and my favorite is the one made with murmura. Murmura is basically puffed rice cereal and here is how I make this great snack. Oh yeah, I am in that stage now- I make a reasonable quantity of the chivda and then stock it up in air tight containers.

Needed:

Murmura (Puffed Rice Cereal), peanuts, roasted chick peas (roasted chana dal- available at the IGS), salt, oil.

 Murmura or Puffed Rice Cereal in a bag
 Murmura
 Roasted Chana Dal/Chick Peas

I throw in, you don't have to if you don't want to!:

Green Chillies, a couple cloves of garlic- smashed, curry leaves (if lying in my fridge), red chilli powder.

Method:

1. I take a huge pot and pour in a few tablespoons of oil. Get the heat going on medium and then add peanuts. Fry them until they start turning brown.
2. At this point, I add some split chick peas followed by a couple green chillies slit lengthwise and a couple cloves of smashed up garlic. Quickly give it one stir- don't want it all to burn! I then turn the heat down to minimum.

The initial frying

3. I then pour in the bag of murmura, followed by salt and red chilli powder. Mix everything up and keep stirring for at least 10 minutes. I keep stirring until my hand literally starts hurting! I then taste it and if it is crunchy enough, I switch off the stove. Done! As easy as that!

 Murmura Chivda Ready!

After the mixture has cooled off, I transfer it into air tight containers.Works out great for those mid-day "oh-I-need-a-snack" moments and of course, when you have guests over. I believe this stuff is pretty healthy too-- I mean, for starters, there's not much grease involved and that is always a plus, right? And it tends to be pretty light on your stomach as well. And then there's nuts!

Wednesday, April 28, 2010

Quick yummy Tuesday night grub

Last evening kids wanted to eat mac'n'cheese. Sweet! Perked it up a bit by adding spinach, you know, for the  vegetable part.......however, wasn't sure if hubs and I would want to eat the same. Then suddenly an idea struck!

So I opened my freezer, took out the Samosa pack, spread a few on a baking sheet and put it in the oven at 400 degrees. Meanwhile I opened a can of Garbanzo beans and gave a quick wash (I always like to wash canned items just to remove the "canny" taste that I think canned items carry). Put a teaspoon of oil into a tiny pot, heated, put some cumin seeds and some red chilli powder (paprika) and then put the washed garbanzo beans into this. Added some tomato paste and a tad bit of water. Jazzed it up with some "aamchur" (i.e. dry mango powder) and "anaardaana" (i.e. dry pomegranate seed powder) and salt per taste. The idea was to convert the bland garbanzo into something nice and hot and tangy. Brought it to a boil and simmered for 5 minutes. Then switched off the stove. Meanwhile, the samosas were baked to perfection (took only 10 mins- though the packet calls for baking for only 6 mins. I think 10 mins works better). I also finely chopped some onion, tomato and cilantro (some green chillies would have been good too).

And now I was all set to create some awesome "samosa chaat!" Mmm! So I took 3 samosas and gently smashed them with a spoon. Then spooned some of that tangy garbanzo mixture onto the smashed samosas. Topped with some of that onion-tomato-cilantro salad and voila! time to eat!!! I added some tomato ketchup to my samosa chaat while hubs added some hot habanero sauce to his. Ohhh, it was simply delicious!

If I were upto it, I would have made some mint chutney, but hey, the samosa chaat was pretty tasty without it! I shall create something amazing with the mint I have lying in my fridge another day.

Enjoy the snaps:

The samosa packet I got from the local Indian store a couple weeks ago.

The baked samosas ready to be smashed! ;)

The final creation!

Relishing! YUM-O! (Pl disregard the paper beside the plate-- that is a whole other topic to be discussed in another blog..........)