Paani Poori is an extremely popular street-food in India.
Paani means water and
poori is basically fried, puffed up Indian flat bread. Uh, yeah, flat bread that is puffed up! In this case, the
poori is nice and thin and crunchy. And oh, bite sized and made with (correct me if I am wrong) a combination of semolina flour and all purpose flour. Another name for
paani-poori is
golgappa; plural:
golgappe or
golgappas.
The main idea behind this snack is to poke a hole in the tiny little
poori and dunk the
poori in this very tangy, spicy, tamarind water so that the
poori is filled with that water (
paani) and keep popping one
poori after another into your mouth, until you are full; rather, until you are satisfied, which could actually take a while, just so you know.
Here's how you do it: You put one
poori filled with the
paani into your mouth, close your mouth and gently pop the
poori with the help of your tongue onto your palate. What follows is this really "loud" explosion inside your mouth, with all that delicious spicy tangy water gushing into your taste buds and you literally shudder and close your eyes in ecstasy, followed by some major lip-smacking (remember, this is street-food we're talking about!). You do the same with the next
poori and the next......and yeah, you got it- the cycle continues!
Now along with the
paani, you can add certain other fillings such as cooked garbanzo, potato, mint chutney and perhaps finely chopped onion, green chilies, cilantro etc.
And here is my take on
paani poori and believe me, you'll see that it is extremely EASY!
Ingredients:
1. I buy the
(paani) poori package from the Indian store. That just made the whole thing easy, didn't it? (Oh, by the way, don't worry about the spelling.......
poori or
puri--- doesn't matter, sort of like tomAAto Vs toMAYto.......)
 |
| Paani Poori (or Pani Puri) box from the Indian store |
2. Cooked garbanzo beans- easiest way is to open a can of garbanzo, all ready to use!
3. Tamarind concentrate (available in any Indian or Asian store).
4. Mint leaves, a couple green chilies, a clove of garlic and some lemon juice for mint chutney.
5. Potatoes- cooked (pressure cooker works best for this or the m-wave may be used) and chopped.
6. Salt, Red chili powder/cayenne pepper, black pepper powder, cumin powder, pinch of garam masala powder (optional), pinch or more of sugar (depends on individual taste preference), pinch of
aamchur (dry mango powder)- optional.
Note: The spices are really your choice.
Steps:
1. Open a can of garbanzo beans. I like to wash them in running water to "freshen" them up a bit. I add a pinch of salt, cumin powder, garam masala powder and just mix it all up.
 |
| Chickpeas/Garbanzo |
2. Next, I get the potato ready. If it is just the four of us, then I just take 1 medium potato, wash it, poke it a bit with a fork all over and then cook it in the microwave. Takes about 3 to 5 minutes. I then peel it, chop it up and season with salt and perhaps some garam masala powder or even just plain simple ground black pepper.
 |
| Potato |
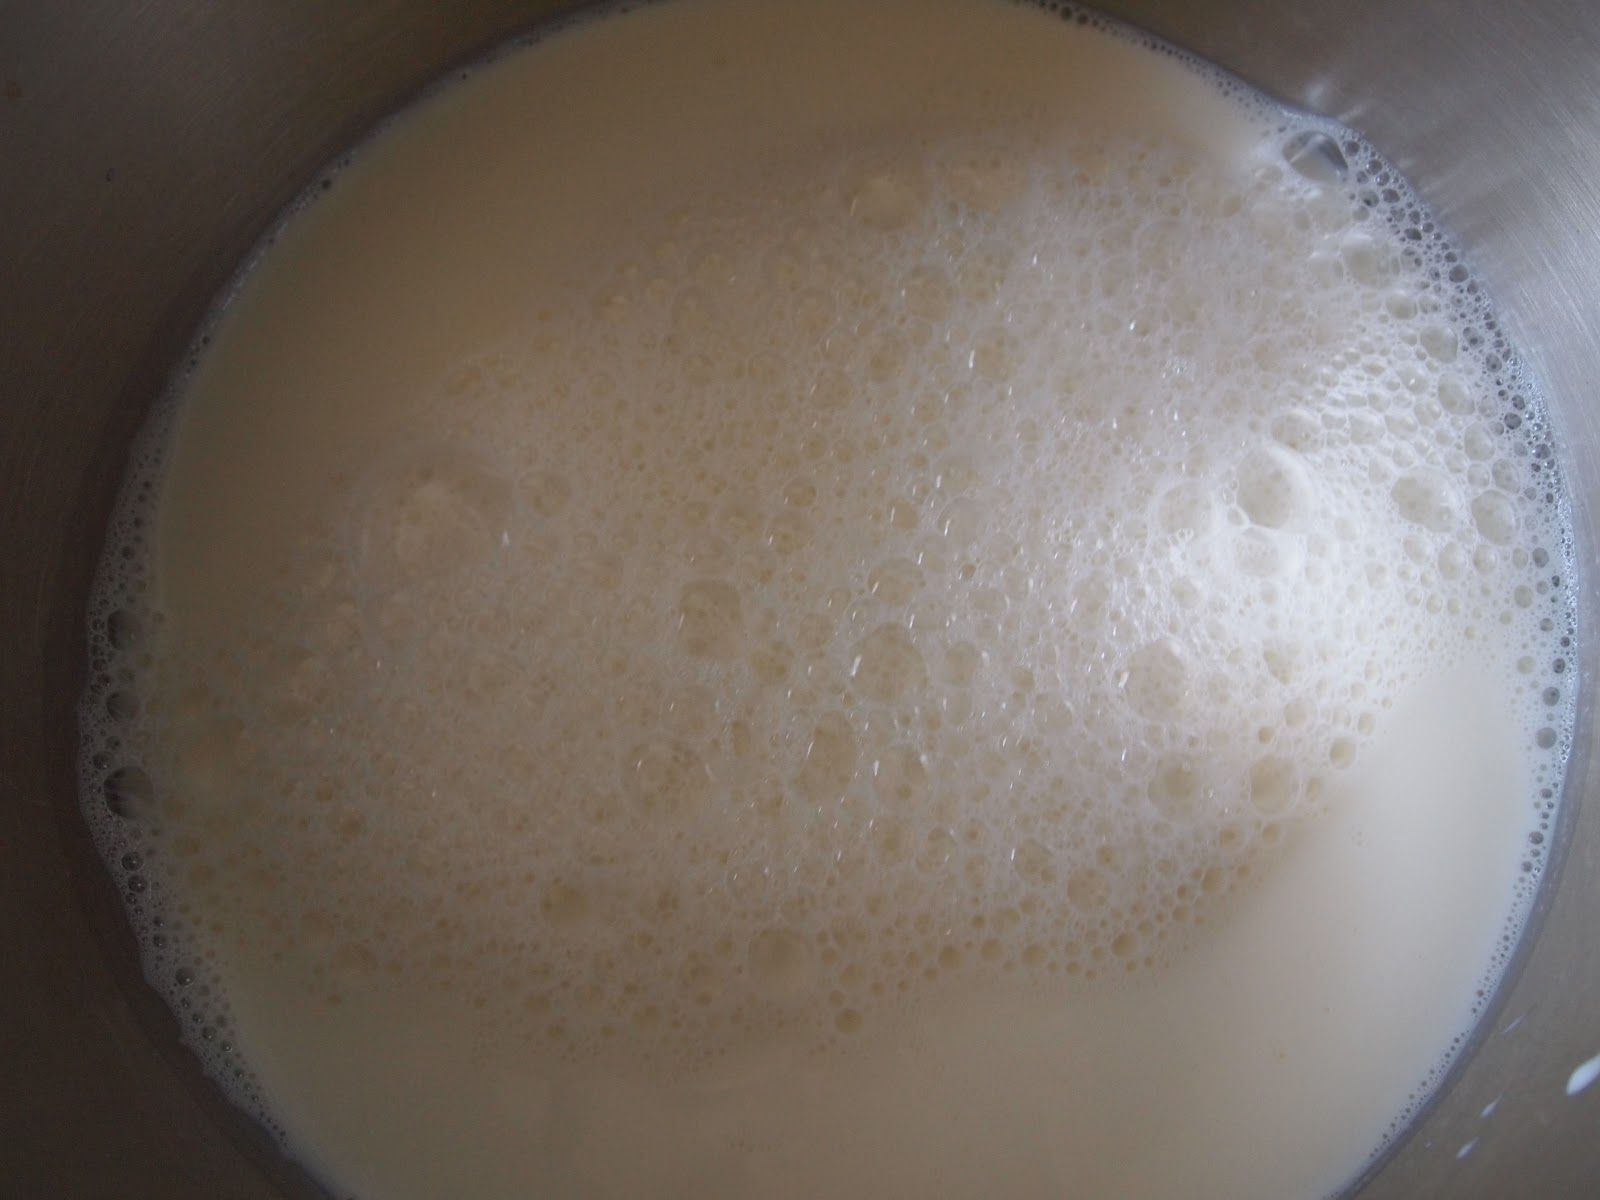
3. For the
paani (the spicy tangy tamarind water), I take a teaspoon of the tamarind concentrate, dilute it with 1/2 a cup of warm water (makes it easier to thin out the concentrate) and then add salt, cumin powder, red chili powder and a pinch of sugar. If you like it sweeter, then add more sugar. And then I stir it all up, and add some more water (room temperature) to thin it out completely. There, the
paani is ready! (Of course, I do taste it and adjust accordingly).
 |
| Paani- Spicy Tamarind water |
4. For the mint chutney, I pluck leaves from my very own home-grown mint plant (how much more organic can you get?!) and then wash the leaves and make a quick not-too-thick chutney in my food processor. It is very simple, really: mint leaves+a clove of garlic+1-2 green chilies+a dash of lemon juice+salt+1/4 cup of water. One or two pulses in the food processor and voila, mint chutney is ready.
 |
| My mint plant (as proof!) |
 |
| Mm-Mint Chutney! |
5. And, last but not the least, I open that box of
(paani) pooris to get the party going!
 |
| Pooris! |
Like I explained earlier, you poke a hole in a
poori, stuff it with some garbanzo, potato and mint chutney and then dunk it in or spoon in some of that lip-smacking delicious tamarind water into the hole and pop it into your mouth and just keep eating........
 |
| Paani Pooris- SLURRRP! |
Sometimes, we eat
paani pooris for dinner. Yes! I just pick up a couple boxes of
pooris from the Indian store and it works out great. The kids love it too! Light, satisfying and totally
slurpilicious!
P.S.: Thanks to the lack of sunshine and the cold temperature at this time of the year, my mint plant is not doing very well, though I am trying to keep it alive and kicking........ gotta see how that goes!