Showing posts with label Vegetarian. Show all posts

Tuesday, December 17, 2019

Good Gourd- spiny gourd and pointed gourd stir fry

I finally cooked the most talked about gourd in my family- the (in)famous kantola. Okay, clarification- the only person who talks about it is my dad, and the only person he talks to about it is me. And the only person who goes "tsk" at this poor innocuous gourd is his wife, my mom.

I spotted this spiny gourd (the most innovative name we humans could come up with for this beauty) for the first time in my life of two+ decades as a home chef the other day at the Indian store. I was thrilled! I also bought parmal or parwal called pointed gourd (!). A quick simple stir fry was in order.


Ingredients:  

Kantola

Parmal 

Jeera (cumin)

Til (sesame seeds)

Dhania (coriander seeds) powder

Hing (asafoetida)

Red Chili Powder

Oil for cooking

Salt to taste


Method: 

1. Wash kantola and parmal. Cut lengthwise. If the kantola spines are not your thing, go ahead and gently scrape them off. Else keep them. I did, and it was great!

2. A few teaspoons of oil in a pan, heat, temper jeera, a pinch of hing, some til, and throw in kantola and parmal together. Add salt to taste, stir fry for a few minutes, lower heat, cover with lid. Cook for 5-10 minutes.

3. Uncover, check for done-ness. Add dhania and red chili powder. Stir fry for a couple more minutes. Done!


Eat with rotis, paranthas, or on the side with some rice and dal. Yum!


Thursday, November 14, 2019

Asparagus Chutney

Grilled, oven roasted, steamed, with a squeeze of lime, a drizzle of olive oil, maybe some butter ... all good stuff, but oh-so-meh! Here's a great recipe for asparagus chutney:

Ingredients: 

Mains: 

Asparagus- 20-30

Green chilies: 5-7 (adjust according to your heat level)

Fresh curry leaves (kari patta): 7-10 small leaves

Tamarind pulp: 2 tsp (adjust according to your tang level)

Flavoring agents that impart body to the chutney: 

Sesame seeds: 2 tsp

Fenugreek seeds: 1 tsp

Cumin seeds: 1 tsp

Mustard seeds: 1 tsp

Urad dal (split black gram that is white, lol!): 1 tsp

Dry red chilies: 3/4

Asafoetida (hing): a pinch

Salt to taste

Oil: 2 tsp

Secret Ingredient: 1/2 tsp jaggery powder

Method: 

Prep asparagus by snapping off bottom stalk (if required), chop, and rinse. Chop green chilies, wash curry leaves and keep ready.

In a pan, add oil, heat, splutter mustard and cumin seeds. Followed by fenugreek, urad dal, sesame, dry red chilies, and asafetida. Roast for a couple minutes until everything's nicely browned, and it all smells good. *Add red chilies in the end to avoid burning

Throw in green chilies and curry leaves, followed by asparagus. Stir fry for a minute or two, add salt,  reduce heat, cover. Cook for 5 minutes. Turn off heat. Add tamarind pulp and the (not so) secret ingredient. Cool.


Blend in food processor. *Doesn't have to be finely ground.

Done!

Add tadka (tempering) of mustard and cumin seeds before serving. YUM! I know my dad will also add some tempered cashews for extra umami and crunch. :D

Eat with plain paratha, or as a true South Indian would love to do- mix with steaming hot rice, add some ghee, and enjoy with a side of papad! NomNom!! It's got a kick, tang, hint of sweet, and is thousand times more exciting than plain old steamed asparagus.

Asparagus Chutney


Monday, May 13, 2019

Caramelized Shallots- Indian Style Pyaaz Ki Sabzi

Here's a fantastic and super simple recipe that helps use up those shallots, baby onions, and regular onions lying unloved for days together in that onion basket on your kitchen counter:

Pyaaz Ki Sabzi


Ingredients: 

Note: Eyeball measurements, and tasting as you go is the way to go.

1. Shallots: 6-8

2. Coriander Powder: 1-4 tsp

3. Red Chili Powder: 1-4 tsp (depends on your desired level of heat)

4. Turmeric powder: a pinch

5. Asafoetida (hing)- a pinch

6. Cumin seeds: 1 tsp

7. Sugar: a pinch, just to enhance sweetness of the shallots

8. Salt to taste

9. Cooking Oil: 3-5 tsp

10. Water: 1-2 tbs

Optional: Anardaana (pomegranate seeds) and aamchur (green mango powder) : a pinch each

Method:

1. Peel shallots, wash, dry, cut into halves if you like, else keep whole.

2. Make a spice paste using turmeric, coriander powder, red chili powder, and salt.

3. Temper cumin seeds, add a pinch of asafoetida powder. Add shallots to this. Stir fry on medium flame for a few minutes, until shallots are browned good enough. Be careful not to burn them. We simply want a nice golden brown color. Sprinkle a pinch of sugar over the shallots. This allows for enhancing their natural sweetness. If you like some tartness, you could add a pinch each of anardaana and aamchur. This also adds a nice color.

4. Add the spice paste, and stir everything. The 1-2 tbs of water in the spice mix is good enough to soften the shallots. Lower the flame, and cover pan. Cook for 5-7 minutes until shallots are beautifully soft as well as caramelized.


Serve with fresh phulkas, rotis, or parathas.


Pyaaz Ki Sabzi is also a wonderful idea when you are all out of ideas!! No, really!! ;D 


Monday, March 11, 2019

Mexican Hot Salsa

I love myself a quick snack of warm tortilla chips and spicy salsa. The mild and medium kind ain't gonna do it for me. Fresh salsas are good, but when the ingredients are charred first, and then blended into a salsa- that taste is elevated to a whole new level, and it's mm mm mm!


Ingredients: 

Tomatoes- 4

Red Onion- 1/4 piece

Garlic- 6-8 cloves, skin on

JalapeƱos or any hot pepper of your choice- 2-4 (adjust according to desired level of heat)

Cumin- 1 tsp

Salt to taste

A drizzle of oil

Lemon/Lime

Method: 

1. Place ingredients, except cumin and salt, in an oven safe dish.

2. Drizzle some oil all over.

3. Place under broiler for 10-15 minutes, until peel is charred.


4. Remove from broiler, and cool.

5. Remove charred peel.

6. Put into blender. Add cumin and salt.

Note: If using Vitamix type of food processor, keep the peel on. The flavors will be bolder. 

7. Blend into salsa.

8. Squeeze some lemon/lime juice for zing. 

9. Eat with chips!


Friday, November 16, 2018

Nutrela- Nutri Kulcha, Soya Nuggets Recipe

I have loved Nutrela since childhood. Especially Nutrela pulav. Whenever the parents went out for a party in the evening, I'd cook nutrela pulav and egg curry for my brother and me, and boy, were those some really awesome, memorable TV Dinners! We'd spread newspaper on the floor, place the hot cooker with pulav, and kadhai with egg curry on the newspaper, get our plates and spoons, sit on the floor, and eat away, with the television on. Mm, really really enjoyable, memorable, and delicious dinners. Thankfully my kids love nutri nuggets too.

The other day, a new friend on Quora introduced me to what sounded like a really delicious dish- Nutri Kulcha, a street food that he simply loves to gorge on when he visits his hometown, Udhampur in Jammu. It's the perfect kind of food, especially on cold winter days- hot, spicy, tangy, flavorful, buttery, and simply delicious. After I read the description, I of course got all excited, and I just had to make it. So I did. And I was extremely pleased with the result. Here's the recipe. Do note that I am not including measures for all ingredients, because well, one- I made this a few weeks ago and I have forgotten the exact measures I used (lol!), and two- I feel like unless you are a complete novice at cooking, one doesn't really need to know exact measures- it's all about experimenting, and creating something that YOU like!

Ingredients: 

1. Nutrela or Soya nuggets
2. Tea bags- 2 or 3
3. Onions- finely chopped
4. Tomatoes- finely chopped
5. Ginger garlic paste- 1-2 tsp
6. Green chilies- according to your heat level preference
7. Garam Masala
8. Red chili powder
9. Amchur (dry mango) powder- a pinch
10. Anardaana (pomegranate) powder- a pinch
11. Chaat masala (for the end)
12. Cumin seeds
13. Good Yellow Butter- such as Kerry Gold
14. Black pepper- a pinch
15. Salt to taste
16. Water to cook nutrela, and some to adjust thickness of final dish
17. Cooking oil
18. Soy sauce- for that final umami

First of all: 

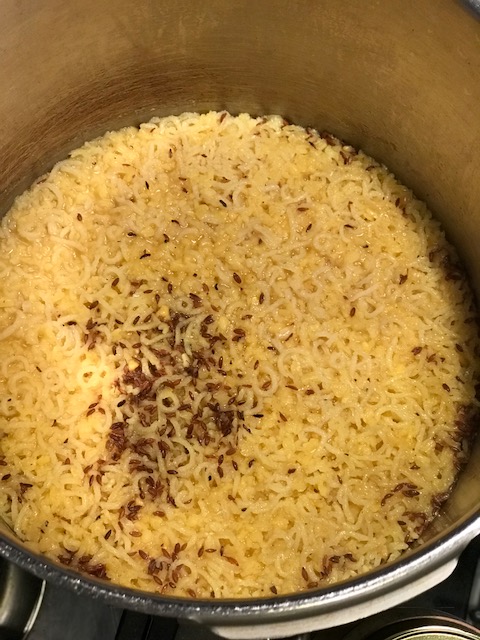
Cook nutrela or soya nuggets in water infused with tea. I simply took a pan with water, placed a tea infuser filled with some loose tea leaves in it, and then cooked the nuggets in this tea infused water. Basically it imparts a lovely deep color and (tea) flavor to the soya nuggets.


Then drain water, squeeze out any remaining water from the cooked nuggets, and chop it all up into tiny pieces.


Next:

1. Take a few teaspoons of oil in a kadhai or a pot/pan, get the heat going, temper a teaspoon of cumin seeds.

2. Add finely chopped onions, tomatoes, green chilies, and ginger garlic paste. Fry it all until you see oil kind of "floating" on top. 

3. Add garam masala, chili powder, and salt to taste, stir it all.


4. Add cooked nutrela into this, mix it all. Add a teaspoon of soy sauce. If it looks a bit too dry, add some water. The nutri should be more on the thicker side, easily spreadable on thick bread. Add the remaining masalas- amchur, anardana, as well as black pepper. Taste, add some more masala and or salt if required. Cover. Simmer for a good 30-45 minutes. Do not rush- for you want all of the flavors to marry really well.


5. Add a good pat of butter in the end. Sprinkle chaat masala on top, garnish with fresh green cilantro, and serve nice and hot alongside some thick bread such as kulcha, or naan.


I spread some in a bun, sprinkled extra chaat masala, and ate it. It was SO GOOOOOOOOD!!!! It was hot, spicy, tangy, peppery, and the nutri nuggets were juicy, and well, what can I say- it was deeeelish!!!


Thanks, my new foodie buddy from Quora, for the inspiration! This nutri truly rocks! The next time around, I shall be sure to serve it with kulcha.

Wednesday, January 10, 2018

Food Post #209: Green Mango Cilantro Coconut Green Chile Chutney

This is one vibrant green chutney, hot and spicy and tangy and deeeeelish! Goes very well with idlis, dosas, rotis, bread, etc. Bonus- you can whip it up in under 20 minutes!


Idli Chutney 


Ingredients: 

Green Mango 1, chopped into size good enough for your blender

Cilantro, fresh 1 bunch

Green Chilies (I prefer Thai) 4-6
*Adjust according to desired level of heat

Coconut, fresh grated 1/2 cup

Salt to taste

Jaggery 1/2 tsp

Oil 1 tbs

Mustard seeds 1/2 tsp

Cumin 1/2 tsp

Asafetida a pinch

Method: 

This is basically a 2-step process:

1. Blend green mango, cilantro, green chilies, coconut, jaggery, and salt into a chutney in your nifty blender.

2. Heat a tablespoon of oil, add a pinch of asafetida, followed by tempering some mustard and cumin seeds. Pour this onto the chutney.

Done! Mix and serve with hot spongy idlis, or crispy dosas, or make a sandwich. YUM!

Note: If you find that the green mango is not tangy enough, just squeeze some lemon juice. The chutney should taste tangy, hot, and spicy, with a very slight hint of sweetness.


Thursday, November 30, 2017

Food Post #204: Mediterranean style Muhammara

I am excited to present to you a brand new dish that I made yesterday- Muhammara- a delicious, red colored, peppery, lightly sweet, tart, and nutty Mediterranean style dip. I ate this on a plane ride from Seattle to Dubai a couple years ago, and I quite liked it. It's a great addition to that Mezze platter that you can serve as an appetizer at your next party.

The traditional key ingredients in Muhammara are roasted red bell pepper, aleppo pepper, walnuts, and pomegranate. Now as it often happens in my home kitchen pantry, I don't always have all the ingredients at one time for one dish, and so then I make do with whatever there is available. In this case, I didn't have any walnuts, nor aleppo pepper, so I decided to use almonds instead, and some reaper chilli flakes. My friend had given me some sumac, a tart spice (very similar to the Indian anaardana) a few months ago, and I was delighted because I could finally use some of it in this dish! :)

The only longish step in terms of time is roasting the bell pepper. Once that is done, it takes under 10 minutes to whip up this tasty as well as super healthy dip.


Muhammara 


Ingredients:  

Red Bell Pepper- 2

Almonds- 2 tbs

Garlic- 2 cloves

Pomegranate- 2-4 tbs

Chilli flakes- 1-2 tsp

*If using reaper chilli flakes which are VERY HOT, a pinch will do

Salt to taste

Sumac- a pinch

Method: 

1. Wash bell pepper, wipe dry, brush oil all over the bell pepper, place in an oven safe pan/dish.


2. Broil under high setting for 10-12 minutes each side. The idea is to char the skin of the bell pepper.


3. Set aside to cool.

4. After it has cooled off, remove skin, and the stem. The seeds will come off with the stem, which is exactly what you want.


5. Cut this roasted, peeled red bell pepper into strips, and transfer into your food processor. Add some chili flakes, and salt to taste.


6. Toast some almonds, and add a couple cloves of garlic to the toasted almonds to soften them up a bit.


7. Add the above to the bell pepper in the food processor. Also add some pomegranate seeds to the same. Blend it all into a nice dip.


8. Transfer into serving dish. Garnish with pomegranate seeds, sumac, and a drizzle of good olive oil. Serve with some warm pita, crackers, or vegetables.


Saturday, November 25, 2017

Food Post #201: Khichdi

Khichdi is the perfect dish to make and consume when one faces certain situations, some of which I list as below:

1. You don't know what to cook

2. You know what to cook, but are feeling lazy

3.  You are sick and tired of eating lavish foods, and your tummy needs some TLC

4. Extrapolating #3: Your tummy has had it, and you are sick and tired of popping those fruity, calcium rich Tums into your system. Your tummy needs some TLC

5. You are suffering from a fever, or a cold, or a cough, or a cold and a cough, or a fever, a cold, and a cough

6. You desire for some comfort food, and are quite tired of eating soup

7. You need to cook something ASAP

8. You miss the time when your kids had just started eating solid foods, and all you needed to cook for them was khichdi, and they would eat it up very happily

9. You remember your childhood when Mom used to cook khichdi for you, and the rest of the family on certain occasions. I am pretty sure she too encountered the aforementioned situations that drove her to cooking this wonderful dish. And I do say "wonderful" without any ounce of sarcasm. Really! No, really!!


The Very Basic Khichdi made with Rice and Mung Dal 

Yield: 2 adults

Ingredients: 

Rice- 1/2 cup

Mung dal- 1/2 cup

Asafetida (hing)- 2 pinches

Cumin seeds- 2 tsp

Turmeric powder- 1/2 tsp

Pepper- fresh ground- 2-4 tsp

Oil or Ghee- 1 tablespoon 

Salt to taste

Water to cook- 2-4 cups 

Method: 

1. Wash rice and dal and keep aside. Meanwhile in a pressure cooker, pour in some oil or ghee, or a combination of oil and ghee, get the heat going, add a couple pinches of asafetida, followed by cumin seeds, turmeric, and pepper powder. Then throw in the washed rice and dal. Stir for a minute or so. 

2. Add water. I like my khichdi a bit "watery," nice and mushy. If you prefer it dry- then add only double the quantity of water. Add salt to taste. Cover lid. Pressure cook for 5 minutes. Done! 

Khichdi almost ready to be eaten!


3. At this point the khichdi is ready to be eaten. I like it a bit mushy, so I stir it and make it so. Then add a bit of ghee (yum!), and eat away. Some Indian pickle on the side is a good way to eat it. Or perhaps some sliced onion. Or just some plain yogurt. Any way you like it! 

Mushy khichdi for me please! 


Khichdi with some ghee and Indian pickle on the side- Yum! 


Friday, November 24, 2017

Food Post #200- Just Do It

Slightly altered blogpost title from "Daily Food Post (#8)" to Food Post #200. This is my 200th post here! Finally! I started off very enthusiastically way back, and then slowly became irregular, then kinda stopped completely, and then did some intermittent posting- it took a lot of effort on my part, really. And then just last week I decided that I just gotta do this. I remember saying to people when I'd mention this food blog- "Oh, I don't post regularly. I post when inspiration hits me." Okay- that's a whole load of, err, rubbish. I realized that if I continue waiting for that "inspiration" to "hit" me, it'll never happen. And therefore, I told myself- woman, just do it!

Corn Upma 

It is only recently that I got re-introduced to corn upma. I like the simplicity of the dish. It's simple, quick, and delicious, as well as healthy. Wait, then again, that's how most of my cooking is. 

Ingredients: 

Frozen Corn kernel- 2 cups

*This dish will taste way better with fresh corn kernel rather than frozen. If using fresh, it may require using a little bit of water to aid in cooking the corn. It will also take a bit longer to cook

Onion- 1 small, chopped

Green chilis- 2-4 (or 6!), slit and chopped

Coconut- grated, 1/4 cup

Mustard seeds- 1/2 tsp

Asafetida (hing)- a pinch

Oil- 3-4 tsp

Salt to taste

Cilantro to garnish

Lemon juice- a dash


Delicious Corn Upma


Method: 

1. Heat pan with some oil. Add a pinch of asafetida (hing), splutter mustard seeds, add chopped onion, green chilis, and fry for about 5 minutes, or until cooked. 

2. Throw in the corn, add salt to taste, stir fry for another 5 minutes. 

3. Add grated coconut, and cilantro. Mix. Squeeze some lemon juice, and it's ready! 


Yummy! 

It takes under 10 minutes to whip up. It's almost like corn salsa. I like to eat it as it is. It could possibly be eaten with tortilla chips, or in tacos. The fried onions, and the heat from the green chilis, and the coconut make this dish delicious. And it's corny!  


Tuesday, November 21, 2017

Daily Food Post #6: Aloo Palak Sabzi

Here's a jhatpat (super quick) recipe for a potato and spinach preparation, spiced very simply with asafetida, and spluttered mustard seeds. Eat with roti or parantha, or as a side dish with rice and lentils.

Aloo Palak Sabzi


Ingredients: 

Spinach- 1 lb, coarsely chopped

Potatoes- 2 medium, boiled and chopped into bite sized pieces

Garlic- 2 cloves, smashed

Tomato- 1 medium, chopped

Mustard seeds- 1/2 tsp

Asafetida- a pinch

Cooking oil- 3-4 tsp

Crushed red pepper 1/2 tsp

Salt to taste

Method: 

1. In a pan with some oil, get the heat going. Add a pinch of asafetida, and splutter mustard seeds

2. Add smashed garlic, crushed red pepper, followed by spinach. SautƩ a bit, add salt to taste, stir, reduce flame, cover pan, and allow to cook for about 5-7 minutes

3. Now add the chopped boiled potato, and tomato, give it a stir, cover, and cook for an additional 5-7 minutes

Done! Easy as that!

Serve with hot rotis or paranthas and plain yogurt on the side. Or eat as a side with hot rice and dal. It's simple, delicious, and healthy.


Thursday, November 16, 2017

Daily Food Post #1: Warm Yellow Corn

Considering the rather infrequent posts around here, the reason behind which is that I don't cook extravagantly every single day. I am not a famous chef in any snooty restaurant, or heck, in ANY restaurant, snooty or otherwise. I am just another regular home cook. Now that the disclaimer has been taken care of, I have decided to go the Instagram way. And so here is today's food post:

Warm Yellow Corn, a perfect quick meal for a cold rainy afternoon in Seattle  


Ingredients: 

Frozen yellow corn kernel 1 cup

Salt to taste

Freshly ground pepper 1/2 tsp

A pat of butter

Lemon juice- a squeeze

Method:

1. In a microwave safe bowl, pour in a cup of frozen yellow corn kernel straight out of the package.

2. Run it on high for a couple minutes, until it is nice and warmed up.

3. Add salt to taste, some freshly ground pepper, and a pat of butter. Mix it, and run it on high for another 30 seconds to a minute.

4. Mix, add a squeeze of lemon juice, and eat away!


Monday, August 14, 2017

Bitter Gourd Gojju Feedback

I am pleased to inform you that the gojju recipe that I posted a couple days ago has been tried and tested with positive results. Yash, from Wisconsin followed the recipe and said that it was delicious! She even sent me a picture! It looked exactly like the picture I posted. She changed it up a bit in a couple places: instead of using bitter gourd (she is not a fan of this unfortunate bitter beauty like I am!), she used eggplant and bell pepper. Nice! And she reduced the quantity of the red chilies by half. Okay, yeah, I completely understand that not everybody likes their food screaming hot and spicy. ;)

Thanks, Yash! Glad you and your family liked the gojju!

Yash's Eggplant Bell Pepper Gojju

Just to show you how similar the above picture is to the picture I took:

Bitter gourd Gojju

Saturday, August 12, 2017

Kakarakaya Gojju- Hot, Sweet, Tangy Bitter Gourd

If you are thinking- what on earth is kakarakaya gojju, here, allow me to explain:

Kakarakaya is the Telugu name for bitter gourd, aka bitter melon, whilst Gojju is a Kannada word that means, and this is my interpretation- a mishmash of vegetables such as onions, tomatoes, okra, aubergine/eggplant, capsicum/bell pepper, etc, and of course, bitter melon. Fruits such as pineapples, apples, grapefruit, raisins, etc can also used to make gojju.  The final flavor profile is hot, sweet, and tangy. So I suppose one could call it ketchup or jam of sorts, or achaar or a chunky pickle or a chunky salsa. The optimum way of enjoying gojju is by mixing it up with some cooked rice, and adding a spoonful of ghee to it. YUM!

Bitter gourd is called karela in Hindi, and haagalkaai in Kannada. According to yours truly, only the elite foodies like this bitter beauty. For reasons unknown to me, most people cringe at the mere mention of bitter gourd. 

Now that the meanings are out of the way, here's a recipe for kakarakaya gojju that I learned from my sweetie's grandma. It's easy, and tastes delicious.


Ingredients: 
Yield: Enough for 2 karela-lovers

1. Sesame seeds- 4 tbs
2. Cumin seeds- 1 tbs
3. Urad dal- 1 tbs
4. Red chilis- minimum 7 (If you don't  have red chilis, can use red chili powder- 4-5 tsp)
5. Black pepper powder- 1-2 tsp
6. Mustard seeds- 1-2 tsp

7. Bitter gourd from the Indian store- 4
8. Oil- 7-10 tsp (skip skimping!)
9. Turmeric powder- 1 tsp
10. Asafetida (hing)- 1/2 tsp
11. Salt to taste

Quantities of the following two ingredients depend more on your preference for sweet and tang, so adjust accordingly:

12. Jaggery powder- 4 tbs
13. Tamarind pulp- 4 tbs

14. Water- 1/4-1/2 cup, to adjust consistency of gojju according to your preference

Method: 

The gojju masala:

1. Dry roast ingredients 1 through 6 until the mixture turns fragrant, and the sesame seeds begin to "dance" in the pan (and may start jumping out of the pan too!), and the urad dal turns brown.

*If using red chilis, add them towards the end, else they will burn. If using red chili powder- it can be added directly to the bitter gourd.

2. Transfer to a food processor or a coffee grinder and pulse into a fine powder. Set aside.

The bitter gourd:

Note: I have become a hardcore bitter gourd fan, and so now I merely wash it, chop it, cook it, and eat it. I don't do the whole pre-prepping by soaking in turmeric and salt, and then squeezing the bitterness out. I mean, instead I might as well suck on a honey stick!

1. In a pan, add 7-10 tsp of oil, heat, add a pinch of asafetida (hing), splutter 1/2 tsp of mustard seeds, and then throw in chopped bitter gourd, as well as a pinch of turmeric, followed by salt to taste. Stir fry for 5 minutes on high flame, and then sprinkle some water, lower flame between medium and low, cover, and cook for another 10 minutes, until the bitter gourd is tender, and yet retains some crunch.

2. Uncover. Add gojju masala to the above and stir. Add some water to thin it out a bit. Now add tamarind pulp and jaggery. Stir. The sesame seeds act as thickening agent, so go ahead and add quarter to a half cup of water. Taste. Add salt and chili powder if required. Taste. Cover again and simmer for 5-7 minutes. Switch off.

Enjoy with hot rotis or rice.

Check out these other bitter gourd recipes that I posted a while ago:

Jalapeno and Bitter Melon

Stuffed Bitter Gourd

Karela Stir Fry


Wednesday, January 18, 2017

Raw Mango Relish

Not sure what the real name of this dish is, because some call it aam ki sabzi, some aam ki chutney, some aam ka achaar, and therefore I'll just call it raw mango relish. I mean, I could possibly call it A's Amazing Aout Auf Azis Aworld.... okay, okay, let's just stick with raw mango relish. It's easy, quick, tasty, and has a decent shelf life of about 7-10 days in the refrigerator. It can be eaten with rotis, chapatis, parathas, bread, or even on the side with some rice and lentils. It is hot, sweet, as well as sour, and perfect for these still-chilly January days.  

Ingredients: 

1. Unripe (raw) mango (available in Indian Store): 2, chopped into bite sized pieces. 

Note: Some recipes call for the mango be peeled. I think that's such a waste of the beautiful fruit. I also save the mango pits for later. I use them in rasam.   

2. Cumin Seeds: 1-2 tsp

3. Fennel Seeds: 1-2 tsp

4. Mustard Seeds: 1 tsp

5. Nigella Seeds: 1 tsp

6. Fenugreek Seeds: 1 tsp 

Note: Can use the Bengali panch-phoron if you happen to have it in your pantry

7. Red Chili powder: 2-4 tsp (or according to your liking)

8. Turmeric powder: a pinch

9. Salt to taste

10. Jaggery (grated): 2-4 tsp. Again, this is more of a personal taste. So adjust accordingly. 

Alternatives to jaggery: Sugar, brown sugar, or agave syrup 

11. Cooking oil: 2 tsp 

12. Water: Just enough to cover the mango

Method: 

1. Splutter cumin, fennel, mustard, nigella, and fenugreek seeds in oil, and throw in the chopped raw mango, followed by salt to taste, turmeric powder, red chili powder, and jaggery. Stir for about a minute or so. Then add water just enough to cover the mango. Bring it to a boil, cover, simmer for 7-10 minutes. 


Unripe Mango

Mango, Spices and Water


2. At the end of 10 minutes, uncover. The mango will have softened up nicely, and the sauce will have thickened up a bit. Gently smash some of the cooked mango with a spoon, so that there's whole pieces, as well as smushed up mango. Garnish with fresh cilantro, and the hot, sweet, and sour mango relish is ready to be err, relished. Come on now, that's chuckle-worthy!! ;)  


Ready! 

Delicious! 


Wednesday, November 9, 2016

Juice and More

America has a new Mr. President. Wonder how much longer it will take for this "first world" nation to have a Ms. President. Meanwhile, back in my birth country, India, "Operation Black Money" is the talk of the town. Exciting times! Btw, India, a "third world" nation, has had a woman prime minister as well as a woman president..... just saying. And that's about as much politics that I can really talk. Because one- I'm not passionate about politics. 
____________________________________________________________________________

I have a new addition in my kitchen- a Breville juice machine. It's lovely! Every morning I make fresh juice for the family, my favorite combination being carrots, oranges, apples, and ginger, and a squeeze of lemon juice. The result is an extremely delicious, gorgeous bright orange colored juice. One sip, and you-can't-stop-glugging-it-down-delicious!!! Now here's a fun fact: I call this particular juice, "Sunshine in Seattle." The best part is that the words can be played around with- so for instance, in the morning I call it- "Sunrise in Seattle," in the afternoon- "Sun Shines in Seattle," and if I make it in the evening, "Sunset in Seattle." ;) 

This one I called "Sunshine in a Cup" in the morning: 


"Sunshine in a Cup"


The one thing that I am not too crazy about this new juice machine: the pulp that ends up being wasted. It extracts the juice out of the veggies and fruits, but then you end up with this huge amount of "waste." And every time I discard it into yard waste, I cringe. 

However, here's the good thing: I have started incorporating that "waste" into my cooking, and it is working out quite well. What I do is that I first run the carrots and after the extraction is done, I switch off the machine. Then I gather up the carrot pulp (all the good fiber) and store it in a container for use later. And then I run the rest of the ingredients. 

I am not much into dessert making--- but am sure the fruit "remains" could be very well incorporated into desserts (/baking).

Another idea: Smoothies

The carrot pulp from the morning's juice was later used to make a delicious carrot-peas pilaf.


"Sunshine with Peas"

Delicious Pilaf

I am quite enjoying the early morning juice ritual. It's a little bit of extra work in the mornings, but it's totally worth it. Especially because the kids love it. Apparently it gives them more energy. Maybe it does or maybe it's placebo. Whatever it is, it's all good and delicious.
___________________________________________________________________________

And because two- Life Goes On!

Friday, September 16, 2016

Quick Recipe 3: Flatbread Pizza with Spinach and Mozzarella

Sometimes, actually most times of late, I don't know what the heck to cook! When I complain over the phone to my dear brother, he says: Go eat some grass off your backyard. 
You know what, I just might in fact do that one of these days!! 

Flatbread pizza is a great idea for people like yours truly. I mean, it is not even a "recipe" really, but it turns out pretty damn good. It's quick, easy, delicious. 

Ingredients: 

Flatbread- any kind such as pita, naan, roti, parantha, lavash, etc. 

Marinara sauce- I love Trader Joe's marinara, it's delicious

Mozzarella cheese- grated

Baby spinach- a few leaves

Method: 

Preheat your oven to 425 degrees F. 

1. Top flatbread of your choice with marinara sauce, followed by spinach, and grated mozzarella. I like to add a dash of salt and pepper on top of the spinach before the mozzarella. 


Top it up


2. Place on a baking sheet (doh!) and place on the middle rack in the oven heated to 425 degrees F. Bake for 3 minutes. The cheese will have melted. 

3. Then switch off the bake feature, and switch on the broil feature. Broil on high for 2 minutes, or just until the cheese starts browning. 

That's it! Sprinkle some oregano or a little bit of dry Italian seasoning, and eat away! 


Delicious Roti Pizza! 

Thursday, August 25, 2016

Quick Recipe 1: Basil Chili Infused Oil

Over the next few weeks, I shall be posting real easy, super quick, and delicious recipes that incorporate very few ingredients, and will take under 5 minutes to whip up. Wait, I take that back. Let me make that 15 minutes or less, just to be on the safe side. 

This week, I present Basil Chili Infused Oil. All you need are five ingredients, four of which all of us almost always have somewhere in the house.... definitely in the kitchen pantry.... ;)

Ingredients: 

Note: There are no exact quantities to be used here. It's just personal preference. So adjust accordingly:

1. Oil of your choice (I like olive oil and avocado oil)

2. Fresh basil leaves

3. Garlic powder (fresh garlic may be used)

4. Chili flakes of your choice (I like reaper, scotch bonnet, ghost pepper, etc....)

5. Salt to taste


5 Ingredients

Method: 

1. Take a bowl and put in the five ingredients (as shown in picture) into the bowl.

2. Place in microwave and heat for about a minute to 75 seconds (75 seconds= 1 min 15 secs.... ;)). The oil will have boiled and the flavors will have nicely infused into it.  


Oil plus salt, garlic, chili flakes, and basil

Ready!


Serve with rustic bread. Can drizzle over pasta too for extra deliciousness.

Extra: The basil leaves will have crisped up- delicious!


Delicious!