Showing posts with label Chicken. Show all posts

Monday, November 20, 2017

Daily Food Post #5: Nachos

It was only recently that I found out the history behind one of the most popular food items in America- Nachos. Quite intriguing, really, how something so simple, and tasty, actually has history attached to it. For starters, I had my own doubts about whether or not this dish was even truly Mexican. You know, like General Tso's Chicken, and Cauliflower Manchurian- that aren't actually Chinese. Or heck, the food served at most Indian restaurants here showcasing paneer tikka masala, tandoori chicken, chicken tikka masala, and naan (highly highly overrated) on their menus, as if these dishes encompass the entirety of *all* Indian cuisine. So not correct!

Going back to Nachos- so apparently back in 1943, in Piedras Negras, Mexico, Ignacio "Nacho" Anaya, the headwaiter at the Victory Club, threw together this dish with some tortilla chips, cheese, and jalapeño poppers for a bunch of hungry army wives. He called it, Nachos Especiales. The hungry ladies were very thankful to Mr. Nacho, and started eating. The warm, crispy tortilla chips topped with ooey-gooey melted cheese, and spicy jalapeños totally made their day. They felt satiated at the end of the meal. When they asked him for the recipe, he was nice enough to give it to them. And then, you know how it goes- people talk, news travels, recipes travel too, and the nachos recipe somehow got into the hands of this one Frank Liberto in Texas. Mr. Liberto altered the recipe by coming up with cheese sauce, which in fact is supposedly not even cheese! Go figure! However, unlike good old Ignacio "Nacho" Anaya, who readily gave away the recipe to his innovation, this latter dude did not believe in divulging the recipe to the cheese sauce created by him. So that's a trade secret. He built a company, made money, and now his son runs the company. Meanwhile, when the original Mr. Nacho died in 1975, they built a bronze plaque in his memory, and declared October 21st as International Day of the Nacho. But then they call Mr. Liberto as "The Father of Nachos." I suppose they ought to call Mr. Nacho as the Grandfather of Nachos? Those hungry women who first tasted nachos, and spread the original recipe around- are they the Grandmothers of Nachos? Also, did someone build bronze plaques in their memory?    

Interesting read: History of Nachos. There's plenty more articles up there on the internet..... the only thing I haven't found is an image of that bronze plaque they made in memory of Ignacio Nacho. Guess that calls for a trip to Piedras Negras one of these days. I am truly curious to see if it actually exists. 


And now for my version: Spicy Chicken Nachos


Appi's Spicy Chicken Nachos


Ingredients: 

Note: Quantities will vary depending on the number of people you are cooking for, and/or how much you want (them) to eat! Gotta go the eyeball route...
*Your favorite tortilla chips

*Cooked chicken- taco style- i.e. with taco or fajita seasoning. I use onions and bell pepper when I cook chicken for tacos/fajitas

*Pepper jack cheese

*Sharp cheddar cheese

*Fresh jalapeños chopped your style (fine or discs or slit.... )

Method: 

1. In a lightly greased baking dish, layer all the ingredients, starting with the chips. On the chips goes the chicken. On the chicken goes some jalapeño. On that goes some grated cheese. You could layer that again with more chips, chicken, jalapeño, and cheese 

2. Bake the above in a 350 degree F oven for 10 minutes, or until the cheese melts 

3. Broil off for a couple minutes to brown the cheese 

4. Optional: Garnish with more jalapeño or some fresh pico de gallo or perhaps some guacamole or just plain chopped avocado. A dollop of sour cream will also go pretty well with these spicy nachos. 

5. Dig in, just like those hungry women did all those years ago when Ignacio "Nacho" Anaya served them that first ever plate of Nachos Especiales. Be sure to try this recipe, and spread the word. 

Maybe many years from now, somebody will build a bronze plaque in my memory too... and then some more years later, someone will write about me and call me the "Mother of Spicy Chicken Nachos!" Hey, I am allowed to fantasize a little bit!! Incidentally, the year this "Nacho" dude died, is the year I was born! Now that definitely adds to the intrigue! 


Friday, November 17, 2017

Daily Food Post #2: Chicken and Waffles

The other day I suddenly got this unexplainable craving for some chicken and waffles. I opened the freezer and found an old frozen waffle package. There were exactly two waffles in there, hidden somewhere behind the thick ice that had formed over who-knows-how-many-months. But hey, after chipping off that ice, I found the waffles to be in perfect condition. Definitely 'toastworthy' and edible, whispered the foodie from within me. Now what about the fried chicken? No problem! I am one hecka smart person. And so I picked up the car keys, wore those dorky running shoes that I use for walking, sat in the minivan, ignited the minivan (okay, I just wanted to use the term ignite like that) and headed straight to the nearest McDonald's. Picked up a four piece crispy chicken tenders, and rushed back home. I was excited!! 

Appi's Chicken and Waffles 

Here's how you satisfy that sudden out-of-the-blue craving for chicken and waffles: 

Ingredients: 

Frozen Waffles- 2 

Crispy chicken tenders from your nearest McDonald's- 4 piece 

Syrup of choice OR when they ask you what sauce you want at McD's, ask for honey! ;) 

Method: 

1. Toast the waffles 

2. Place a crispy chicken tender or two on each waffle

3. Drizzle some syrup, such as agave or maple or good old honey, all over the chicken and waffles

4. To fancy it up a bit, sprinkle some smoky chipotle pepper powder 

5. Eat, and enjoy! 

YUM! 


Monday, October 31, 2016

Rajasthani Teekhi Laal Murgh- Fiery Red Chicken Curry

Yay, it's officially Fall! Time for gorgeous orange pumpkins, warm hearty soups, stews, and spices, and heat- from hot chilies! Then again, there's never a dearth of spices, nor hot chilies in my kitchen. To complement these chilly evenings, a preparation of Rajasthani style Teekhi Laal Murgh is so very apt. Literal translation: Fiery Red Chicken (curry).

Note: There are no "exact quantities" to be used here. Eyeballing is the way to go.... and of course, taste as you go along.

Ingredients: 

Chicken- boneless, skinless thighs, cut into bite sized pieces

Yogurt- approx 1-2 tbs for a small tray of chicken

Red Chili powder- as much heat as you can handle! ;)

*If you have Kashmiri red chili powder or Karnataka byadegi red chili powder, even better. It imparts a wonderful deep attractive red color to the preparation, while not being overly hot

Ginger-garlic paste- 1 tbs

Lemon juice- 1 tbs

Onion- 1 medium sized, sliced

Fresh garlic- 2-3 smashed

Turmeric- 1 tsp

Salt to taste

Oil to cook- 7 tsp

Water- 1-2 cups (depending on how thin or thick you want the gravy to be)

Fragrant Spices: 

Cardamom- 3-4, smashed

Cloves- 4-5

Cinnamon powder- a pinch

Bay leaves- 4-5 (I like fresh bay leaves, dry is okay too)

Coriander seed powder- 2-3 tsp

Cumin seeds- 2 tsp

Method: 

1. Marinate chicken in yogurt, red chili powder, turmeric, ginger-garlic paste, and lemon juice for at least 30 minutes.

2. With some oil in a pot, get the heat going. Splutter cumin seeds, cardamom, cloves, add sliced onion, fresh bay leaves, cinnamon powder, and fry for about 5 minutes. Then throw in the marinated chicken pieces. Brown the chicken on both sides. Then add salt, water, and some extra red chili powder. If there's leftover marinade, add that in as well. Bring to boil, cover, simmer for 20 minutes.

3. The chicken will have cooked. Uncover pot. The oil will be floating on top, and yes, that's a good sign. ;) Add coriander seed powder, give it a stir and throw in some smashed fresh garlic. Cover again  for 5 minutes, to get coriander and garlic flavor infused in the curry. Serve with rotis or just plain white rice with a side salad. Slurp away and enjoy!


Teekhi Laal Murgh with Roti

Monday, June 6, 2016

Dukkah- Egyptian Spice Mix

Last week we went to this restaurant called Cichetti and although it was quite a rip-off, the Egyptian fried egg and the lamb keftas were extremely delicious. It was quite a rip-off however. Oh wait, I said that already. 

The Egyptian fried egg was basically a soft boiled egg, coated with a beautiful nutty, spicy mixture, placed on a bed of tender asparagus, drizzled with olive oil. It was aromatic, delicious, addictive, and was gone in less than thirty seconds. It was that outer spice coating that took the dish to a whole new level. 

Upon googling I learned that it is called Duqqa or Dukkah, not to be confused with dukkha i.e. suffering (hey, just clarifying!). The Egyptian spice mix Dukkah is made with toasted nuts, seeds, and herbs. They usually use hazelnuts, but pistachios, almonds, and pine nuts can be used too.

Recipe for Dukkah aka Duqqa, Egyptian Spice Mix:   

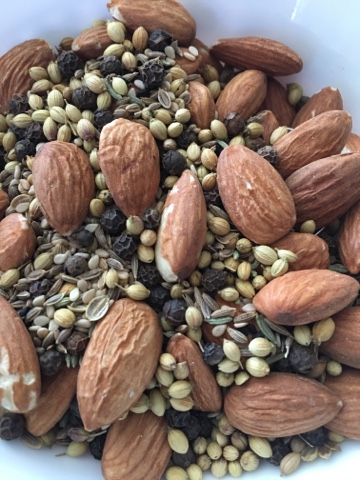
This is my version, and it tastes pretty darn good. Feel free to experiment. The ingredients that you absolutely need are nuts (hazelnuts or almonds or pistachios), coriander seeds, cumin seeds, sesame seeds, and black peppercorn.

Ingredients: 

Almonds- 2 tbs

Coriander Seeds- 2 tbs

Cumin Seeds- 2 tbs

Sesame Seeds- 2 tbs

Fennel Seeds- 2 tbs

Nigella Seeds- 2 tbs

Caraway Seeds- 2 tbs

Black Peppercorn- 2 tsp (increase or decrease qty to taste)

Green Cardamom- 2 pods

Dried Oregano*- 1 tsp 

*A tsp of Italian seasoning will work just fine

Salt to taste

Optional: Red pepper flakes


Dukkah Spice Mix with almonds


Method: 

1. Toast all the ingredients, starting with the nuts. Cool.

2. In a spice grinder (coffee grinder works fine too), give it all a quick pulse, about a couple times. Need not be very fine. 

That's it! 


Dukkah Spice Mix


Ways to incorporate Dukkah in your cooking: 

*Mix with some olive oil and use as dip or spread on toast. 

*Coat boiled eggs with the mixture and make your own Egyptian fried eggs at home. 

*Sprinkle on pasta, baked potatoes and other veggies. 

*Use as a dry rub on meats and grill. Yum! Goes well with seafood too. 

*Use in curries. That's what I did this weekend. I made chicken curry, and instead of using garam masala, I used Dukkah. The result was extremely aromatic, flavorful, and simply delicious.


Dukkah Chicken Curry

Corny Joke Alert:

Try Dukkah in your cooking today. It is guaranteed to reduce some of your dukkha!

Yeah, yeah, I know that was pathetic........


Thursday, June 25, 2015

Chicken Pickle

Flashback:

When I was a little girl, I used to often visit my parents' friends, The Reddys. 

Quick Interruption: In India, we address our elders, related or otherwise, Aunty and Uncle. That's how we show our respect towards them. 

Continuing on: I enjoyed going to their place. One, because I was very fond of Uncle and Aunty. And two, because I was crazy about this one "thing" that used to sit very elegantly on their dining table- a pretty little container placed very neatly at the center. No, it wasn't the container itself that I was in love with, but with what was inside it- the deepest, most attractive red colored, delicious smelling, tongue-tingling, lip-smacking pickle! Not just any pickle- but an extraordinary mutton keema pickle! As I write this, I am salivating merely thinking about it! That look, that taste I will never forget. And I have never ever eaten another mutton keema pickle like that ever again..... never ever.... EVER! 

Here's my take on the recipe. It is quick, easy, and turns out real delicious. This one's for Chicken Pickle. You can follow the same recipe for minced mutton (keema) or lamb, and even fish and shrimp (fish and shrimp will cook faster of course). Doesn't require marinating, so you can make it even on a busy weeknight. 

Ingredients: 

1. Boneless Skinless Chicken Thighs- 4

2. Cooking Oil- 10 teaspoons *No skimping on this please!*

3. Cumin Seeds- 1 tsp

4. Fennel Seeds- 1 tsp

5. Mustard Seeds- 1/2 tsp

6. Garlic- 6 cloves, smashed OR 1/2-1 tsp powder

7. Ginger paste- 1/2-1 tsp

8. Lemon juice- 1 good size, freshly squeezed 

9. Salt to taste

The Pickle Dry Mix: 

1. Red Chili Powder- 2-4 tsp (adjust according to liking)

2. Fenugreek Seed Powder- 1-2 tsp 

3. Mustard Seed Powder- 1-1.5 tsp

4. Sesame Seeds (or powder)- 2-4 tsp 

5. Turmeric powder- 1-2 pinches

6. Cardamom- 2-4 crushed

7. Asafoetida- 1/2 tsp 

*I also like to add 3-4 finely chopped thai green chilies for extra kick

Method: 

1. Cut chicken into bite sized pieces. 

2. Pour oil into the pan. Get the heat going. Splutter mustard, cumin, fennel seeds, followed by a pinch or two of turmeric powder and gently add the cut chicken to this. 

3. After allowing the chicken pieces to hang in there for a minute or so, start stirring and frying the chicken. Add smashed garlic or garlic powder and ginger paste. Stir. Then add salt to taste. Continue frying for around 15 minutes to cook the chicken completely. 

4. Now add the pickle dry mix and continue stirring and frying, so as to coat all the chicken pieces with the beautiful spices, for another 15 minutes. 

5. Give it a taste. Adjust salt etc if need be. That's it! 

Note: Some people like the chicken to be more on the dry side- if you like it dry, continue frying for another 10 minutes.  

6. After a minute of cooling, squeeze a fresh lemon and give it all a quick stir. Chicken Pickle is ready to be enjoyed! It is hot and spicy, with a hint of citrus. Delicious! 


Spicy Hot Chicken Pickle

Serve with chapatis or parathas. Goes well alongside some plain dal-chawal (lentils and rice) and salad. Mm mm! You can refrigerate leftovers for up to 3 days, and it will taste just fine. 

Can I guarantee that this will taste like Reddy Aunty's pickle? Absolutely not! I guarantee that it will taste pretty dang good, though! :) 


Friday, March 6, 2015

Paneer Tikka, Tandoori Chicken- in the panini maker

The Alton Brown effect still lingers over me from two weekends ago. He mentioned his panini maker that he in fact has never used to make panini! He uses it to cook cornish game hen, and other meats, and veggies. Taking cue, I attempted to make paneer tikka (dry) the other day, and got the husband to cook some tandoori chicken- all in the panini maker, that was gifted to us by the bro and his wife last year. And it turned out pretty darn good!

Ingredients:

1) The Marinade (adjust qty according to amount of paneer and chicken, and your personal taste of course). The following is for a pack of 400 g (14 oz) paneer slab, and 4 boneless skinless chicken thighs: 

1. Yogurt- 1 cup 

2. Garlic- 8-10 cloves smashed (or garlic powder- 1 tsp)

3. Ginger- an inch, grated

4. Turmeric- 1/2 tsp

5. Garam Masala powder- 1/2 tsp to 4 tsp (per spice level)

6. Red Chili powder- 1/2 tsp- 4 tsp (per heat level)

7. Lemon juice- 1 tbs 

8. Oil- a couple good drizzles

9. Salt- per taste

2) Paneer cut into cubes

3) Chicken- boneless skinless thighs and/or breasts


Don't forget: 

A Panini Maker! Cranked up all the way to max heat setting. 


Crank it up all the way to max


All heated up


Method:

1. Whisk the yogurt and other ingredients altogether in a mixing bowl. Give it a quick taste and adjust accordingly, if need be. 

2. Marinate the paneer cubes and the chicken in separate bowls (you don't want to mix raw poultry with paneer or veggies) for at least 2 hours. 

Note: When marinating the chicken, make sure you give it a lot of love, by thoroughly massaging with the yogurt and spices so as to get all the flavors going.  

3. After marination is done, and the panini maker is all heated up, cook as you would a panini. 

In this case, our panini maker took 5 minutes for the paneer, and 12 minutes for the chicken. 

The paneer is easy- you'll know that it is done when it looks like this. 


Paneer Tikka in the making

Paneer Tikka- mm mm! 


Cooking the chicken in the panini maker could get a bit messy, but it is super easy to clean up later. So it is worth it. You do want to make sure that the internal temperature of the chicken is between 165-175 degrees F before you consider it done. A little cooking thermometer will work fine. If you don't have one, just cut a bit off from a corner, and check for doneness. 


Internal temperature 165-175 degrees F

Tandoori Chicken mm mm! 


Result: 

1. Paneer Tikka and Tandoori Chicken, with a side of lovely green salad dressed with a simple vinaigrette, turned out pretty darn tasty!

2. The clean up later was easy-peasy.

3. Only flip-side- because we could fit barely two chicken thighs at once, the time spent in cooking the chicken ended up being longer. If you are pressed for time, I'd say broiling in the oven is a better option, as you can stick all the chicken in, and be done in one shot. OR own a large panini maker!

Conclusion:

The panini maker (or panini press) is certainly a versatile kitchen equipment. I think every kitchen must have one decent panini maker. Or two!

My opinion about charred meat:

*I personally don't worry too much about the health risks of eating charred meat because for starters, I don't eat charred meat on a regular basis.

*If it is of concern to you, just remove the charred parts, and eat the rest!

*Car exhaust fumes and cigarette smoke contain Polycyclic Aromatic Hydrocarbons (PAHs).....!!

Tuesday, September 13, 2011

Puli Chicken Curry- Not for the Faint at Heart!

The weekend before last, we had been, yet again, to my brother's place. They took us to this event called Pig Out at the Park. You know, a food fair of sorts with a good number of food stalls and as the name suggests- you basically pig out! One of the stalls there had this thing called "Huli-Huli Chicken." No, I did not eat it and I sure am glad I didn't because I later found out that Huli-Huli sauce is this Hawaiian sauce made with brown sugar and ginger- sort of like a mix of teriyaki and barbeque sauce, both of which I am not fond of. Hey, gimme some heat and spice, not brown sugar!

So a few days ago, I made this amazing chicken curry and I called it "Puli Chicken Curry," taking cue from that Huli-Huli chicken. "Puli" in Telugu means tiger. Ferocious, strong and majestic--- a tiger, sure, but so was my chicken curry! I used habanero in the curry base and it was quite ferocious, in a good way, of course.

Ingredients:

1. P.S.: Pretty much the same onion+ginger+garlic+tomato base that I use for North-Indian curries, but with a couple extra additions- namely cilantro and habanero.

I would have added one entire habanero to this, but I cut that to just 1/2 a habanero because of the kids. So, you can see the ingredients in the picture below:

The "Puli" masala base
That orange habanero in the right corner looks small- but believe me, it was HOT! And like I said earlier, I would have liked to use one entire habanero, but then it would have been torture for my poor kids. And I do love my kids, you know!

2. Some boneless skinless chicken thighs (I usually buy it at Costco), roughly cut up into bite sized pieces and marinated in lemon juice, salt, turmeric powder and just a pinch of red chilli powder.

Chicken marinating
I put the chicken away in the fridge and let it all hang out to get the flavors going.

Method:

1. I took the masala/curry ingredients and put them in my nifty food processor and made a nice chutney as you can see below:

Chutney with Habanero!
2. Once that was done, I took my very faithful pot and put in some oil, got the heat going and then spluttered some cumin seeds and a couple cardamom pods. Into this I added the marinated chicken and cooked it for 10 minutes.

3. I then folded in that awesome habanero-cilantro chutney into this chicken. Mixed it so as to coat all the chicken pieces with the beautiful chutney. Added some salt and brought it to a boil and then covered the pot and simmered for 20 minutes.

4. When the timer went off, my Puli Chicken curry was ready- ROAR! Yes, that was very cheesy indeed, but I had to say that- just to emphasize on the fact that the habanero totally kicked this dish up by quite a few good notches!

Puli Chicken Curry
I served this ferocious chicken curry with plain basmati. Oh, that heat from the habanero and the fragrant cilantro with the lemony undertone (remember, I marinated the chicken in lemon juice) was simply outstanding. Ferociously delicious!

I am glad I passed that Huli-Huli chicken stall at Pig Out at the Park that day. That's how my chicken curry with habanero got its name! :)


Saturday, July 23, 2011

Minchi from Macau--- or not!

The new season of Anthony Bourdain's "No Reservations" on Travel Channel has begun and yes, I have set my DVR to record every new episode. I watched his show on Macau and I am probably not the only one saying this, but it was such an eye-opener. Well, for starters, call me ignorant, but whenever I thought of China, I always thought of Hong Kong! Never knew that gambling in Macau is big, I mean, BIG! Las Vegas is nothing compared to Macau! Portuguese happens to be one of their two official languages, Cantonese being the other. It was the last Portuguese colony in China that lasted from the 16th century to 1999! Wow, quite a history there! (And enough with the exclamation marks, I suppose!)

Macanese cuisine is a wonderful blend of Portuguese, Chinese, African and even Indian (yes!) flavors. In fact, one of the people who Bourdain was talking to on the show clearly said that Macanese cuisine is "fusion cuisine." And I am all for fusion cuisine. If different flavors marry each other and create something even more delicious, hey, it is definitely worth it, don't you think?

And so, on that show, I saw this lady prepare a dish called "Minchi" with ground pork and wood ear mushrooms. She said that they use ground beef too. The preparation looked pretty darn good on TV and I of course was already coming up with a plan. I was going to use chicken instead of pork or beef and I was going to try and cook that Minchi from Macau in my kitchen!

Ingredients:

1. Ground Chicken (I used 4 boneless skinless breasts and ground them myself in the food processor)
2. 2 green onions, 3 cloves of garlic, a tiny piece of ginger
3. A handful of wood ear mushrooms
4. 4-5 tablespoons of soy sauce
5. 3 dry red chillies and a pinch of red crushed pepper (you can adjust this per your heat level)
6. 1-2 tablespoons of oil
7. 1-2 cups of water (depending on how wet you want)

My twist on the dish:

1. Peas- a couple handfuls (or say, 1/2 cup)
2. Tomato ketchup- 1/4 cup (this added a lovely tang)

This was the first ever time that I used wood ear mushrooms. When I touched one of the mushrooms, it felt almost like jello--- not at all gross like I expected--- was pretty cool actually.

Wood ear mushrooms, green onions, garlic, ginger

Method: 

1. I took my lovely pot and poured in a couple tablespoons of oil, got the heat going and then added the chopped green onion, garlic, ginger, some red crushed pepper and 3 dry red chillies. Sauteed it all a bit and then added the ground chicken.

2. Cooked the chicken for about 10 minutes, also adding a bit of salt in between to season the chicken. After 10 minutes of cooking, added 4-5 tablespoons of soy sauce, stirred everything.The chicken looked a bit dry and so I added around 1-2 cups of water (broth would work even better). Gave it a quick taste.

3. Upon tasting, I felt it needed something more. Something tangy. Tomato Ketchup! Added a quarter cup of that and it actually worked! Covered the pot and let it simmer for 10 more minutes. Everything smelled real good!

4. Once the timer went off, I took off the lid, tasted it and had my daughter taste it too and we both loved it. And then my brilliant mind whispered to me, "Color!" So I grabbed the frozen peas packet from my freezer and scooped out a couple handfuls and threw it into the almost-ready "minchi." I covered the pot once again and switched off the stove.

I served it with some plain, steamed rice. And it was simply delicious! I had to add some extra hot sauce for myself because really, it needed that kick.

Delicious Minchi!
To my pleasant surprise, my son, the one who hates mushrooms, did not complain even once about those wood ear mushrooms. He just gobbled everything up and quite appreciated it too!

Not sure what a true Macanese chef would say about my take on minchi--- heck, it might not even be close to the real Minchi from Macau--- but I give myself points for my attempt. Besides, the end result was delicious and that is what counts, right?

Tuesday, February 15, 2011

Just-Over-30 minutes-Trio!

I am super-proud of myself for creating a super-healthy, super-delicious and super-pleasing-to-the-senses meal last night with not one, not two, but three wholesome dishes! And everything in just over 30 minutes! Enough with the "super," I suppose and no, I am not trying to imitate Rachel Ray; though I must point out that she says, "under" 30 minutes.......!

Dish 1: My Mint-Cilantro Pesto Pilaf: 

1. Took a handful of almonds, some fresh cilantro, a nice bunch of fresh mint leaves, half a jalapeno, a couple cloves of garlic, lemon juice and salt in my nifty food processor. Within a few pulses, my beautiful mint-cilantro pesto was ready. I tasted it and boy-oh-boy, it awakened my senses like crazy. I almost thought of using it as a dip.......and that minty-lemony-cilantroey (just invented that word!) aroma was simply amazing.

2. I wish I had brown rice or wild rice. But well, I just used regular white rice. Washed a couple cups of rice in my rice cooker and then poured in that mint-cilantro pesto onto the washed rice. Added a couple splashes of olive oil followed by 3.5 cups of water. Now usually the water to rice ratio I use is 2:1, however, in this case, I had all that pesto as well- hence I used half a cup less water. Stirred it up and tasted it once more before switching on the rice cooker to do its thing.

Look at that gorgeous mint-cilantro pesto!

Dish 2: Root-Medley: 

1. Took a sweet potato that I had lying in my pantry for over a month now. Luckily it was absolutely fine. Roughly peeled and chopped it up into bite sized pieces. Chopped up a couple carrots, a couple broiler onions. Threw in a couple cloves of garlic. Sprinkled some salt, freshly ground pepper, italian seasoning and drizzled some olive oil. I had some mushrooms that were going err, bad--- picked out the ones that looked OK- a grand total of 2 and threw that in as well. I placed all this on a baking sheet.


Root-medley (with some mushrooms) ready to get roasted

2. Put it into the oven at 425 degrees F for 30 minutes.

Towards the end, I baked some broccoli florets for 10 minutes and added it to the root-medley for color and as you know, broccoli is good for you!

Roasted Root+Broccoli-Medley

Dish 3: Herbed Chicken: 

1. Took a couple boneless, skinless chicken breasts. Cut them into bite sized pieces and put them in a baking dish. Added salt, pepper, italian seasoning, lemon juice. Also stuck a few cloves of garlic in between, here and there. Drizzled some olive oil and mixed it all up. Covered it with foil.

2. Put this into the oven at 425 degrees F for 30 minutes.

Tender and moist herbed chicken

Note: The great thing about this meal was that I could cook both the chicken as well as the veggies in one go at one temperature. Plus my pesto pilaf was getting ready simultaneously in my rice cooker! 


The kitchen was alive with some tantalizing aromas. We couldn't wait to eat dinner. The pilaf was just right with the mint and cilantro flavors going on. The roasted veggies were cooked to perfection and the chicken was amazingly tender and moist, which was quite a pleasant surprise because boneless, skinless chicken breast usually ends up being a bit dry. The juices that were released in the process worked like a sauce that we just spooned over the rice for extra flavor--- delicious!

The highlight of the evening was this comment from my son, "This dinner is phenomenal, Mommy!"


Herbed Chicken on a bed of Mint-Cilantro Pesto Pilaf with roasted root-medley on the side


Monday, October 18, 2010

Not your ordinary Chicken & Mushroom!

The other day, I picked up this nice package of Hummus from Costco. Nice because it has several snack sized cups.......pretty convenient, I think. Well, the primary purpose was of course to have the kids take it as part of their school snacks and lunches (that is what most of us go to Costco for, right?). But then the plan sort of backfired on me and well, I was left with these 16 2 oz unopened cups of hummus lying in the fridge. Well, sadly for the kids, their plan of not eating the hummus backfired on them! HAHA! (Note the evil laugh!)

I made some really delicious chicken and mushroom dish and what do you think I incorporated to get that beautiful consistency as well as the flavor? One guess!

I took: 

Boneless skinless chicken breast, mushrooms (the regular white button kind), some cherry tomatoes, a couple cloves of garlic, some salt, black pepper, red crushed pepper, tad bit of water and the "secret" ingredient- hummus!

The cooking:

OK, I'm telling ya, the cooking involves pretty much nothing. Literally the easiest thing to whip up, ever!
  1. I cut up the chicken into bite sized pieces, minced up the garlic and threw the two together into some heated oil in a pot. Stirred it all to brown up the chicken and basically cook it. Salted it and also added some black pepper as well as some red crushed pepper flakes.
  2. Then I threw in the mushrooms that I had cut into halves and sauteed them together with the cooked chicken. I then added some beautiful red cherry tomatoes for color. The mushrooms and tomatoes had released some water, but to increase the quantity, I added some more water.
  3. And finally I stirred in some of that awesome hummus into the chicken and mushroom. It not only added an extra flavor profile to the whole dish, but also gave it an excellent consistency. I let it simmer for a few more minutes and then tasted it and was bowled over! It was so delicious!!!! I knew for sure that the kids and the husband would love it too. 
Not your ordinary chicken and mushroom! 

Was I right?

Of course! The family loved it like crazy! I served it with brown rice. And it was superbly yummy!

Was the secret revealed?

OK, I admit- normally, I would have just shut up. But well, I wanted to tell the kids that hummus is in fact pretty yummy and therefore the "secret" had to be revealed.

The Kids' Reaction?

Oh we knew it, Mom!

Me: 

YEAH RIGHT!

So is the hummus over?

Err, no. Not to worry, though. I am sure it will get incorporated into yet another brilliantly delicious preparation, thanks to yours sincerely!


Wednesday, September 15, 2010

My Rockin' Chicken with Couscous

I have never been to Morocco and neither have I been to a Moroccan restaurant. I don't have any Moroccan friends..........so yeah, basically I have never eaten Moroccan food. I have however watched a few shows on Travel channel and other foodie channels and have a general idea about Moroccan food. So yesterday I thought hey, why not attempt some Moroccan food? And that is how last evening's menu was set- couscous with my version of Moroccan chicken- My Rockin' Chicken!! Get it?!

The Spice Rub:

Cumin seeds, cinnamon, cloves, turmeric powder, red crushed pepper.

I took the cumin, cinnamon and cloves in a m-wave safe bowl and m-waved it for about 40 seconds to gently roast. Then I added the red crushed pepper and turmeric and powdered it all in my nifty little coffee grinder.

 The Spice Rub

The Chicken:

I bought a little tray of 4 chicken thighs, bone in, skin on. Took off the skin and then rubbed that lovely spice rub all over. Gotta make sure you massage the chicken with that spice rub to get all the goodness into the meat. I also added a splash of lemon juice and sprinkled some salt. Gave it one more quick massage and covered and put it away in the refrigerator. As the rule goes, 30 minutes is a good amount of time for marination--- but more the better. I did this in the afternoon so it was way more than 30 minutes........

Chicken with the spice rub sitting in the fridge

And then My Rockin' Chicken:

Soon it was evening and time to cook dinner. My everyday cooking pot was going to be that special clay pot with the conical lid that is used in Moroccan cooking. Hey gotta make-do with what you have!

I took some oil in the pot and heated it and then put in the 4 thighs packed with the spice rub one by one into the hot oil. Allowed that bottom side to get browned up and then flipped the pieces over to brown up the other side. Looked very yummy!
Well browned and browning up the other side too

While the other side was browning up, I roughly chopped up some garlic, onion, carrots and potatoes. I wish I had some kind of squash- that would have been a good addition too.

Special Stuff: And then I threw in a handful of dried apricots and some blanched almonds. Ooooh yeah!

Added a tablespoon of tomato paste (whole tomatoes would work just fine), some extra water and salt. Put the lid on the pot and allowed everything to simmer for 25 minutes. My Rockin' Chicken was on its way to getting ready!

The Couscous:

While the chicken and veggies were simmering away, I prepared the couscous. This took literally less that 5 minutes! Boiled some water. Added some salt and a dash of olive oil and then poured this hot water into the couscous. Covered it up. That's it! All that I needed to do was to fluff it up and serve.

Finally:

Served my version of Moroccan chicken on a bed of couscous and garnished with cilantro. The chicken was perfectly cooked, tender and delicious with that cumin-cinnamon goodness. The apricots added a lovely sweetness to the whole concoction. Not overwhelmingly sweet, mind you! And the huge chunks of veggies were delicious. The almonds added a nice almost-crunchy texture. It was simply outstanding.

My Rockin' Chicken on a bed of Couscous


I know what I am going to cook for my next party! And I bet it'll be much appreciated!

Friday, May 14, 2010

Jiffy Indo-Chinese

I miss the wonderful Indo-Chinese delicacies that we get back in India. Every time I visit, I gorge on gobi (cauliflower) manchurian, baby corn manchurian, paneer (Indian cottage cheese) manchurian, veggie ball manchurian, chicken manchurian and oh, mushroom manchurian. Hope I have not forgotten any other kind of manchurian that might exist. Whoever first came up with this dish is a genius for sure!

There is one Indo-Chinese restaurant around here, but no way comparable to the real thing you get back in India. So well, since necessity is the mother of all invention, I started cooking different kinds of manchurian myself at home. Started with the most popular one, Gobi (cauliflower), followed by baby corn, mushroom and then graduated to chicken manchurian too.

Now I used to follow this very tedious method of first marinating the chicken, then making a corn flour batter, dipping each chicken piece into the batter and then frying it all. Then make a sauce out of onions, garlic, ginger & tomato paste. Finally pouring the sauce over the fried chicken. I would literally stand in the kitchen for at least 2 solid hours. Then one fine day, my friend P happened to give me a recipe for her chilli chicken. I followed the recipe and then suddenly I got this brilliant idea of adding this "miracle ingredient" towards the end of the cooking process and I was thrilled with the final result! It was chicken manchurian alright! Without all that tediousness.

So here is how I make chicken manchurian--- you could call it chilli chicken too:
I just buy the organic boneless skinless chicken thighs from Costco. So convenient. I cut the chicken into 1 inch cubes. Marinate in soy sauce and vinegar (1 cup soy sauce+1/2 cup vinegar is the ratio I use), crushed garlic, tad bit of salt (soy sauce is pretty salty already), red chilli powder (paprika) and that's it. Refrigerate for a minimum of 2 hours. If I am going to be cooking this for a party, I just do this the previous night and that way the marination happens for a good 24 hours and the chicken ends up tasting oh-so-awesome!

Chicken marinating in soy sauce, vinegar, garlic, paprika & salt

While the chicken is marinating, I slice some onion, crush a couple extra cloves of garlic and slit some thai chillies (gotta have that kick!). Then I saute` this for a couple minutes and then throw in the marinated chicken pieces. I try not to put in the marinade along with the chicken because then it just poaches the chicken and then there is, well, no fun to the dish! Of course, some amount of marinade does sneak in somehow--- so I just keep stirring the entire contents till it sort of evaporates. This takes about 20-25 minutes. (I tell myself to be patient--- you know me, I want my cooking to be done in no time........)

Then, when there is still a little bit of sauce left in the pot/pan (I make sure the chicken is cooked at that point), I add that "miracle ingredient" I mentioned earlier. Cornflour!! I add a couple to 3 tablespoons of cornflour and immediately start combining it with the chicken. The flour coats the chicken pieces and seals in the yummy flavor and as you keep stirring it, the outside part becomes nice and brown and at that point, it starts sticking to the bottom of the pot/pan. Not to worry. That just improves the flavor. Then finally in about 35-40 minutes (from the start), it is done. Sometimes I add some freshly ground black pepper in the end. It is delicious!

Still waiting for the evaporation to happen!

Chicken Manchurian/Chilli Chicken garnished with some green onion. Cilantro would be good too.

My family loves my chicken manchurian. We usually eat this with a simple veggie fried rice.

I use this same method for baby corn manchurian too. Works real well!

We don't miss Indo-Chinese food that much anymore. I mean, why miss it when I can cook it; in a jiffy, that too!

Tuesday, May 4, 2010

Shortcuts work!

Tuesdays and Thursdays are super busy for me. I chauffeur the kids to and from their Taekwondo class and by the time we get back home, it is time for dinner. I usually try to keep it simple and quick. Actually pretty much all my cooking is under 30 minutes (if you have been following my blog). Hey! I sound like Rachael Ray! ;)

I do use a lot of shortcut in my cooking...........I mean, I don't have the time and patience (mostly the latter) to spend hours together in the kitchen! Following my shortcut policy, I decided to grab a Rotisserie chicken from Fred Meyer, since anyway I was driving to that area for my kids' class. Also grabbed a bag of salad, one of those mixed greens kind.

I picked up a lemon pepper rotisserie chicken today. The only problem with rotisserie chicken is that the outside part no doubt is yummy because that is where all the seasoning is, but the inside part is pretty bland, especially for our taste buds that are more accustomed to spicy food. But hey, once in a while it is OK to skip the spice, right?

Mmm, look at all that yummy pepper!

Next I jazzed up the salad by adding some tomato, almonds, "pixie" orange, salt, pepper and lemon juice. I added some pure OJ in the end and it was one heck of a salad! Fresh and crisp lettuce, radicchio and carrots all mixed up with crunchy almonds and tangy tomatoes with a note of sweet citrus--- YUM!

I found this "pixie" orange at Uwajimaya the other day. It tastes like any other orange and more resembles a tangerine. I have no idea why they call it a pixie orange. The skin is sort of wrinkly compared to a regular tangerine/orange--- maybe that's why they named it a pixie orange..........?  Must ask Alton Brown. I bet he has a good explanation!

Salad from a packet- all jazzed up!

I made some excellent brown rice to go with the chicken and the salad. Took 2.5 cups of brown rice, washed it a couple times and added 5 cups of water to it including a cube of veggie stock and a tablespoon of soy sauce. This was just to add some flavor to the rice. Pressure cooked for 20 minutes. Turned out perfect!

 Meal created using a couple shortcuts!

Now we did find it all a bit too bland, but that's why we have that special habanero sauce in our refrigerator!