Showing posts with label South Indian. Show all posts

Wednesday, January 10, 2018

Food Post #209: Green Mango Cilantro Coconut Green Chile Chutney

This is one vibrant green chutney, hot and spicy and tangy and deeeeelish! Goes very well with idlis, dosas, rotis, bread, etc. Bonus- you can whip it up in under 20 minutes!


Idli Chutney 


Ingredients: 

Green Mango 1, chopped into size good enough for your blender

Cilantro, fresh 1 bunch

Green Chilies (I prefer Thai) 4-6
*Adjust according to desired level of heat

Coconut, fresh grated 1/2 cup

Salt to taste

Jaggery 1/2 tsp

Oil 1 tbs

Mustard seeds 1/2 tsp

Cumin 1/2 tsp

Asafetida a pinch

Method: 

This is basically a 2-step process:

1. Blend green mango, cilantro, green chilies, coconut, jaggery, and salt into a chutney in your nifty blender.

2. Heat a tablespoon of oil, add a pinch of asafetida, followed by tempering some mustard and cumin seeds. Pour this onto the chutney.

Done! Mix and serve with hot spongy idlis, or crispy dosas, or make a sandwich. YUM!

Note: If you find that the green mango is not tangy enough, just squeeze some lemon juice. The chutney should taste tangy, hot, and spicy, with a very slight hint of sweetness.


Monday, August 14, 2017

Bitter Gourd Gojju Feedback

I am pleased to inform you that the gojju recipe that I posted a couple days ago has been tried and tested with positive results. Yash, from Wisconsin followed the recipe and said that it was delicious! She even sent me a picture! It looked exactly like the picture I posted. She changed it up a bit in a couple places: instead of using bitter gourd (she is not a fan of this unfortunate bitter beauty like I am!), she used eggplant and bell pepper. Nice! And she reduced the quantity of the red chilies by half. Okay, yeah, I completely understand that not everybody likes their food screaming hot and spicy. ;)

Thanks, Yash! Glad you and your family liked the gojju!

Yash's Eggplant Bell Pepper Gojju

Just to show you how similar the above picture is to the picture I took:

Bitter gourd Gojju

Saturday, August 12, 2017

Kakarakaya Gojju- Hot, Sweet, Tangy Bitter Gourd

If you are thinking- what on earth is kakarakaya gojju, here, allow me to explain:

Kakarakaya is the Telugu name for bitter gourd, aka bitter melon, whilst Gojju is a Kannada word that means, and this is my interpretation- a mishmash of vegetables such as onions, tomatoes, okra, aubergine/eggplant, capsicum/bell pepper, etc, and of course, bitter melon. Fruits such as pineapples, apples, grapefruit, raisins, etc can also used to make gojju.  The final flavor profile is hot, sweet, and tangy. So I suppose one could call it ketchup or jam of sorts, or achaar or a chunky pickle or a chunky salsa. The optimum way of enjoying gojju is by mixing it up with some cooked rice, and adding a spoonful of ghee to it. YUM!

Bitter gourd is called karela in Hindi, and haagalkaai in Kannada. According to yours truly, only the elite foodies like this bitter beauty. For reasons unknown to me, most people cringe at the mere mention of bitter gourd. 

Now that the meanings are out of the way, here's a recipe for kakarakaya gojju that I learned from my sweetie's grandma. It's easy, and tastes delicious.


Ingredients: 
Yield: Enough for 2 karela-lovers

1. Sesame seeds- 4 tbs
2. Cumin seeds- 1 tbs
3. Urad dal- 1 tbs
4. Red chilis- minimum 7 (If you don't  have red chilis, can use red chili powder- 4-5 tsp)
5. Black pepper powder- 1-2 tsp
6. Mustard seeds- 1-2 tsp

7. Bitter gourd from the Indian store- 4
8. Oil- 7-10 tsp (skip skimping!)
9. Turmeric powder- 1 tsp
10. Asafetida (hing)- 1/2 tsp
11. Salt to taste

Quantities of the following two ingredients depend more on your preference for sweet and tang, so adjust accordingly:

12. Jaggery powder- 4 tbs
13. Tamarind pulp- 4 tbs

14. Water- 1/4-1/2 cup, to adjust consistency of gojju according to your preference

Method: 

The gojju masala:

1. Dry roast ingredients 1 through 6 until the mixture turns fragrant, and the sesame seeds begin to "dance" in the pan (and may start jumping out of the pan too!), and the urad dal turns brown.

*If using red chilis, add them towards the end, else they will burn. If using red chili powder- it can be added directly to the bitter gourd.

2. Transfer to a food processor or a coffee grinder and pulse into a fine powder. Set aside.

The bitter gourd:

Note: I have become a hardcore bitter gourd fan, and so now I merely wash it, chop it, cook it, and eat it. I don't do the whole pre-prepping by soaking in turmeric and salt, and then squeezing the bitterness out. I mean, instead I might as well suck on a honey stick!

1. In a pan, add 7-10 tsp of oil, heat, add a pinch of asafetida (hing), splutter 1/2 tsp of mustard seeds, and then throw in chopped bitter gourd, as well as a pinch of turmeric, followed by salt to taste. Stir fry for 5 minutes on high flame, and then sprinkle some water, lower flame between medium and low, cover, and cook for another 10 minutes, until the bitter gourd is tender, and yet retains some crunch.

2. Uncover. Add gojju masala to the above and stir. Add some water to thin it out a bit. Now add tamarind pulp and jaggery. Stir. The sesame seeds act as thickening agent, so go ahead and add quarter to a half cup of water. Taste. Add salt and chili powder if required. Taste. Cover again and simmer for 5-7 minutes. Switch off.

Enjoy with hot rotis or rice.

Check out these other bitter gourd recipes that I posted a while ago:

Jalapeno and Bitter Melon

Stuffed Bitter Gourd

Karela Stir Fry


Tuesday, July 29, 2014

Quinoa Dosa

Yessss, I did it, finally! I managed to successfully make quinoa dosas! They turned out real good!!

Ingredients: 

1. Quinoa- 3 measures

2. Split urad dal (white gram)- 1 measure

3. Fenugreek seeds- 1-2 tsp (good for tummy)

4. Chana Dal- 1-2 tbs (I assume for color...?)

5. Water to soak, and then water to grind

6. Oil

7. Salt per taste (to be added in batter) (Optional)

Method: 

The procedure is exactly the same as you would follow for regular dosa batter. See Dosa 1 and Dosa 2.

1. Soaking: Add ingredients 1-4 in a container, and rinse with cold water 2-3 times. Then add water so as to cover it all, and set aside for minimum 2 hours.

2. Grinding: After 2 hours, the above mixture is ready to be ground/blended into a nice batter. Blend/grind everything into a pancake sort of consistency. I noticed that grinding quinoa+dal is way faster than the traditional rice+dal. So that's good! ;) I add salt per taste while grinding. You can skip salt, if you are watching your salt intake......

3. Fermenting: After the batter is ready, I like to stir it all up well with a ladle. The idea is to well-aerate it, in order to aid fermentation, and the dosa will turn out better. So if you live in a nice hot sunny place, you will have lovely fermented batter, all ready to go in under 6 hours. But if you live in Seattle or Alaska (yay!), better to resort to the good old oven. I just keep the container with the batter in my oven, with the light on for warmth, overnight. Next morning my batter is good to go!

P.S.: I noticed that quinoa dosa batter actually fermented a bit faster as compared to the traditional dosa batter. Either that, or well, guess it is summer here after all! ;)

4. Make the dosas! Get your pan going on the stove, spread out the dosa batter with the help of a ladle. Add a few drops of oil to the circumference of the dosas, and in about 2-3 minutes, you'll have yummy quinoa dosa ready.

Quinoa Dosa cooking

Quinoa Dosas ready! 
Serve with chutney, or just a good pat of good old butter, or both! YUM!

Observation:

1. Quinoa dosas seem to brown up quite quickly, so gotta be careful not to burn 'em.

2. Couldn't get them to become crispy as I'd have liked- perhaps because of the lack of rice....?

3. To the novice tongue, this might taste slightly bitter..... but don't worry, you'll get used to it. ;)

Healthy Ideas:

1. Use oats to make dosas! Or combine oats and quinoa.

2. Make pancakes with quinoa flour instead of all purpose flour! Bet that'll be good.


Thursday, April 24, 2014

Finger Millet Flatbread or Ragi Rotti

Finger Millet or Ragi has been a favorite with diabetics, because of the fact that it is rich in fiber, and upon consumption, blood sugar levels don't just instantly shoot up, but instead, it is all nice and slow. Ragi is also rich in iron, calcium, certain amino acids (that apparently are absent in most starchy grains), and of course protein. I also read somewhere that it helps relax you- so if you suffer from anxiety, or sleeplessness, or are just feeling the blues, try eating some Ragi. You will feel happy!

My paternal grandfather used to swear by Ragi mudde, and as far as I remember, often times dinner would be Ragi balls with a tamarind based soup. Tata would tell me to tear off a little ball, dunk it in the soup, place it in the mouth, and immediately swallow it. That was fun, really. I mean, the whole concept of not having to chew or bite food, but simply swallow, was so cool back then! And funnily enough, I quite liked that bland Ragi ball.

Another variation of Ragi that we were introduced to was Ragi rotti. This is basically Ragi flatbread, with added spices. It is super delicious! It is similar to akki rotti, the flatbread made with rice flour (Akki Rotti Recipe). In fact, I'd say that the recipe is the same, except that instead of rice flour, you use ragi flour.

Ingredients: 

1. Ragi Flour

Ragi Flour- sprouted ragi- even better! 

2. Onion- finely chopped

3. Green chillies- slit, or chopped

4. Cumin seeds- 1-2 tsp

5. Salt per taste

6. Water to make dough

7. A kadhai or wok, or a pan

8. Oil to cook

Method: 

1. Add onions, chillies, cumin, and salt to ragi flour and mix it up dry once, before adding water.

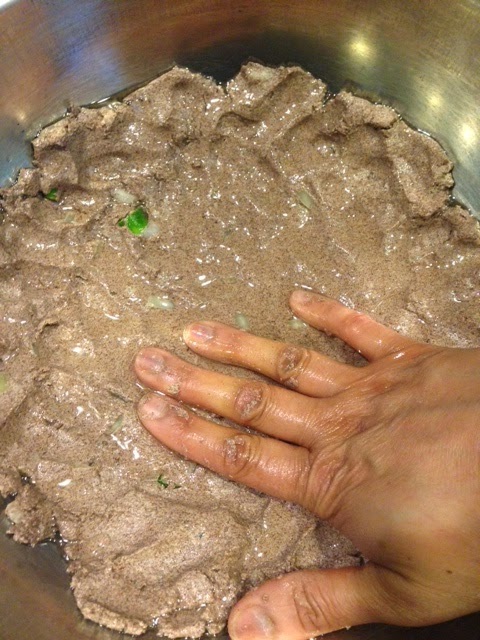
Ragi flour+onion+chillies+salt

2. Pour in water bit by bit, and begin kneading the dough, until you get a nice pliable dough. Similar to pizza dough.

Ragi rotti dough ready

3. Take a kadhai/wok or a pan, or both (like I do), pour a couple teaspoons of oil (you know your pan better- so if you think you need more oil, sure, go ahead. OR if you use a completely non-stick pan, well, skip the oil!). Then make a ball, as shown below:

Ragi ball 
4. Place this ball onto the oil in the pan, and start rolling it out with your fingers and palm of your hand:

Ragi rotti in the making
5. Now cover the pan with a lid, and get the heat going. The first 5 minutes on medium high, and the next 5-7 minutes between low and medium flame, to avoid burning.

Ragi rotti cooking in the pan

In the kadhai/wok
6. Switch off the stove, and that's it, Ragi rotti is ready to be enjoyed! You can eat it with coconut chutney, or chutney powder, or just plain as it is with some ghee or butter. YUM! You could even eat this with some rustic chicken or mutton curry- are you salivating yet? ;)

Eating off of the kadhai/wok- irresistible! 

Don't forget that butter! ;) 

I personally LOVE both varieties- akki (rice flour) and ragi (finger millet) rotti. Both kinds make me happy! You know your rotti is perfect when it is crispy on the first bite, and has this beautiful soft, chewy thing going on as you continue to eat........ SLURRRRRRP!

Wednesday, April 9, 2014

Uttapam

If you love dosas, you probably like uttapams too. Many blog posts ago, I had put up the recipe for this South Indian delicacy (Dosa Part 1 and Dosa Part 2). On Saturday, we had a Dosa party at home for a few friends, and it was quite a hit! I had made enough batter to last us a few days. Today the batter level went down by quite a bit, and when that happens, I know what to do- convert it into uttapam!

Ingredients: 

1. Dosa Batter

2. Onion, finely chopped

3. Green Chilies, either sliced or chopped

4. Coriander leaves/Cilantro, a bunch, finely chopped

5. Little bit of grated ginger

6. Tomato- chopped up- some people don't like it, but I love adding tomato to my uttapam

7. Salt per taste

8. Black ground pepper &/ Red chili powder

Method: 

1. Add ingredients 2 to 8 into the dosa batter, and stir it all up nicely with a ladle. You now have uttapam batter.

Uttapam batter

2. Take a ladleful of the batter, and pour it onto a hot pan (similar to how you would pour pancake batter), and then spread it out evenly. Add a few drops of oil around the entire circumference of the uttapam. Also a few drops in the center.

Uttapam getting ready

3. As you start seeing some browning at the bottom, flip the uttapam, so as to cook (and brown) the other side.

Browning on the bottom
Now browning the other side

4. That's it! Within 3-4 minutes, you'll have made the perfect uttapam, ready to be eaten with chutney, or just plain as it is. Oh, and a little bit of butter on top won't hurt! ;)

Uttapam! YUM! 

I like my uttapam to be nice and crispy. And so I let it stay on the hot pan longer. If you like it soft, don't brown it as much. Uttapam is a great way to utilize leftover dosa batter. Not to forget, it is yum!


Wednesday, May 22, 2013

Horse Gram, the Wonder-Bean

Everybody's heard of garbanzo, kidney beans, black eyes peas, red adzuki beans, cannellini beans, etc.... you find them in any grocery store. But do you know the horse gram? If you do, then great (and you can skip the next paragraph)! If you don't, then well, it is time to introduce you to this wonder-bean.

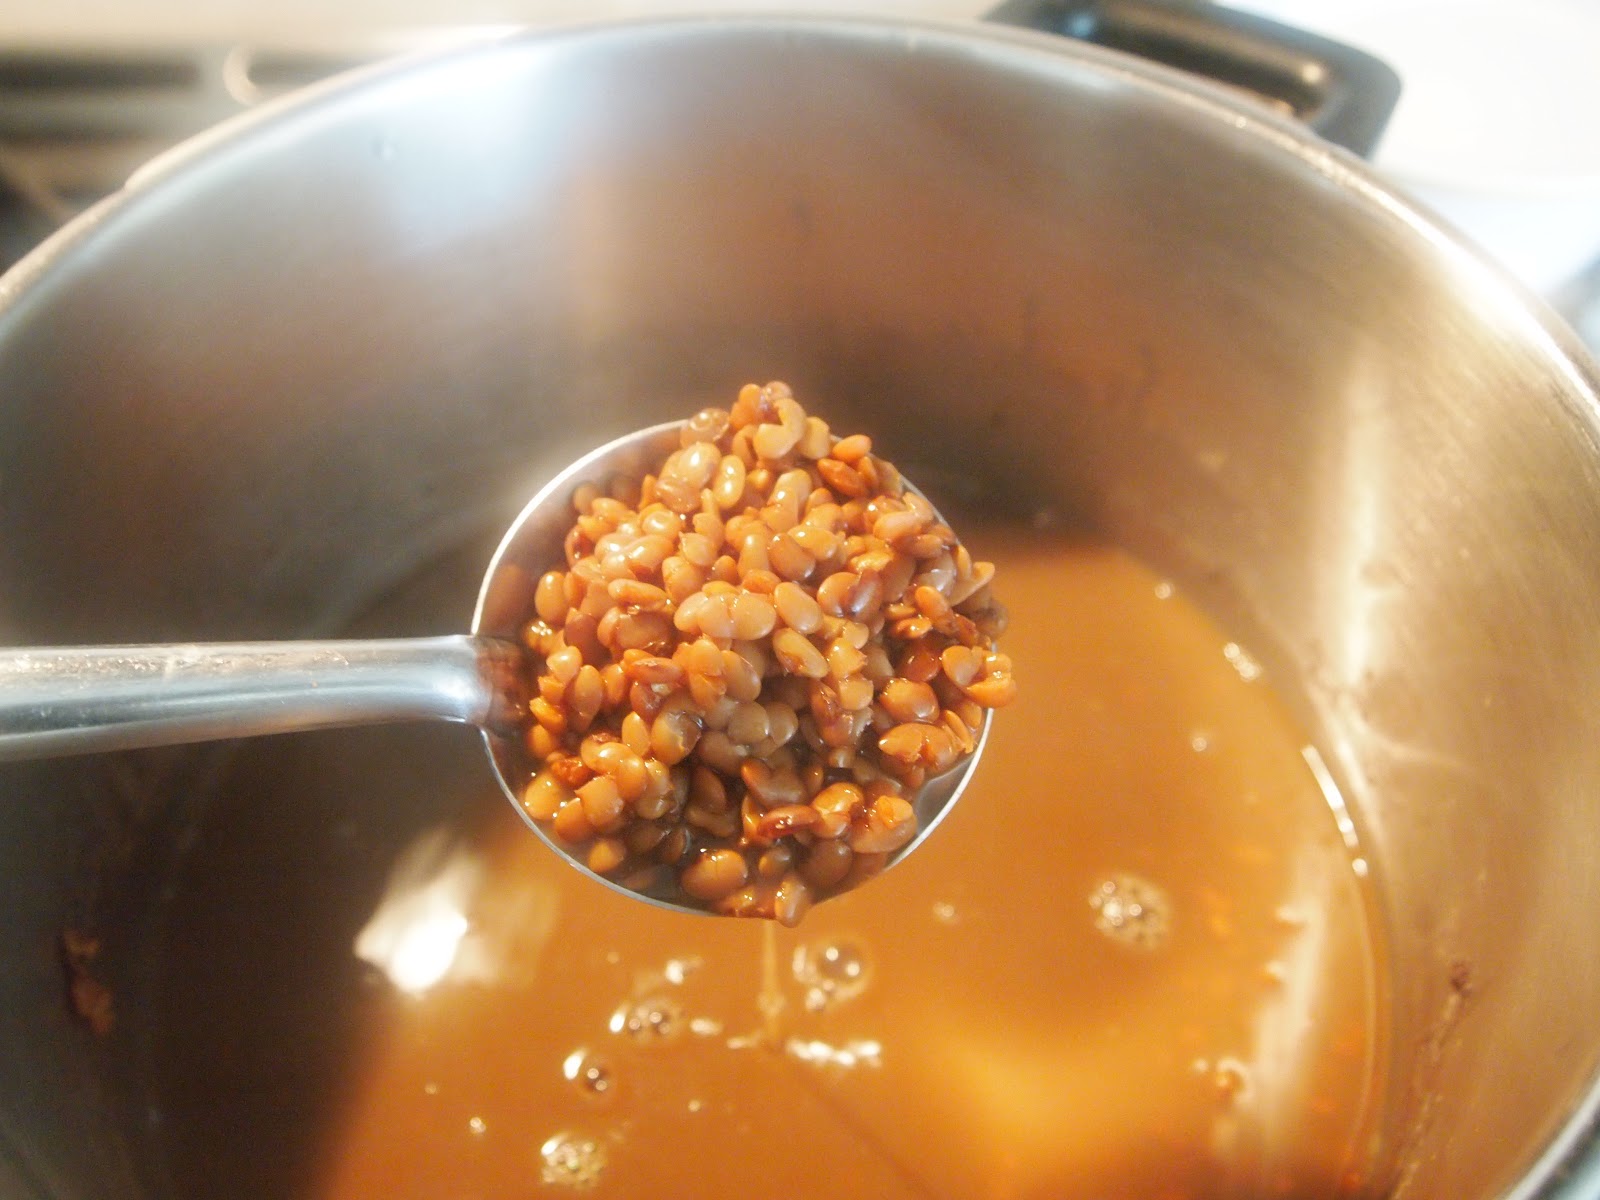
The wonder-bean- Horse Gram (cooked) 
Horse Gram, the wonder-bean: Used widely in Ayurvedic medicine, here are some important health benefits, in no particular order, of the horse gram:

1. Natural remedy for gall, and kidney stones

2. Reduces flatulence, and acidity, and keeps your innards in great shape (good fiber)! 


4. Used for treating rheumatism.

5. Used to treat obesity- and this one is a BIGGIE, especially in these times of biggie fries, super-sized cokes, double whoppers; heck, even those venti frappuccinos and whatnot! 

6. Used to treat menstrual problems in women. Forget those dozens of ibuprofen capsules that you ingest. Try incorporating some horse gram into your diet, instead!

7. Lowers cholesterol

So there, now that you have been introduced to this truly wonder-bean, here are a couple recipes for you. These two are in fact popular South Indian dishes.

First, and Foremost, before anything:


1. Soak the beans in water overnight. This will allow for easy cooking the next day. I haven't seen canned horse gram anywhere- if you do find it, then you can skip this step altogether, and proceed to the recipes.

2. Cook the soaked beans, along with the water that it was soaked in, and with extra water, in a pressure cooker. Add some salt, and a pinch of turmeric powder to this as well.

Note: If you don't have a pressure cooker, you'll have to cook the beans in a pot, like you would cook lentils in a pot. I prefer the pressure cooker, as it does the work in half the time- about 15 minutes.


Horse gram cooked in the pressure cooker
3. Once the cooking is done, separate out the beans from the water, and save that water- that is a key ingredient!

The Water

Cooked Horse Gram
And now we can jump right into the recipes!

Recipe 1- Horse Gram Soup/Hurali Saaru

You need:

1. The water from the above-mentioned cooking-the-horse gram-step

2. 1 teaspoon of ghee/clarified butter, or oil

3. 1 teaspoon cumin seeds

4. Some curry leaves (key to a proper south-indian recipe!)

5. Some tamarind water/concentrate- to add the tang factor. OR lemon juice.

6. 3-4 tablespoons of cooked horse gram, mashed into a paste. You could use a pestle-mortar for this, or just mash it up with a spoon.

7. Some salt, if needed. Remember- we had already added salt in the very first step, so there's salt in that water already.

Method: 

1. Take a pot, add a teaspoon of ghee/clarified butter, get the heat going, temper some cumin seeds, throw in the curry leaves (careful here, the leaves tend to splatter up, so cover the pot with a lid immediately).

2. Then add the horse gram water into this, and the mashed horse gram to impart some texture (sort of acts as a thickening agent). Bring to boil. Spoon in some tamarind water/concentrate for tang, else squeeze lemon juice in the end.

3. Taste, and add salt if needed. That's it! You got yourself a wonder-soup, that can be eaten as it is, or if you can't do without your starch, mix with rice, and enjoy! We call it Hurali Saaru back home.

Note: If you love garlic, you could add some crushed garlic in Step 1. That'll add extra flavor.

Horse Gram Soup/Hurali Saaru
Recipe 2- Horse Gram Salad/Hurali Usali or Sundal:

You need: 

1. Cooked horse gram (remember, the one you get after separating the beans from the water)

2. Grated coconut- 2-3 tablespoons. Fresh coconut would be the first choice, but frozen, as well as dried coconut flakes will work just fine.

3. Curry leaves

Curry Leaves
4. A couple green chilies

5. Salt (again, don't go overboard with this, since we had salted the entire thing in the very first cooking step).

6. 1 teaspoon mustard seeds

7. A pinch of asafetida- I don't think I have ever mentioned this very important spice/resin used in almost all Indian cooking. I will have to dedicate one entire post highlighting the asafetida- known as Hing/Heeng in India. In fact, most of our cooking, almost always begins with a pinch of hing, especially when we cook legumes, beans, lentils-- all those proteins. But more about this in a later post.

8. 1-2 teaspoons oil

Method:

1. Get a pan going on the stove, add a couple teaspoons of oil, heat, add a pinch of hing, followed by a teaspoon of mustard seeds- get them to splutter. Then throw in the curry leaves, and the chilies. Cover with lid.

2.Once the spluttering (and potential splattering!) is over, switch off the stove, take off the lid, and add the cooked horse gram, with the coconut. Give it all a good stir. Add salt if needed.

And you got yourself a super-healthy horse gram salad! Yeah, that's it! We call it Hurali Usali or sundal back home.

Horse Gram Salad/Hurali Usali/Sundal
You could get creative, and add some chopped cucumber to this, or even finely chopped onions, and tomatoes, squeeze some lemon juice--- your choice.

Make this wonderful horse gram salad instead of the same old five bean salad. It might just become your new favorite dish to take to the next potluck! Don't forget the soup!