Showing posts with label Indian Breakfast Delicacies. Show all posts

Thursday, April 24, 2014

Finger Millet Flatbread or Ragi Rotti

Finger Millet or Ragi has been a favorite with diabetics, because of the fact that it is rich in fiber, and upon consumption, blood sugar levels don't just instantly shoot up, but instead, it is all nice and slow. Ragi is also rich in iron, calcium, certain amino acids (that apparently are absent in most starchy grains), and of course protein. I also read somewhere that it helps relax you- so if you suffer from anxiety, or sleeplessness, or are just feeling the blues, try eating some Ragi. You will feel happy!

My paternal grandfather used to swear by Ragi mudde, and as far as I remember, often times dinner would be Ragi balls with a tamarind based soup. Tata would tell me to tear off a little ball, dunk it in the soup, place it in the mouth, and immediately swallow it. That was fun, really. I mean, the whole concept of not having to chew or bite food, but simply swallow, was so cool back then! And funnily enough, I quite liked that bland Ragi ball.

Another variation of Ragi that we were introduced to was Ragi rotti. This is basically Ragi flatbread, with added spices. It is super delicious! It is similar to akki rotti, the flatbread made with rice flour (Akki Rotti Recipe). In fact, I'd say that the recipe is the same, except that instead of rice flour, you use ragi flour.

Ingredients: 

1. Ragi Flour

Ragi Flour- sprouted ragi- even better! 

2. Onion- finely chopped

3. Green chillies- slit, or chopped

4. Cumin seeds- 1-2 tsp

5. Salt per taste

6. Water to make dough

7. A kadhai or wok, or a pan

8. Oil to cook

Method: 

1. Add onions, chillies, cumin, and salt to ragi flour and mix it up dry once, before adding water.

Ragi flour+onion+chillies+salt

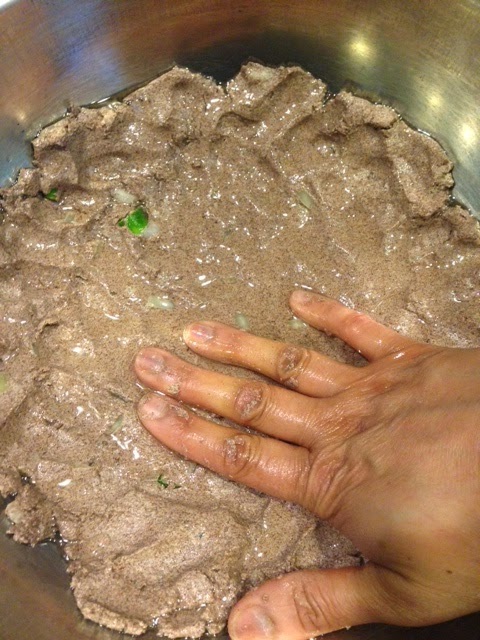
2. Pour in water bit by bit, and begin kneading the dough, until you get a nice pliable dough. Similar to pizza dough.

Ragi rotti dough ready

3. Take a kadhai/wok or a pan, or both (like I do), pour a couple teaspoons of oil (you know your pan better- so if you think you need more oil, sure, go ahead. OR if you use a completely non-stick pan, well, skip the oil!). Then make a ball, as shown below:

Ragi ball 
4. Place this ball onto the oil in the pan, and start rolling it out with your fingers and palm of your hand:

Ragi rotti in the making
5. Now cover the pan with a lid, and get the heat going. The first 5 minutes on medium high, and the next 5-7 minutes between low and medium flame, to avoid burning.

Ragi rotti cooking in the pan

In the kadhai/wok
6. Switch off the stove, and that's it, Ragi rotti is ready to be enjoyed! You can eat it with coconut chutney, or chutney powder, or just plain as it is with some ghee or butter. YUM! You could even eat this with some rustic chicken or mutton curry- are you salivating yet? ;)

Eating off of the kadhai/wok- irresistible! 

Don't forget that butter! ;) 

I personally LOVE both varieties- akki (rice flour) and ragi (finger millet) rotti. Both kinds make me happy! You know your rotti is perfect when it is crispy on the first bite, and has this beautiful soft, chewy thing going on as you continue to eat........ SLURRRRRRP!

Monday, September 23, 2013

Sabudana Vada

Low temperatures and clouds in the sky,
Equate to a hot cup of chai,
And pakoras with some ketchup on the side,
And I kind of lost that whole rhyming thing......
But hey, that's beside (the point).
OK, now, people, do not snide,
For fall is here! And don't we all,
Simply love fall?!

Uh, yes, I shall set aside my poetic genius for now, and jump right into the subject of this post. Sabudana Vada is one of my favorite kind of pakora/fritter. Made of sabudana, i.e. tapioca pearls, also referred to as sago pearls. In fact, I have an older post on Sabudana Khichdi that I would like you to skim through. Note down the first part of the recipe, "Prepping those Pearls." That is exactly what you would do to start off with the fritter recipe. Also get those peanuts ready (in the same recipe).

While the sabudana prepping is going on, cook a few potatoes. I like to use my pressure cooker to cook potatoes- the job gets done in 5 minutes.

Ingredients: 

1. Sabudana

2. Cooked potatoes- 2 or 3 (or more, depending on the quantity of sabudana)

3. Green chilies, sliced or chopped, your choice. Qty per your liking.

4. Salt per taste

5. Red chili powder (optional)

6. Pinch of sugar (secret ingredient!)

7. A pinch of asafoetida/hing (good for the tummy)- if you have it

8. Cumin seeds (jeera)

9. Coarsely ground roasted peanuts

10. Chopped fresh cilantro/coriander leaves

Method: 

1. Mix up the soaked sabudana with the cooked potaoes and all the other ingredients. Mash it all up together. Give it a taste, and adjust accordingly.

Note: Potatoes are basically the binding agent here.

2. Make little patties of the whole mash-up. You could make little balls too.

Sabudana vadas- ready to be fried
3. Take a kadhai/wok/pan/pot, pour in a good amount of cooking oil, and get the heat going.

Tip: I just make a very tiny ball with the sabudana-potato mash-up and throw it into the oil. If the tiny ball immediately floats up, I know that the oil is nice and hot, and ready to go.

4. Start frying those patties/balls. You know they are done, when they are nice and golden brown in color. Ladle them out with one of those slotted spoons/ladles onto some paper towel(s), so as to drain of excess oil.

Frying the sabudana vadas
Golden brown delicious sabudana vadas
Yum yum! 
Eat away!! 

Serve immediately with some ketchup, or mint chutney.

The perfect sabudana vada is cripsy on the outside, and soft, and almost gooey on the inside. Best when served hot, off the oil. The coarsely ground peanuts and the cumin add that crunch, and well, I am salivating right now.......

Don't forget that cup of chai! Happy Fall, y'all!


Friday, May 10, 2013

Cracked Wheat Pilaf/Dalia Upma

Cracked wheat is basically whole raw wheat kernels that have been crushed into smaller pieces. Cracked wheat and bulgur look very similar, however, they are different, in that the latter cooks much faster, because it is already pre-cooked. We call cracked wheat dalia or broken wheat back in India. The popular dishes they make are dalia khichdi, dalia upma, and also dalia kheer (sweet version- which is yum!). And of course, since this is whole grain we are talking about, this stuff is loaded with nutrients, is diabetic-friendly, good for the heart, etc.

Cracked Wheat/Broken Wheat/Dalia


Here's how I make cracked wheat pilaf, or dalia upma:

Ingredients: 

1. 2 cups of cracked wheat

2. Veggies- I like to use finely chopped onion, some green chilies, maybe a potato, carrots, bell pepper, and peas. Since I like tomatoes, I add a tomato as well

3. Peanuts- about a handful- I just like the crunch factor

4. A few teaspoons of oil

5. Mustard seeds, salt, chili powder (optional), a pinch of turmeric powder

6. Water (lots of it, to cook the cracked wheat)

7. Curry leaves- if I want a South Indian twist to the dish, just for the fragrance (available at the Indian Store)

Curry Leaves
Method: 

1. I first toast/dry roast the cracked wheat. Just to get the nutty flavor going. And then set it aside.

2. Meanwhile I get the pan/pot going, add a few teaspoons of oil, heat, fry the peanuts, temper some mustard seeds, followed by a pinch of turmeric powder, and then I throw in the chopped onion+green chilies+curry leaves, and fry for about 5-7 minutes. I then add the other veggies. At this point, I salt it, and add some red chili powder.

Note: I sometimes add "vaangi bhath" powder, for extra flair. For those of you who may not be familiar with this, "vaangi bhath" powder is a special spice blend, that is used in South Indian cooking.

Colorful!
3. I then add the toasted cracked wheat into this, and mix it all. Meanwhile, on the other burner, I have a pot of water boiling. This water will be used to cook the whole pilaf/upma.

Cracked wheat+veggies
4. After about 5-7 minutes of frying everything together, I add the hot boiling water into the mixture of cracked wheat and veggies. (Be careful here, the contents of the pan/pot tend to splatter a little bit-- so watch out!) I add water so as to cover the entire mixture- so say, about an inch higher than the mixture.

Ready to cook....
 5. I bring this to a boil, and then cover it with a lid, and simmer it. It takes a good 30 minutes for the cracked wheat to really cook. After about 20 minutes, I add peas, and then let it all simmer again. Another 10 minutes, and I remove the lid, and this is usually what I see:

Done!! 
Note: I taste it (of course!), and if I think that the grain needs to be more tender, I just add some more of that hot water, give it a quick mix, cover, and simmer for another 5 to 10 minutes.

Cracked wheat pilaf or Dalia Upma is ready to be enjoyed! Super delicious, and super healthy! I like to spoon in a little bit of ghee or clarified butter on top--- mm mmm! ;)

Dalia Upma/Cracked Wheat pilaf


Saturday, October 15, 2011

Kanda Pohe

I am back after a 10 day quick trip to India. My dad was not well, my mom had a fall, our dog died, leaving my parents very sad. My daughterly instinct kicked in and I had to go see them. And I sure am glad I did. The visit was very pleasant and I think I cheered them up a bit.

During my 10-day stay with them, my dad discovered this restaurant called The Peshwa Restaurant that specializes in Maharashtrian cuisine. Of course, we got all excited and set off in search of the restaurant. Driving in all that horrendous traffic, my dad finally took us to our destination. Mom and I rushed inside (you see, we were a trifle bit too excited!), while Dad parked, re-parked and then finally locked the car. We entered the restaurant and found only 2 guests sitting at a table. Disappointment set in as we thought that perhaps the restaurant is shut or maybe it is not that good a restaurant after all! But the red interior was far too inviting to just leave. And so we sat at a table, the waiter came and as soon we saw the menu cards, we knew it was going to be good! We ordered their "Gavran Jevan," that literally means "Village Food"--- food that is eaten in rural parts of Maharashtra. It was a feast! Here, you can check out their menu @ http://thepeshwa.com/.

I was thrilled to find "Pohe" on their menu. Out here, I have never found this dish in any Indian restaurant, ever. The only time I have seen anybody mention Pohe/Poha and cook it was in one episode of The Iron Chef, where Chef Floyd Cardoz made it. Incidentally, poha is known to be Lord Krishna's favorite food and in our family, we all love poha. Oh before I forget, for those of you who might not be familiar with poha-- it is basically flat beaten rice and available in varying degrees of thickness, ranging from very thin to thick. Yes, there's a medium variety too.

I have been having emotional withdrawal symptoms the whole of this past week and living so far away from parents certainly is no help. And so this morning, thinking about my short and sweet India trip and The Peshwa Restaurant, I decided to make some Kanda Pohe. "Kanda" in Marathi means Onion and so Kanda Pohe means pohe made with onion(s).

Ingredients:

1. 1 onion, finely chopped
2. A couple (or more) green chillies- chopped or slit- your choice
3. Peanuts- about 1 tablespoon
4. Cumin seeds- a teaspoon
5. About 2 cups of poha-- I used thick poha today
6. 4-5 teaspoons of oil for cooking
7. Salt, turmeric powder, pinch of sugar

Method:

1. Take 2 cups of thick poha in a colander and give it a quick wash in hot water. Alternately you could soak this thick poha in room temperature water for a few minutes, so as to soften the poha flakes.

Thick Poha
Quickly washed in hot water to soften the flakes
2. Take a pan, pour in a few teaspoons of oil and then add some peanuts and fry them. As they begin to turn brown, add a teaspoon of cumin seeds and just as they begin to splutter, throw in the finely chopped onion and green chillies. If you have curry leaves, you could add some, like I did today.

Peanuts
Onion, green chillies frying away
3. After about 5-7 minutes of sauteeing the onion, add salt per taste, a pinch of turmeric powder, followed by the softened poha and fold it all in. After mixing up everything, add a pinch of sugar and give it one more stir. For thick poha, you might want to add a quarter cup of water before covering the pan, just to make sure that the poha is nice and soft, else it might end up becoming hard and chewy.  


Note: This addition of just a pinch of sugar is very Maharashtrian. It just brings out the flavors even more (well, OK, I admit- when I don't know why something is added, I just say it brings out the flavor.......hey, even those Food Network stars say that!).

4. Cover the pan, cook it all together for about 5-10 minutes. And then eat and enjoy! You could garnish with some fresh cilantro and grated coconut--- mmmm! delicious!

Ready to be folded in
Almost ready!
Kanda Pohe-- delicious treat!
This morning's breakfast was lovely and while I sat all by myself at the table, savoring the deliciousness, I was transported back to my parents' place and the wonderful 10 days I spent with them......... 

Going  back to The Peshwa Restaurant- as we were enjoying our "Gavran Jevan," people started pouring in......... so I guess it is quite popular amongst the Maharashtrian crowd in Bangalore. Good discovery, Dad!

Monday, October 11, 2010

Upma

Normal Breakfast at my house: Cereal, Bread, perhaps eggs. 

Normal Breakfast back at mom's house: Dosa, Idli, Poha, Sabudana khichdi, Akki Rotti, just to name a few and the ever famous Uppittu (kannada) or Uppindi (telugu), better known as Upma.

Sometimes, especially on a weekend, I decide to make something special for breakfast. Now special to me of course means something that I would eat if I were back at my mom's place in India. I love upma because well, for starters, it is delicious! And it is extremely quick* and simple to make. And as you know, I am always up for simple, quick and delicious!

There are several kinds of upma one can make. You know, the very basic one where you put err, nothing- basically like a savory porridge. Then you have the kind where you incorporate onions and potatoes (and tomatoes, that I love). And then there is the whole mixed veggie kind. And then again, there is the kind that incorporates only green peas and it is simply delicious.

You need:

Green peas (I just use the frozen kind), Coarse Rava/Sooji- available at any IGS (you could substitute this with cracked wheat, works awesome!), salt, green chilli(es), hot water, oil, mustard seeds.

Method:  
  1. I take a pan and put in a few teaspoons of oil. Heat and then splutter some mustard seeds followed by some green peas and green chillies (depending on how much heat you like). Quickly stir. 
  2. I then pour in the coarse Rava/Sooji (usually for 2 of us, I take 1 to 1.5 cups) into this pan with the peas and then add salt to taste. Stir it all up for about 2-3 minutes. I don't mind if it kind of browns up a bit, in fact, I like it.
  3. Then I take the pan off the heat and pour in hot water and immediately stir it all up. There is going to be some major boiling-bubbling action going on, but don't worry, it is all part of the fun! ;) And then I place the pan back on the heat and cover it up and let it simmer. 
  4. Usually in about 7 to 10 minutes, all the water would have disappeared and the upma is ready to be served! 
  5. If I am in the mood, I garnish with some chopped up cashew nuts, grated coconut and cilantro. YUM!
Green Peas Upma- YUM!

If you know couscous and like it, I am sure you will like upma too. Do give it a shot!


Saturday, October 9, 2010

Akki Rotti

If you do not know the language, Kannada, then you might be wondering about the title, "Akki Rotti." Well, Akki stands for Rice and Rotti stands for Roti/bread. So simply put, it is bread made of rice flour. I simply LOVE this preparation and as usual, I think that my mom and Avva (mom's mom) make THE best akki rottis in the world!

The standard version incorporates finely chopped onion, green chillies and cilantro. And of course, the innovative version or well, MY version, incorporates spinach and even grated carrots!

You need:

The standard version: Rice Flour (available in any IGS), finely chopped onion, some chopped or slit green chillies, cilantro, cumin seeds, salt to taste. I sometimes use grated coconut too......adds to the taste.

The spinach or grated carrots version:  As above plus chopped spinach or grated carrots. Easy!

Oh and a few teaspoons of oil (yep, you don't need a lot of oil for this!)

First, the Dough:

You know how you make pizza dough? Or dough for rotis/chapatis? This one is pretty similar.

1. So take rice flour in a mixing bowl, add the chopped onion, green chillies and cilantro, cumin seeds and salt (and coconut, if you are using it). If you are using spinach, then go ahead and put that in too. Ditto for grated carrots.
2. Take some water in a cup and start pouring it into the above flour mixture bit by bit. Start mixing it all together with your fingers. Keep adding water until you can make a nice pizza-dough like dough. It should all hold together when you make a ball out of it.

Next, the making of Akki Rotti: 

1. Take a pan (my mom & grandmom use aluminium kadhais/woks for this. But I just make-do with regular pans..........) and put a teaspoon of oil into it.

2. Then take some of that dough you made and form a rough ball out of it and then put this into the pan and start patting with your fingers, so as to spread it out. It is almost like the reverse of making a pizza base out of pizza dough. The difference being, you make the pizza base with your fingers underneath the dough and spread it out, while here you use a pan as a support and spread it out with a patting action going on. Here, this picture should help a bit:
See how I spread out the dough with my fingers? 

3. Then switch on the stove and cover the pan with a lid and cook the rotti. You don't have to cook both the sides because the bottom part gets cooked with the heat from the stove and the top part gets steam cooked because of the combination of the heat and the lid on top.

4. I like my akki rotti nice and brown and crunchy and so I cook it for about 7-10 minutes on medium heat......if you prefer it white and soft, then just cook for 5-7 minutes and it should be good to go!

5. Can be eaten with chutney or Indian pickle or even with any kind of curry. Pretty rustic and yummy!!

Akki Rotti with tomato chutney

Making akki rotti can be pretty tedious the first time around. But as with anything, practice makes perfect! If you want a really healthy, rustic version of this already rustic preparation, use Ragi (finger millet) flour.

Note: You gotta make sure that when you start patting out the dough to make the rotti, the pan has to be cool and not hot--- because if it is hot, then patting it out is going to be one messy job.

When I make akki rotti for the entire family, I just use 4 pans at a time. That way I get 4 rottis in one shot!

Thursday, September 9, 2010

The Ultimate Masala Dosa- Part 2

So I went to my oven this morning and took out the pot with the dosa batter I made last night. I removed the lid and peeked inside. I was thrilled to see that the batter had nicely risen. Fermentation successful!

Observe the bubbles........ perfectly fermented dosa batter

Beautiful consistency- not too thick, not too thin

I then put away the fermented batter into the refrigerator since I was going to make dosas for dinner and I did not want the batter to over-ferment and get all sour and stinky (yeah, that could happen! While some people do like that extra fermented taste---I don't). However, I got the other items ready. I had a busy evening ahead and therefore wanted to be done with all the preparation in advance.


The Accompaniments:

The most important accompaniment to a masala dosa is well, the masala itself. Like I mentioned in Part 1 of The Ultimate Masala Dosa, the masala is basically a smashed potato filling. So here is how I make the masala:
  1. I cook a few potatoes in the pressure cooker. Any kind should work, though I prefer the Yukon Gold kind just because I like the natural sunny color and the texture. My pressure cooker takes 4 minutes to cook those taters. 
  2. I meanwhile finely chop up some onion and slit a few green chillies. I also like to use kari patta or curry leaves just because I simply love the aroma. Besides you gotta use kari patta if you are making South Indian food! 
  3. I take a little bit of oil in a pan, temper some mustard seeds and then throw in the chopped onion, chillies and kari patta. I add salt and turmeric powder to this and sautee it all. I make sure to add some extra salt so that I don't have to bother adding salt again after incorporating the cooked taters into this. 
  4. While the onions are sweating, I peel the skin off the potatoes and roughly chop them up before throwing them into the cooked onions. At this step, I switch off the stove. 
  5. I roughly smash up the potatoes and then mix everything up. The masala is now ready! 
Mmm, the gorgeous yellow masala for my dosas!

The next thing you need is a chutney. Now there are a variety of chutneys that can be eaten with a dosa or a masala dosa. My mom makes this superb coconut chutney with green chillies and cilantro. Of late I have been making this tomato chutney as well as a chutney with onions and red chillies. I made these two again today. (Recipes are included in my Chutney/Pesto/Sauce section).

There, the accompaniments were ready and all I had to do was actually go ahead and make dosas later in the evening.

Finally, making of the Dosa:  
  1. I get my not-so-non-stick pan heated. 
  2. I then pour some batter onto that hot pan with the help of a ladle and immediately start spreading it with the ladle itself in circular motion so as to create a round, thin dosa. I add a wee bit of oil around the circumference of the dosa and in the center too. This sort of fries the dosa thereby cooking it. Soon enough the bottom part of the dosa begins to turn brown, thus indicating that the dosa is pretty much done.
  3. And then I spoon in some of that potato masala into one half of the dosa and then fold the dosa- like a taco.
  4. And the masala dosa is ready!
 First scoop of batter.........

Spread out with the help of the ladle

Spoon in the masala into one half of the dosa

Folded over like a taco

A couple crisp dosas with two kinds of chutney ready to be gobbled down! 

A few pointers:
  • Usually the very first dosa turns out not-so-great. But no worries. As the pan gets hotter, the dosas turn out way better. 
  • Some people prefer their dosas thick, white and soft--- in that case there is no need to spread it out much with the ladle--- in fact then it is exactly like a pancake, with that extra step of flipping involved. 
  • I know I said that hotter the pan, better the dosa. Well, a slight catch there---- if the batter starts sticking to the pan as you try to spread it out, that means that the pan is a little too hot. When that happens, I just sprinkle some cold water onto the pan to cool it down a bit and then resume again. 
  • I love my dosa with sambar (a South Indian lentil and vegetable medley), the recipe for which I shall write another day. (Since I was a bit busy today, I skipped making sambar.......)
  • If you are a health freak, you can use a non-stick pan and not use any oil at all. But well, I must tell you that everything tastes better with some grease.......

So is this THE Ultimate Dosa afterall? Nope, because it still does not match my mom's dosas nor CTR's dosas. In fact it probably never will. However, in this part of the world, this is indeed THE Ultimate Masala Dosa that my family has access to. And that sure makes me one proud mama! :)


Wednesday, September 8, 2010

The Ultimate Masala Dosa- Part 1

My mom makes THE best Masala Dosas in the whole entire world. Next in line would be CTR. CTR is a tiny little restaurant in Malleswaram, Bangalore. Now sadly for me, both my mom and CTR are about 9000 miles away and so I get to eat those scrumptious dosas only once every couple years. Yeah, tell me about it--- ridiculously sad. But I can't just sit here all sad and glum, yearning for their dosas every day, now can I?

I used to get those ready-to-make dosa packets from the Indian Store. You just take the mix (full of unnecessary sodium bicarbonate) and add some water and then make the dosas. Pretty blech, if you ask me. I stopped buying those. Then a couple years ago, the Indian Store started carrying the actual batter. So there was no need to mix up a powder with water- it was pre-made and well, definitely way more convenient. But I soon discovered that the batter was well, not great, in fact not good at all. Then my cousin V advised that I should just make it at home. My first reaction was, "Uggh! Soak all that stuff and then grind it all and then allow it to ferment?? Too much work!!" But then, after much reluctance, I decided to give it a shot. And I have not looked back ever since!

What is Dosa?

In my dictionary, I like to define Dosa as a South Indian rice and lentil "pancrepe" (somewhere between a pancake and a crepe) and a Masala Dosa is basically the same pancrepe with some beautiful jazzed up smashed potato filling.

In this post I shall tell you how I go about with the very first and basic step- making of the dosa batter. If I want to make dosas on a Thursday, I make the batter on Wednesday. So really, there are two parts to this whole dosa-making process. Therefore I call this Part 1.

Ingredients for Dosa Batter:
  1. Rice (any kind of rice should be fine, except maybe sticky rice. My mom says no to Basmati, but I have used it and have had no issues......)
  2. Urad Dal or White Lentil- available at any Indian Grocery Store (IGS) (picture follows)
  3. Salt
  4. Fenugreek Seeds
  5. Toor Dal or Pigeon Pea- again, available in any IGS
  6. Rice Flakes
  7. Water
P.S.: Ingredients 4,5 & 6 are totally optional. I just use them coz my mom said so. Apparently the fenugreek is good for the tummy and the other two just impart better texture and color to the end product, the Dosa. 


Urad Dal or White Lentil

Fenugreek Seeds (called Methi Daana in Hindi)

Toor Dal or Pigeon Peas


Rice Flakes (Poha)


I know, I know, the ingredients' list seems pretty long and complicated, but hang in there with me--- I promise that this is EASY! Besides, like I mentioned above, you don't even have to use 3 of the ingredients from that list if you don't want to........ so there, you can go  "Phew" now!

Soaking:
  1. Per mom's instructions, I take 3 measures of rice in a container. I wash the rice a couple times or so to remove any unwanted foreign particles. Then I soak the washed rice in water.
  2. I add a teaspoonful each of fenugreek seeds, toor dal and rice flakes to the above and cover the container and proceed to the next step.
  3. I take 1 measure of Urad Dal in another container and wash it like I wash the rice, you know, a couple times or so. Then soak the dal in water, cover the container and then leave it. 
That's it. I leave the rice and dal soaking away, at least for 2 hours. The soaking helps soften the grain, thereby making it easy to grind into a nice smooth batter.

Top container has the rice (+fenugreek+toor dal+poha) soaking and bottom one has the urad dal soaking

Grinding- Making of Dosa Batter:
  1. After 2 or 3 hours, I discard the water from the containers. I then take the rice in my blender, add cold water to it and blend it into a nice smooth batter. This usually takes about 2-3 minutes, max 4. In the beginning I suggest you start adding water in batches, little by little, so as to avoid making the batter too thin. Remember, this is somewhere between a pancake and a crepe and so the consistency has to be neither too thick nor too thin.
  2. I then pour this rice batter into a big enough container. The container has got to be a tad bit larger than the actual quantity of batter because the batter is going to be left to ferment. Upon fermentation, the level of the batter will rise and if the container is not big enough, the batter will actually flow out of the container and it will be one big mess and I say this with experience, yessiree! It usually takes a couple rounds to finish grinding all the rice.
  3. And then I proceed to do the same with the dal. The only glitch here is that the dal tends to get ground very fast and then starts sticking to the blade of the blender. OK, not trying to scare you, but you just gotta be prepared. As soon as you hear the blade make a weird sound, you must stop and add some more cold water. This takes no more than 2 minutes. Just keep adding cold water until the weird sound stops. 
  4. I then pour this dal batter (which, BTW, is so lovely to touch--- it is super smooth and silky and you  might be tempted to dab some on your face.......) into the rice batter, add some salt to this and then give it a couple stirs. 
  5. Finally I cover it up and set it aside on the counter if it is a nice hot summer day or put in the oven like I usually end up doing in this part of the world where it is usually overcast and chilly. I keep the oven light on for warmth that helps with the fermentation. I leave it in the oven with that light on for the whole night. 
Dosa Batter sitting in Appi's Multipurpose Oven (yeah, I do store some other kitchen stuff in my oven....... hey, I don't live in a palace, you see!)

There, Part 1 of the dosa-making process is over. I did that today and right now my dosa batter is quietly fermenting away in the oven. Tomorrow morning I shall take it out of the oven and make sure it has indeed fermented well enough for me to proceed to Part 2.

Until then, I say to my dosa batter- Happy Fermenting!!

Thursday, July 15, 2010

Sabudana Khichdi

Sabudana khichdi is a very popular breakfast (/snack) item in the western state of Maharashtra in India. They even make awesome sabudana vadas (fritters) that are simply delicious. In South India I have usually found that people stick to making sabudana kheer (pudding or porridge). I don't know, but I prefer the khichdi to the kheer. Well, on second thought, the kheer is pretty yummy too! Sabudana is made from tapioca/cassava and is called Tapioca Pearl in English.

I learned how to make this beautiful dish from my Avva, my maternal grandma. She used to make the best sabudana khichdi on earth!

I buy sabudana from the Indian store. If I am going to make it for breakfast, I just prep it up the previous night. That way it is all ready to be cooked when I wake up the next morning.

Here's the basic recipe. You can add potatoes, onions, and sometimes I add tomatoes too, since I love tomatoes!

Ingredients: 

Sabudana- 2 cups

Peanuts, roasted- 1-2 handful (if you are like me, you'll go overboard with nuts!)

Cumin seeds- 1 tsp

Green Chilies- 3-4 slit lengthwise

Red Chili Powder (optional)- 1-2 tsp

Cooking oil- 6-8 tsp

Salt to taste

Sugar* (yes, sugar!)- 2-4 tsp

Fresh cilantro to garnish

*Sugar is used in a lot of Maharashtrian and Gujarati foods. It in fact adds a nice sweet backdrop to the dishes, that just somehow nicely balances out with the salt and spice elements.

Important Step- Prepping the Pearls:

Rinse the sabudana with water twice or thrice (just like rinsing/washing rice before cooking).  Then sprinkle some water on top to soak.

*You need to be careful with this. If you put too much water, you will end up with a soggy mess. If you put too little, you will end up with half-cooked mess. So my way of ensuring that I am sprinkling the right amount of water is by making sure that the topmost layer of sabudana is just very slightly submerged in water. Cover the container and leave it alone for at least a couple hours. (Leaving it overnight is perfectly fine).


Tapioca Pearls- sabudana


Soaked and ready to be cooked


Method: 

1. Coarsely grind the roasted peanuts. A coffee grinder works very well. Or you could use a traditional pestle and mortar.

2. Loosen up the soaked sabudana with the help of a spoon, or even better, your fingers. Otherwise it'll become a lumpy mess. Add the peanut powder to this. Add salt, red chili powder, and sugar to this, and mix it all up.

3. Get your kadhai or wok or pan going on the stove, add oil, and splutter cumin seeds.

Optional: At this point, you could add a diced potato and 1/2 an onion, finely chopped, and green chilies. Some people even add garlic. But personally, I like only potatoes in my sabudana khichdi. I do like tomatoes too- though sabudana khichdi purists might smirk at this idea! ;)

If you do add potato, onion, etc. fry it so as to cook. And then go to the next step.

4. Add the sabudana mixture (step 2) into the wok/pan, and begin stirring it all.

Note: If you don't stir and mix, the sabudana has a tendency to stick to the bottom, and then it might get burnt. So do stir! 

5. After about 7-10 minutes, the sabudana will have cooked to a nice soft and spongy texture. The coarse peanut powder adds some crunch. Garnish with fresh cilantro. Squeeze some lemon juice for a fresh citrusy burst before serving. Yum!


Sabudana Khichdi 


Delicious!! 


Wednesday, July 14, 2010

Rava Dosa- my style!

After having returned from a lovely vacation and not having eaten ANY cereal or bread at all, my taste buds have gotten used to eating different kinds of breakfast every single day! Of course, I know very well that this will soon fade away and we'll eventually be eating cereal or waffles or bread & eggs everyday all over again.........but for now, we shall enjoy some variety.

This morning felt like eating rava dosas (salty-spicy-pancakes, Indian style). My mom taught me how to make awesome rava dosas the last time she was here. I love this recipe because it totally follows my basic cooking rule: simple and quick cooking.  And there is absolutely no fermentation required as in case of normal dosas.

All you need is some maida (M) (all purpose flour), rice flour (R) (available in any Indian grocery store) and fine sooji rava (R) (cream of wheat). A small onion, some cilantro and green chillies. Oh some salt and cumin seeds. That's it! My mom taught me a ratio for the first three ingredients that I think is 1:2:3 or is it 3:2:1?? See, I always forget that ratio and in the end, I just eye ball everything, like I usually do. Yep, that's me! But no worries because the end result is usually pretty good!

So I mix up the first three dry ingredients, MRR and then pour in cold water to mix it all up and make a nice thinnish batter. You don't want this batter to be too thick else it'll result in thick and unappetizing dosas. Now remember the ratio I mentioned in the earlier para? Today I actually followed the M:R:R=1:2:3 and it turned out excellent. Therefore now I am sure that the ratio is indeed 1:2:3. Yaay!

Next I cut a small onion, some cilantro and a couple green chillies and added it to the batter. Salt per taste and also a dash of cumin seeds. Mix it all up and done! Meanwhile I have my pan heating up on the stove. I check the temperature of the pan by sprinkling some cold water onto the heating pan. I know that the pan is ready to go when the cold water just evaporates with that typical "phusshh" sound (OK, I don't know how else to explain that sound!).

Then I pour some batter (make sure you mix the whole thing up and then ladle it in) onto the hot pan, just like you would for a pancake. You know things are going in the right direction when you see holes forming immediately as you pour the batter onto the hot pan. Again, pretty much like a pancake. Gotta spoon in some oil around the edges of the dosa to help it cook and not stick to the pan. Sometimes you might need a few drops of oil in the center of the dosa as well. Don't worry about the shape--- doesn't have to be a perfect circle.

See those holes? That's good!

After a minute or two (depends on how brown and crunchy you like dosa/pancake to be), flip it. Cook again for a couple minutes (more if you like it crunchier) and it is ready to be eaten!!

Flipped over. This one was for my daughter, who prefers soft dosas.

Now some chutney on the side would be really good, but eating this dosa sans chutney works real well too. My family likes a little bit of ghee (clarified butter) atop the dosas.

Rava Dosa ready to be gobbled up!

Rava Dosa- a delicious treat for the whole family!