Tuesday, December 17, 2019

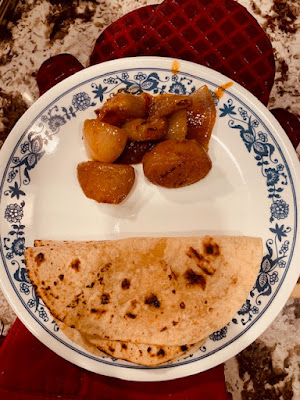
Good Gourd- spiny gourd and pointed gourd stir fry

I finally cooked the most talked about gourd in my family- the (in)famous kantola. Okay, clarification- the only person who talks about it is my dad, and the only person he talks to about it is me. And the only person who goes "tsk" at this poor innocuous gourd is his wife, my mom.

I spotted this spiny gourd (the most innovative name we humans could come up with for this beauty) for the first time in my life of two+ decades as a home chef the other day at the Indian store. I was thrilled! I also bought parmal or parwal called pointed gourd (!). A quick simple stir fry was in order.


Ingredients:  

Kantola

Parmal 

Jeera (cumin)

Til (sesame seeds)

Dhania (coriander seeds) powder

Hing (asafoetida)

Red Chili Powder

Oil for cooking

Salt to taste


Method: 

1. Wash kantola and parmal. Cut lengthwise. If the kantola spines are not your thing, go ahead and gently scrape them off. Else keep them. I did, and it was great!

2. A few teaspoons of oil in a pan, heat, temper jeera, a pinch of hing, some til, and throw in kantola and parmal together. Add salt to taste, stir fry for a few minutes, lower heat, cover with lid. Cook for 5-10 minutes.

3. Uncover, check for done-ness. Add dhania and red chili powder. Stir fry for a couple more minutes. Done!


Eat with rotis, paranthas, or on the side with some rice and dal. Yum!


Thursday, November 14, 2019

Asparagus Chutney

Grilled, oven roasted, steamed, with a squeeze of lime, a drizzle of olive oil, maybe some butter ... all good stuff, but oh-so-meh! Here's a great recipe for asparagus chutney:

Ingredients: 

Mains: 

Asparagus- 20-30

Green chilies: 5-7 (adjust according to your heat level)

Fresh curry leaves (kari patta): 7-10 small leaves

Tamarind pulp: 2 tsp (adjust according to your tang level)

Flavoring agents that impart body to the chutney: 

Sesame seeds: 2 tsp

Fenugreek seeds: 1 tsp

Cumin seeds: 1 tsp

Mustard seeds: 1 tsp

Urad dal (split black gram that is white, lol!): 1 tsp

Dry red chilies: 3/4

Asafoetida (hing): a pinch

Salt to taste

Oil: 2 tsp

Secret Ingredient: 1/2 tsp jaggery powder

Method: 

Prep asparagus by snapping off bottom stalk (if required), chop, and rinse. Chop green chilies, wash curry leaves and keep ready.

In a pan, add oil, heat, splutter mustard and cumin seeds. Followed by fenugreek, urad dal, sesame, dry red chilies, and asafetida. Roast for a couple minutes until everything's nicely browned, and it all smells good. *Add red chilies in the end to avoid burning

Throw in green chilies and curry leaves, followed by asparagus. Stir fry for a minute or two, add salt,  reduce heat, cover. Cook for 5 minutes. Turn off heat. Add tamarind pulp and the (not so) secret ingredient. Cool.


Blend in food processor. *Doesn't have to be finely ground.

Done!

Add tadka (tempering) of mustard and cumin seeds before serving. YUM! I know my dad will also add some tempered cashews for extra umami and crunch. :D

Eat with plain paratha, or as a true South Indian would love to do- mix with steaming hot rice, add some ghee, and enjoy with a side of papad! NomNom!! It's got a kick, tang, hint of sweet, and is thousand times more exciting than plain old steamed asparagus.

Asparagus Chutney


Tuesday, September 24, 2019

Decluttering Tips

There is no other way to say this. If you are serious about decluttering, and minimalism, there's only two words and one rule: LET GO! No, you don't have to hold the thing close to your heart to see if it gives you joy, coz guess what? Such feelings are not to be trusted. Trust me!

During the crucial time of decluttering there is no room for any feelings.

Steps: 

1. Keep a discard container ready, such as a trash bag, or a box, etc.

2. Pick up thing.

3. Simply stare at it blankly, and do not ask yourself, I repeat- DO NOT ask yourself ohhh, do I need this? Believe me, you don't! Say adios, sayonara, hasta la vista, or a simple goodbye, and place it in the discard container.

4. Repeat Steps 2, and 3 until discard container is full.

5. Repeat Steps 1, 2, and 3, until more discard containers are full.

6. Place full discard containers in your mode of transport. A minivan works real well.

7. Drive to the nearest donation place such as Value Village, Savers, or Goodwill, etc. Donate. Pick up tax receipt. Hey, might as well!

8. Drive back home. Make yourself a nice cuppa, sit, relax.

Repeat Steps 1-8 the next time around. You gotta do this diligently, and nonstop until you have truly truly gotten rid of minimum 60% of your original accumulated stuff. After the 60% mark, it'll be a piece of cake to get rid of the remaining 30%. As for the last 10%- eh, keep it.

Now if you feel that the above seems like a very cold and heartless way to go about with the process of decluttering, and you'd like to put some amount of thought into it (ahem- honestly, thinking is a waste of time, if you ask me!) my go-to tip that always works for me is: If I haven't used something for a month, or max 6 months, then I know that I don't need it. And so it can go into that discard container.

Now that you've done a great job of getting rid of unneeded stuff, remember to always remind yourself when you see something that makes you feel like "omg, I need that," that you in fact don't need that. Tyvm. 


Friday, June 21, 2019

Life Lessons

I learned an important life lesson early this morning.

I was on this lovely beautiful summer morning walk, out in the woods. As I walked, handsome blue-green colored swallows flew everywhere, some flying close to my face, as if to say, "hey there, gorgeous," or at least that's what it felt like, and making my heart leap with joy. Flutter with joy? Okay, yeah, I am trying hard to utilize some of those things they taught back in writing class, and it is not working one bit. I mean, you get the idea- there were plenty of cute looking swallows everywhere, red winged blackbirds, which frankly look more like orange winged, if you ask me! And towhees, and red breasted robins. Lots of birds chirping all around.

And then I spotted these bright purple colored bell shaped blooming beauties- foxgloves. They sure look beautiful this time of the year. And of course, the thought of "click a photo for Instagram" popped up. So I took out my nifty phone, and started posing. Yeah, to click a picture, we picture takers have to pose too! Gotta get that perfect angle, light, and everything. So after making some body adjustments, I clicked.

And then followed a silent thud into darkness, and a moment of absolutely blissful empty mindedness, before I discovered myself sprawled on a cushiony slope full of thorns. Ouch! First thought- gosh! hope nobody saw this!! Second thought- phew, the phone's still in my hand! Third thought- um, okay, now what? Fourth thought- lemme put the phone back into my jacket pocket. Wait, lemme see how the picture turned out. Ooh, not bad! 

Thanks to the effect of the soft mud combined with the added benefit of having a cushiony body, the thorns didn't really manage to pierce my lovely epidermis. I escaped with micro-scratches, and a tiny little bruise on my arm. Thanks to all the intermittent workin' out of glutes and quads and hamstrings, I was able to get up quite smoothly, and didn't even hear my knees creak nor grumble.

So what exactly was the life lesson learned? The life lesson learned is: Enjoy your fall while it lasts, for the picture will always turn out great in the end!! ;D 


Monday, May 13, 2019

Caramelized Shallots- Indian Style Pyaaz Ki Sabzi

Here's a fantastic and super simple recipe that helps use up those shallots, baby onions, and regular onions lying unloved for days together in that onion basket on your kitchen counter:

Pyaaz Ki Sabzi


Ingredients: 

Note: Eyeball measurements, and tasting as you go is the way to go.

1. Shallots: 6-8

2. Coriander Powder: 1-4 tsp

3. Red Chili Powder: 1-4 tsp (depends on your desired level of heat)

4. Turmeric powder: a pinch

5. Asafoetida (hing)- a pinch

6. Cumin seeds: 1 tsp

7. Sugar: a pinch, just to enhance sweetness of the shallots

8. Salt to taste

9. Cooking Oil: 3-5 tsp

10. Water: 1-2 tbs

Optional: Anardaana (pomegranate seeds) and aamchur (green mango powder) : a pinch each

Method:

1. Peel shallots, wash, dry, cut into halves if you like, else keep whole.

2. Make a spice paste using turmeric, coriander powder, red chili powder, and salt.

3. Temper cumin seeds, add a pinch of asafoetida powder. Add shallots to this. Stir fry on medium flame for a few minutes, until shallots are browned good enough. Be careful not to burn them. We simply want a nice golden brown color. Sprinkle a pinch of sugar over the shallots. This allows for enhancing their natural sweetness. If you like some tartness, you could add a pinch each of anardaana and aamchur. This also adds a nice color.

4. Add the spice paste, and stir everything. The 1-2 tbs of water in the spice mix is good enough to soften the shallots. Lower the flame, and cover pan. Cook for 5-7 minutes until shallots are beautifully soft as well as caramelized.


Serve with fresh phulkas, rotis, or parathas.


Pyaaz Ki Sabzi is also a wonderful idea when you are all out of ideas!! No, really!! ;D 


Monday, March 11, 2019

Cauvery's Kitchen

My dear ardent readers (that's about 2 people including me),

Please subscribe to my new cooking channel, where I channel Cauvery Aunty, who is an excellent experienced home Chef from Bengaluru, Karnataka. If you search for Cauvery's Kitchen on YouTube, you will find this brand new cooking channel.

Cauvery's Kitchen

A couple recipes by Cauvery Aunty:

Peas Upma

Fried Egg

Do check out her channel, and spread the word.

Thanks so much!

Cheers,
Aparna


Mexican Hot Salsa

I love myself a quick snack of warm tortilla chips and spicy salsa. The mild and medium kind ain't gonna do it for me. Fresh salsas are good, but when the ingredients are charred first, and then blended into a salsa- that taste is elevated to a whole new level, and it's mm mm mm!


Ingredients: 

Tomatoes- 4

Red Onion- 1/4 piece

Garlic- 6-8 cloves, skin on

JalapeƱos or any hot pepper of your choice- 2-4 (adjust according to desired level of heat)

Cumin- 1 tsp

Salt to taste

A drizzle of oil

Lemon/Lime

Method: 

1. Place ingredients, except cumin and salt, in an oven safe dish.

2. Drizzle some oil all over.

3. Place under broiler for 10-15 minutes, until peel is charred.


4. Remove from broiler, and cool.

5. Remove charred peel.

6. Put into blender. Add cumin and salt.

Note: If using Vitamix type of food processor, keep the peel on. The flavors will be bolder. 

7. Blend into salsa.

8. Squeeze some lemon/lime juice for zing. 

9. Eat with chips!