Monday, August 30, 2010

Drupe le Gourmet

Don't get all confused by the title- I was just trying to show off some of my Botany expertise there.........then again, I think it is an apt name for this lovely gourmet nutty delight.

Remember my nifty little recipe for peanuts (Peanut Maharaja)? Well, I have an equally nifty little recipe for almonds. Totally sticks to my policy of simple and quick and with the word GOURMET written all over it!

I take:

Almonds, salt, red chilli powder, lemon juice (yep, that's it!)

My method: 
  1. I take the desired amount of almonds in a microwave safe bowl and run it in the m-wave for about 45 seconds to a minute, thereby toasting them.
  2. Give it a quick shake and then add salt per taste, red chilli powder (you could use black pepper, if you want) and a dash of lemon juice. Mix it all up with a spoon.
  3. Run it in the m-wave again for about 35-45 secs. Done! You have some very special and delicious gourmet almonds ready to eat!
Drupe le Gourmet

These almonds are perfect for a chilly late afternoon snack, toasty and crunchy and when they enter your mouth, they just explode with that lemony-salty-spicy zing. I suggest you go right ahead and try this today-- I promise you will love it!

Saturday, August 28, 2010

Apple crumble of sorts

We don't usually eat dessert everyday-- in fact, my hubby and I barely eat any dessert at all. But just once in a while, one of us gets this crazy craving for something sweet. Last evening was one such crazy-sweet-tooth-moment (OK, I admit, it was me this time) and I had to whip up something quick. My eyes fell upon the apple lying in the fruit basket. One part of it was beginning to, err, rot and of course, my brilliant mind said to me that I must use that apple before it completely rots and ends up in trash. Soon enough, out came the bread, the condensed milk, the vanilla essence and a baking pan and another beautiful creation was on its way in my little kitchen!

I took:

5-6 slices of regular bread, condensed milk, regular 2% milk, vanilla essence & the apple sans the rotting part (a good apple will do just fine!).

What I did: 
  1. Chopped up the apple into little cubes (don't worry, I discarded the bad part of the apple). 
  2. Tore the bread into little pieces directly in the baking pan. 
  3. Threw in the chopped apple into this torn bread and added just a tad bit of milk to sort of soak it all. 
  4. Added a dash of vanilla essence followed by a good drizzle of the condensed milk (this depends on how sweet you like your dessert). Mixed it all up. 
  5. Baked it at 350 degrees for about 20 to 25 minutes until the top part was sort of browned up. Done!
By the time I took the picture, 3/4th of it was gone!

It was stupendously yummy with a perfect balance of textures--- the browned part was caramelized and crisp and the apple bits added a nice fruity texture, while the rest of the pudding was soft. We had it with some whipped cream on top.

Mmm, the warm apple crumble (of sorts!)

Gorgeous!

Wednesday, August 25, 2010

Bitter & Hot!

If you remember, I love eggplant, that a lot of people hate. Likewise, I love bitter melon or bitter gourd, that well, most people again, hate! As the name suggests, this vegetable is bitter. Apparently this bitter veggie is very beneficial in the prevention of diabetes and weight management...........well, at least that is what I remember being told while growing up and of course, I can't say if this is indeed true. All I know is that I love this vegetable and I cook it exclusively for myself (the other 3 in my family loathe it!).

The Indian bitter gourd is small, about 4-6 inches long and with a more "spiny" look. Also a darker green. And I have found that it is way more bitter than the Chinese kind. The Chinese bitter melon is a lighter shade of green and a little bit longer and smoother outside. Now a days I just get the Chinese bitter melon because it involves mush lesser prep time and cooking time compared to the Indian variety. And my favorite recipe involves jalapenos. Mmm, just imagine--- you have bitter and you have hot--- a complete dynamite!!

I ate this preparation at this local Chinese restaurant, Sichuanese, a few years ago. The menu card said, "Bitter Melon and Harapeno" followed by the little chilli sign on the side indicating that it was a hot and spicy item. I realized soon enough that the "harapeno" was in fact jalapeno. I quite liked it. And now I just make it at home myself--- it is that simple.

Look at the lovely green bitter melon and the equally lovely jalapenos!

Needed:

Bitter Melon, Jalapenos, Salt, Black Beans (special stuff available at any Asian store) OR Soy sauce.

What I do:
  1. I julienne the bitter melon. Likewise I cut the jalapenos into thin strips too. (The ratio of bitter melon to jalapenos really depends on how much heat you want.......)
  2. I take a pan, put in a couple teaspoons of oil and once the oil is hot enough, I throw in the cut bitter melon and jalapenos, followed by salt to taste. Stir fry it. Takes about 5 minutes. 
  3. I then add a little bit of the black beans into the stir-fry and give it all one more quick stir. Done! If I am out of the black beans, I just add a teaspoon of soy sauce for flavor. 

Cut into strips

The black beans from Uwajimaya

Ready to eat!

Yep, that is it. Can't get any easier than that!! It goes well with simple fried rice or even with flatbread (roti). I love the combination of the bitter melon with the hot jalapenos. I think it is quite sexy.

The only other person who liked this preparation: My brother (Thanks!).
  
Sichuanese Menu Card: Still says "Bitter Melon and Harapeno."

Monday, August 23, 2010

Peanut Maharaja

I love peanuts! No, I don't use them in pretty much everything I cook, but I do use them often enough that I always have them in my pantry. One very famous peanut item in my family is what we call Peanut Maharaja (literal translation: Peanut The Great King). It is super-quick, super-simple and super-DElicious. My mom used to make it (especially as an appetizer for her lavish parties) and now I make it too.

Sometimes toward the evening, you know how you get hungry all of a sudden and crave for a snack and you keep opening all the cupboards in your kitchen with the hope of finding something good to munch on? Well, that is exactly what happened to me a few hours ago and so I decided to make myself some of that awesome Peanut Maharaja. Of course, I had to share it with the husband and the son.

Needed:

Peanuts of course, onion, tomato, green chillies, cilantro, salt, lemon juice, maybe some red chilli powder.

What I do:
  1. I take the desired amount of peanuts in a m-wave safe bowl. Run it in the m-wave for about a couple minutes--- you will know when to stop the m-waving...... basically roasting the peanuts (that traditionally is done in a nice hot pan on the stove).
  2. Meanwhile I finely chop the onion, the tomato and the green chilli(es). (Today I did not have any cilantro.........)
  3. Then I throw in the chopped onion+tomato+green chilli(es) into the hot m-wave-roasted peanuts. This step is cool coz it makes this lovely sound......you know, cold stuff falling onto hot stuff......followed by a dash or two of lemon juice, salt to taste and a little dash of red chilli powder. Mix it all up with a spoon. 
  4. For me step 3 would be the last step. But my husband prefers the onion-tomato mixture to be "cooked" some more. Therefore I run the entire thing once more in the m-wave for about another minute. 
  5. That's it. Garnish with fresh green cilantro and eat away!! 
 Peanut Maharaja. Too bad I was out of cilantro- it sure would have added a nice green color--yummy, nevertheless!

Peanut Maharaja is a great snack item. I mean, packed with over 30 essential nutrients (OK, OK- that was from Wikipedia.....!) as well as the dose of lycopene from the tomato (this one I knew!) and the good stuff from the onion (don't want to go overboard with the list)..........this stuff is way better than a bag of junk chips! So go ahead and make this the next time you crave for a quick and satisfying snack.

Wednesday, August 18, 2010

Summer evening BBQ

The past few days have been super hot, as in, temperatures have been in the mid 80s and hitting 90s.........and I HATE IT! Thankfully I live in a place where there's only 3 months of summer and yippee! it is almost over! One good thing about summer, though, is the grilling. You can just head to your backyard and crank up your grill and throw some hot dogs or burgers and actually enjoy the summer evenings...........yeah, I don't mind summer evenings.

So last evening I made these amazing turkey burgers. No, not those pre-made ones. Right from scratch. Actually it is THE easiest thing to make. And when the husband offers to grill 'em for ya, nothing like it, right? Bought some ground turkey and some sourdough onion bread, rather than plain old hamburger buns. Had rest of the ingreds at home.

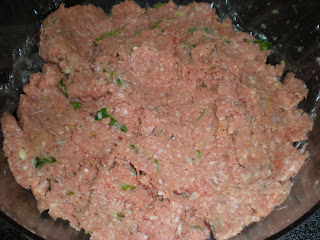
First: Transferred the ground turkey into a big mixing bowl. Added some minced garlic (about 3-4 cloves), some fresh cilantro, followed by a dash of salt, pepper, lemon juice and a little bit of that Italian seasoning. Then my eyes fell upon this little bottle of biryani spice powder (cinnamon+cloves+bay leaves+cardamom etc etc......) and of course, my genius mind said go ahead and add that as well! Then I added some grated parmigiano and some bread crumbs (to hold everything together). Mixed it all up and allowed to rest in the refrigerator.


Next: Sliced up half an onion. Put a couple teaspoons of oil into a pan. Threw in the sliced onion and sprinkled some salt and sugar and Italian seasoning--- the sugar to bring out the sweetness of the onion as well as to aid in caramelizing the onion. Kept it on low heat-- that is the key to the whole caramelizing process. Believe me, totally worth it!

The sliced onion into the pan

Gorgeously caramelized!

Meanwhile: Had the kids set the patio table. Had the husband to get the grill going. Took out the seasoned up ground turkey from the fridge and made 4 beautiful patties, 1 for each of us and handed them over to the hubby.

Perfect patties, eh?!

Finally: The kids and I settled down at the table, waiting for the hubby to grill the burgers. While waiting for the burgers, we ate some caesar salad from one of those pre-packaged bags. Hey, gotta get some veggies into the body too! Finally the burgers were ready and within no time, it was all gone! Crispy on the outside, but juicy inside. Perfectly grilled--- yes, the hubby did a great job!

On the grill

Waiting........(OK, try not to look at the salad dredged with dressing.........!!)

Aah, finally! Perfect grill marks!

Topped with caramelized onions

Some of that turkey was leftover in the fridge. I converted that into beautiful meat balls and the kids were delighted to eat spaghetti and meat balls today for lunch. What a good usage of all that turkey!
(Note: I used whole wheat angel hair pasta--- mm hmm, talk about going healthy!)

Meat Balls

Every kid's delight- Spaghetti & Meat Balls

Note to Self: NO MORE turkey for at least a couple weeks!!


Tuesday, August 10, 2010

Plantain Sabji

I had bought these plantains about, let's see, 3 weeks ago and they were lying in the fridge......you know how it is--- you have this nice variety of things available in your very own refrigerator, but for some reason, you never ever use some of these and then finally they go bad and just have to be thrown away! I know it happens to me sometimes and really, I feel bad. Such a waste, right?

These plantains were already on the verge of going bad and I decided nope, I am not going to throw them away this time. The bright green skin had turned black! Anyway, so I took off the skin and as expected, some of the parts were kind of ripening. I chopped them up nevertheless into little cubes and then debated between the usual curry style versus a quick "sabji," that basically means a stir-fry. The latter option seemed to be the best, both in terms of time as well as effort.

The Fundamentals: Plantain, turmeric powder, red chilli powder, oil, mustard seeds, salt.

The Procedure: I took a pan, put in a couple to 3 teaspoons of oil, tempered some mustard seeds and threw in the chopped plantain. Added half a teaspoon of turmeric powder and salt per taste and started to quickly stir-fry the whole thing. Thanks to the plantains' almost-going-to-rot situation, everything cooked up in under 10 minutes! Towards the end I added a little bit of red chilli powder to give it some kick. That's it! Crazy easy!


The plantain

Almost ripening.......but that's OK!

Chopped up

Crazy-good "sabji" (psst- the red stuff is err, half a tomato that I threw in just because that tomato too was going bad..........!!)

Not just crazy easy, but crazy good too!

Monday, August 9, 2010

King of Veggies!

When I was a kid, there was this show on television that was a musical of sorts and the characters were all the different types of vegetables. Now I don't really remember most of that show, however, one thing got stuck in my head, that I remember even today, every time I come across an eggplant. Yep, Aubergine or better known in India as Brinjal is supposedly, per that show, the KING of vegetables! No clue why! I am guessing because of that "crown"--- but then so many veggies have a crown.......then why this particular veggie? Oh, interestingly, it is all over the internet too and there seems to be a debate on "who" really is the king of veggies--- brinjal/eggplant or potato?!  Well, not my problem--- all I know is that I love this veggie, which is quite cool because most people, for some reason, hate the eggplant!

 "Baingan ka bhartha:" Basically the Indian version of Baba Ghanouj. Smoky, spicy and delicious! (OK, kids HATE it, though the Dad loves it!)

Basics: American eggplant, oil, onion, garlic, ginger, tomato (or tomato paste), salt, red chilli powder, mustard seeds, a pinch of garam masala (optional) and err, a little bit of patience!

Prepping the Eggplant:
  1. This is THE most important step in the whole process of cooking baingan ka bhartha. If you are in a BIG hurry, you could just cook up the eggplant in the microwave or in a pressure cooker. But that would be just, well, boring!
  2. This is where the broiler comes in handy. So I place the eggplant in the broiler pan and broil the entire thing for a good 30 mins, with one turning over in between. The idea is to char the outer part of the eggplant such that the flesh inside gets this beautiful smoky flavor to it-- that is what is key to this whole preparation. 
 Eggplant ready to be charred!

Oh yeah, nicely charred!

Almost there:

That's it. Once the broiling is done, I set the eggplant aside to cool. Remember, we broiled it for a good 30 minutes and it is going to be super hot. Gotta be careful  not to burn yourself.

While the eggplant is in the broiler, I chop up some onion and a clove or 2 of garlic. Crush some ginger. Then I take a pan, put a few teaspoons of oil, temper some mustard seeds and then sautee the onion, garlic, ginger. Also add a couple teaspoons of tomato paste (you could use some chopped tomato too). Add salt per taste, some red chilli powder and a pinch of garam masala. The base is ready.

By the time the base is ready, the eggplant would have cooled off. So then I run a fork through the charred skin of the eggplant, so as to expose the flesh and then I spoon out the flesh into the base in the pan.

That's the flesh we are looking for

The charred remains!

I try not to put the charred skin along with the smoky flesh. I mean, it is just unpleasant to bite into.
Finally I sort of mash up the eggplant flesh and stir it with the rest of the base (the onion, ginger, garlic & tomato).
I garnish with fresh green cilantro (or a green chilli like I did today-- the reason being, I was out of cilantro!). The best way to eat this is with roti or parantha or naan. Regular bread, preferably toasted, works well too.

Indian Baba Ghanouj--- Baingan ka Bhartha

Now I do know that a lot of people simply hate the eggplant. Apparently it reminds them of certain undigested matter! I think that is just plain simple fear. I really think that when it comes to vegetables, or fruit, for that matter, one must be open to trying out all the available variety out there. Oh well, I dunno about you, but I LOVE vegetables and I most certainly love the King of Veggies, the Eggplant!

Monday, August 2, 2010

Basic Fish & Potato Curry

Whenever I don't know what to cook and that happens quite frequently, if you have observed!--- I just whip up the most basic Indian curry and throw in either some veggies or peas & paneer (Indian cottage cheese) or chicken. I don't usually cook fish in this basic sauce, but today thought, heck why not? Should taste pretty good, right?

The 4 ingredient Curry Base: Onion+Tomato+Garlic+Ginger

  1. I take a medium size onion, 1 juicy beefsteak tomato, a couple to 3 cloves of garlic and some ginger. THAT'S ALL! Run it in the food processor until well processed. 
  2. Then I take a pan/pot, put in a few teaspoons of oil (the more the oil, the better the taste--- but of course, we all know that we try to eat healthy now a days!). 
  3. Then temper some mustard seeds, cumin seeds, fennel seeds, cardamom, cinnamon (you can skip some of these and use only cumin or only mustard seeds if you want- your choice) and then pour in the curry base. Start stirring it. You gotta be careful because this stuff tends to come to a boil real fast and then tends to splatter all over. The idea is to get all that water out of the base (water from the onion and the tomato) until the end result that is a lovely dark red colored thick paste. This can take upto 20 mins or so.
  4. Just as the evaporation is happening, add the desired amount of salt and red chilli powder followed by some of that famous garam masala powder. 
  5. The basic North Indian style curry base is ready to be transformed into any saucy curry! 
The Fish:

Today I decided to actually fry the fish a little bit so as to brown up the outer part. Else of late I have just been poaching the fish (remember- the healthy cooking!). So I cut up the fish into bite sized pieces and then marinated in some lemon juice+salt+red chilli powder. A half hour is good enough. Then I took a pan and put in a few teaspoons of oil and then gently added the fish pieces and browned them up. This took only about 4 mins. The main idea was to get the fish to brown up and not fall apart easily when thrown into the curry.

Fish marinating

Partially cooked fish- look at that OIL!

The Final Touch:
 
  1. I let the fried fish rest on a couple paper towels to blot off the extra oil. 
  2. Meanwhile I added a cup of water into the curry base and brought it to a boil. 
  3. Oh, I cooked a couple potatoes as well in the curry. Then I turned off the stove.
  4. Finally I added the fish pieces one by one into the beautiful curry. Put the lid on the pot and that's it! DONE! The partially cooked fish cooked up prefect in that hot curry.
  5. Before serving, garnished with some fresh green cilantro. 


The delicious fish & potato curry!

I love the versatility of this 4 ingredient curry base. I mean, you can use it to of course make curries (veggie or meat). You can even use this same base for rice pilafs too. Oh, this stuff is so yummy- you can sometimes just use it as a spread or a chutney!

I served this fish & potato curry with some plain streamed rice.I was right--- it did turn out pretty darn good!