Wednesday, January 18, 2017

Raw Mango Relish

Not sure what the real name of this dish is, because some call it aam ki sabzi, some aam ki chutney, some aam ka achaar, and therefore I'll just call it raw mango relish. I mean, I could possibly call it A's Amazing Aout Auf Azis Aworld.... okay, okay, let's just stick with raw mango relish. It's easy, quick, tasty, and has a decent shelf life of about 7-10 days in the refrigerator. It can be eaten with rotis, chapatis, parathas, bread, or even on the side with some rice and lentils. It is hot, sweet, as well as sour, and perfect for these still-chilly January days.  

Ingredients: 

1. Unripe (raw) mango (available in Indian Store): 2, chopped into bite sized pieces. 

Note: Some recipes call for the mango be peeled. I think that's such a waste of the beautiful fruit. I also save the mango pits for later. I use them in rasam.   

2. Cumin Seeds: 1-2 tsp

3. Fennel Seeds: 1-2 tsp

4. Mustard Seeds: 1 tsp

5. Nigella Seeds: 1 tsp

6. Fenugreek Seeds: 1 tsp 

Note: Can use the Bengali panch-phoron if you happen to have it in your pantry

7. Red Chili powder: 2-4 tsp (or according to your liking)

8. Turmeric powder: a pinch

9. Salt to taste

10. Jaggery (grated): 2-4 tsp. Again, this is more of a personal taste. So adjust accordingly. 

Alternatives to jaggery: Sugar, brown sugar, or agave syrup 

11. Cooking oil: 2 tsp 

12. Water: Just enough to cover the mango

Method: 

1. Splutter cumin, fennel, mustard, nigella, and fenugreek seeds in oil, and throw in the chopped raw mango, followed by salt to taste, turmeric powder, red chili powder, and jaggery. Stir for about a minute or so. Then add water just enough to cover the mango. Bring it to a boil, cover, simmer for 7-10 minutes. 


Unripe Mango

Mango, Spices and Water


2. At the end of 10 minutes, uncover. The mango will have softened up nicely, and the sauce will have thickened up a bit. Gently smash some of the cooked mango with a spoon, so that there's whole pieces, as well as smushed up mango. Garnish with fresh cilantro, and the hot, sweet, and sour mango relish is ready to be err, relished. Come on now, that's chuckle-worthy!! ;)  


Ready! 

Delicious! 


Wednesday, November 30, 2016

Kashmiri Pink Chai- an Ongoing Experiment

I drank my last cup of authentic kahwa back when I was a kid at the Vaishnavis' residence back in Delhi. Kahwa is Kashmiri chai/tea and is the most delicious type of chai I have ever had. I remember it being a beautiful pink colored concoction, sweet, with a hint of savory, full of nuts and munakka, i.e. golden raisins, and simply delicious. The other evening I suddenly craved for kahwa and decided to make it myself. After searching online, I kind of got the idea. And with great enthusiasm, I began. 

Ingredients: 

1. Green tea leaves, good quality (not the tea bag kind)- 2-3 tsp 

2. Baking soda- 1/2 tsp

3. Salt- 1/2 tsp

4. Cardamom- 2 pods

5. Almonds, crushed- 2-3 tsp

6. Golden raisins- 7-10 

7. Water- 2 cups

8. Milk- enough to maintain pink color

9. Sugar (optional)- 1/2- 1 tsp 


Method: 

1. Add 2 cups of water, green tea leaves, and cardamom to a pot. Get the heat going.


Water, Green Tea, Cardamom

2. Bring it to a boil. Add baking soda and stir vigorously for a few seconds, until the water starts turning red! Yes, it will turn red. 

Fun Fact: There's chemistry behind it! 

Green tea reacts with NaHCO3 (Sodium bicarbonate i.e. baking soda) in water and turns red under high temperature. 

I tried and tried to find out the exact reaction that occurs, but I couldn't find it. So for now, I just take joy in the fact that Kashmiri Chai making is in fact a scientific experiment that I can conduct in the comforts of my own kitchen!!   


Baking Soda + Green Tea in Water, boiling temperature= Red!! 


3. Continue boiling for a few more seconds, reduce flame, and start adding milk until a lovely pink color is achieved. Stop. Add salt. Stir. 

Optional: I like my kahwa a bit sweet too, so I add sugar as well. 

4. In a cup with crushed almonds (or pistachios) and golden raisins, pour this lovely pink chai, stir, and enjoy! 

Now for the truth: 

*I have tried making this chai 5 times so far. I was successful twice. 2 out of 5, not bad, I suppose.

*For some reason, I seem to get to the red color stage, but then, after adding milk, it stays pink for a few seconds, and then it just turns brown.

*Taste: Quite delicious 

*BUT: Why doesn't it stay pink?? 

Some pictures: 

Attempt 1: Disaster 


Boiling, froth, looks alright


#1: Disaster!! 


Attempt 2: Not bad.... but still, not quite up to the mark

#2: Nope! 


Attempts 3 and 4: Successful!!

Looking red, looking good! 


#3: Yessss!


Red- good! 

#4: Oh yessss! 


Attempt 5: Disaster!!

#5: What? Where's the pink?? 


Factors to consider for next attempt: 

1. Time (?)
2. Temperature (?)
3. Type of green tea leaves (?)
4. Will figure out.....

Conclusion: I haven't quite mastered the technique and art of making Kashmiri kahwa. It definitely is an experiment of its kind. I suppose practice makes perfect..... so I'll just continue practicing until I experience that eureka! moment.

Oh, most important ingredient: Patience, my friend, patience


Wednesday, November 9, 2016

Juice and More

America has a new Mr. President. Wonder how much longer it will take for this "first world" nation to have a Ms. President. Meanwhile, back in my birth country, India, "Operation Black Money" is the talk of the town. Exciting times! Btw, India, a "third world" nation, has had a woman prime minister as well as a woman president..... just saying. And that's about as much politics that I can really talk. Because one- I'm not passionate about politics. 
____________________________________________________________________________

I have a new addition in my kitchen- a Breville juice machine. It's lovely! Every morning I make fresh juice for the family, my favorite combination being carrots, oranges, apples, and ginger, and a squeeze of lemon juice. The result is an extremely delicious, gorgeous bright orange colored juice. One sip, and you-can't-stop-glugging-it-down-delicious!!! Now here's a fun fact: I call this particular juice, "Sunshine in Seattle." The best part is that the words can be played around with- so for instance, in the morning I call it- "Sunrise in Seattle," in the afternoon- "Sun Shines in Seattle," and if I make it in the evening, "Sunset in Seattle." ;) 

This one I called "Sunshine in a Cup" in the morning: 


"Sunshine in a Cup"


The one thing that I am not too crazy about this new juice machine: the pulp that ends up being wasted. It extracts the juice out of the veggies and fruits, but then you end up with this huge amount of "waste." And every time I discard it into yard waste, I cringe. 

However, here's the good thing: I have started incorporating that "waste" into my cooking, and it is working out quite well. What I do is that I first run the carrots and after the extraction is done, I switch off the machine. Then I gather up the carrot pulp (all the good fiber) and store it in a container for use later. And then I run the rest of the ingredients. 

I am not much into dessert making--- but am sure the fruit "remains" could be very well incorporated into desserts (/baking).

Another idea: Smoothies

The carrot pulp from the morning's juice was later used to make a delicious carrot-peas pilaf.


"Sunshine with Peas"

Delicious Pilaf

I am quite enjoying the early morning juice ritual. It's a little bit of extra work in the mornings, but it's totally worth it. Especially because the kids love it. Apparently it gives them more energy. Maybe it does or maybe it's placebo. Whatever it is, it's all good and delicious.
___________________________________________________________________________

And because two- Life Goes On!

Monday, October 31, 2016

Rajasthani Teekhi Laal Murgh- Fiery Red Chicken Curry

Yay, it's officially Fall! Time for gorgeous orange pumpkins, warm hearty soups, stews, and spices, and heat- from hot chilies! Then again, there's never a dearth of spices, nor hot chilies in my kitchen. To complement these chilly evenings, a preparation of Rajasthani style Teekhi Laal Murgh is so very apt. Literal translation: Fiery Red Chicken (curry).

Note: There are no "exact quantities" to be used here. Eyeballing is the way to go.... and of course, taste as you go along.

Ingredients: 

Chicken- boneless, skinless thighs, cut into bite sized pieces

Yogurt- approx 1-2 tbs for a small tray of chicken

Red Chili powder- as much heat as you can handle! ;)

*If you have Kashmiri red chili powder or Karnataka byadegi red chili powder, even better. It imparts a wonderful deep attractive red color to the preparation, while not being overly hot

Ginger-garlic paste- 1 tbs

Lemon juice- 1 tbs

Onion- 1 medium sized, sliced

Fresh garlic- 2-3 smashed

Turmeric- 1 tsp

Salt to taste

Oil to cook- 7 tsp

Water- 1-2 cups (depending on how thin or thick you want the gravy to be)

Fragrant Spices: 

Cardamom- 3-4, smashed

Cloves- 4-5

Cinnamon powder- a pinch

Bay leaves- 4-5 (I like fresh bay leaves, dry is okay too)

Coriander seed powder- 2-3 tsp

Cumin seeds- 2 tsp

Method: 

1. Marinate chicken in yogurt, red chili powder, turmeric, ginger-garlic paste, and lemon juice for at least 30 minutes.

2. With some oil in a pot, get the heat going. Splutter cumin seeds, cardamom, cloves, add sliced onion, fresh bay leaves, cinnamon powder, and fry for about 5 minutes. Then throw in the marinated chicken pieces. Brown the chicken on both sides. Then add salt, water, and some extra red chili powder. If there's leftover marinade, add that in as well. Bring to boil, cover, simmer for 20 minutes.

3. The chicken will have cooked. Uncover pot. The oil will be floating on top, and yes, that's a good sign. ;) Add coriander seed powder, give it a stir and throw in some smashed fresh garlic. Cover again  for 5 minutes, to get coriander and garlic flavor infused in the curry. Serve with rotis or just plain white rice with a side salad. Slurp away and enjoy!


Teekhi Laal Murgh with Roti

Monday, October 17, 2016

Bengali Fish Fry

My good friend, Oindrila, who taught me how to make Shukto, also makes great fish fry. My son and I are big fans of her fish fry. Finally after all these years of depending on her, yours truly decided to learn the recipe and make it herself because one has to learn to be self sufficient. 

The process of making fish fry is quite straightforward. Though I must say that to a novice it might prove to be a bit tedious and could get messy, but in the end, it's all worth it!* Also, of course, it's all a matter of practice.....  

*Statement made based on personal experience

Ingredients: 

Tilapia filets, boneless skinless- 1 filet per person

Oil for frying

Bread crumbs

Eggs- 2, beaten

Chutney to marinate fish:  

Cilantro- 1 bunch for 4 filets

Thai green chili- 2-3 (per preferred level of heat)

Garlic- 2-3 cloves 

Lemon juice- 2 tsp

Salt to taste

Method: 

1. First make the cilantro-chili chutney. Combine cilantro, green chili, garlic, lemon juice, and salt and make a chutney in the blender/food processor. 

2. Halve each tilapia filet. Add chutney and gently combine, so as to coat all the fish pieces with the chutney. Now put away in the refrigerator for 15-30 minutes. 


Tilapia and Cilantro Chili Chutney

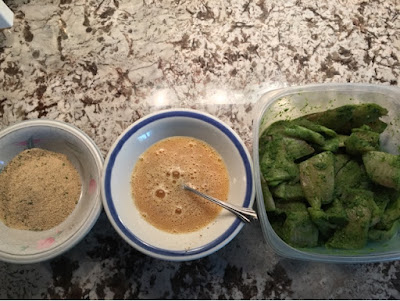
While that is marinating, get the following ready to go:

1. Breadcrumbs in a bowl

2. Eggs (beaten) in a bowl

3. Oil for shallow frying in a frying pan

Then arrange in this order:   


Fish, egg, breadcrumbs

Take each marinated fish piece, dip in egg, coat with breadcrumbs, and then fry. Easy! 

Tip: If it's for a party, keep everything ready ahead of time as shown below. The frying can be done just before the party begins...... 


Fish coated with egg and breadcrumbs, waiting to be fried 


Fry us! ;) 

Shallow fry until golden brown. 


Shallow fry

Serve with ketchup. I make extra cilantro-chili chutney that goes very well with this fish fry. 


Delicious Fish Fry


Friday, September 16, 2016

Quick Recipe 3: Flatbread Pizza with Spinach and Mozzarella

Sometimes, actually most times of late, I don't know what the heck to cook! When I complain over the phone to my dear brother, he says: Go eat some grass off your backyard. 
You know what, I just might in fact do that one of these days!! 

Flatbread pizza is a great idea for people like yours truly. I mean, it is not even a "recipe" really, but it turns out pretty damn good. It's quick, easy, delicious. 

Ingredients: 

Flatbread- any kind such as pita, naan, roti, parantha, lavash, etc. 

Marinara sauce- I love Trader Joe's marinara, it's delicious

Mozzarella cheese- grated

Baby spinach- a few leaves

Method: 

Preheat your oven to 425 degrees F. 

1. Top flatbread of your choice with marinara sauce, followed by spinach, and grated mozzarella. I like to add a dash of salt and pepper on top of the spinach before the mozzarella. 


Top it up


2. Place on a baking sheet (doh!) and place on the middle rack in the oven heated to 425 degrees F. Bake for 3 minutes. The cheese will have melted. 

3. Then switch off the bake feature, and switch on the broil feature. Broil on high for 2 minutes, or just until the cheese starts browning. 

That's it! Sprinkle some oregano or a little bit of dry Italian seasoning, and eat away! 


Delicious Roti Pizza! 

Friday, September 9, 2016

Quick Recipe 2: Shrimp, Basil, Tomato Fettuccine

For this week's quick fix, here's a lovely fettuccine with shrimp recipe that uses very few ingredients, and is ready in under 15 minutes. Yeah!

Ingredients: 

Fettuccine of your choice- 1 packet

Shrimp- 7-8 (or more!) shrimp per person 

Garlic, the more, the better- smashed and almost minced

Basil- a good handful

Tomato- 1 chopped

Cooking oil- 2-3 tsp

Italian seasoning- a pinch (for extra flavor)

Salt to taste

Method: 

1. Follow the instructions on the fettuccine packet and cook. It usually takes 3 minutes. Then drain off water. I like to rinse the cooked fettuccine under cold running water to stop it from cooking any further (you want it al dente).

2. In a pan with 2-3 tsp of oil, get the heat going. Add a pinch of Italian seasoning, followed by smashed, minced garlic. Quickly stir a little bit and add the shrimp. Within no time the shrimp will turn pink, which means it is cooked. Turn the heat down, throw in the chopped tomato.

3. Then fold in the cooked fettuccine into the pan. Tear up some fresh basil leaves into this. Add salt to taste. Mix it all up.

Zing it up with some lemon juice and freshly ground pepper and enjoy!  


Yummy!


Fun Fact: I noticed a recipe on the back of the empty fettuccine packet that I was about to discard into the trash can. So I thought I'd check it out. It turned out to be the exact same recipe! And here I was, thinking how brilliantly original I was.....!!